February 1, 2019 October 15, 2022
Wizard101 Questing Strategy
How to Avoid Dying in PvE: Part 2
Are you dying a little too often when you’re questing? Or have you been stuck on that quest because you couldn’t get past a boss? As we discussed in part 1 of this series, having good gear can help a lot, so many Wizards assume it’s their gear.
Did you know that your strategy has a bigger impact on how well you survive? Even with “okay” gear, if you use an effective strategy, you can still quest like a pro!
Check out our strategy recommendations below They focus on taking out your enemies quickly since longer battles give your enemies more opportunities to cause problems.
Table of Contents
- Only Defend and Heal When Necessary
- Prioritize Zero-Pip Buffs
- Prioritize Other Buffs
- Try Not to Hit Short
- Consider Taking Minions Out Early
- Handle Shields and Weakness
- Coordinate & Communicate
- Have the Right Cards at the Right Time
- Don’t Let Them “Cheat” You Out of Victory
Only Defend and Heal When Necessary
For most battles, you’ll be able to achieve victory by casting only buffs and hits. As the old saying goes, sometimes the best defense is a good offense.
But for others, your enemies may get a lucky critical, or a boss and their minions may get your health low before you’re able to take out the minions. In these cases, a well-timed heal, shield or damage reduction aura (e.g., fortify) can give you the extra time you need to finish the battle.
Even if you’re playing a healer/support role on a team, you typically won’t need to heal or shield every round, and you’re usually more helpful casting buffs for your hitters so they can achieve higher damage.
Prioritize Zero-Pip Buffs
In order to take out your enemies quickly, you’ll need:
- Enough buffs so that the damage from your hit will take out the enemies (or at least do a large amount of damage)
- Enough pips to hit
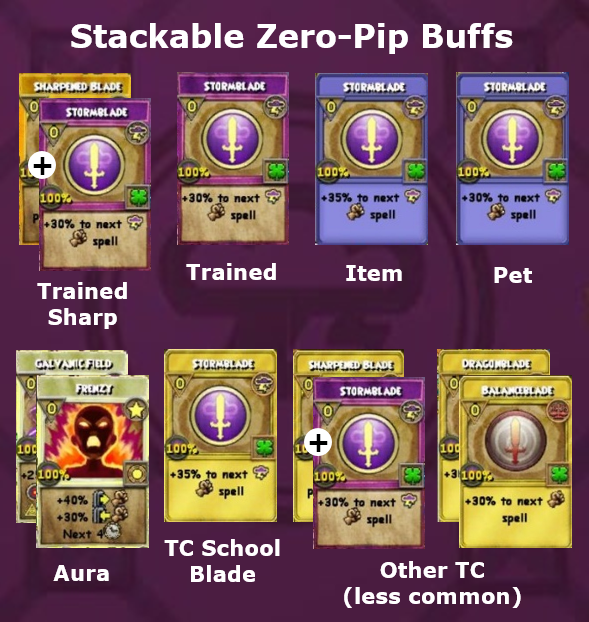 So for most turns, the most helpful thing you can do is cast a stacking zero-pip buff.
Did you know that higher level Wizards easily have access to six stackable zero-pip buffs?
Even a starting Wizard can have access to 2 stackable zero-pip buffs (pet blade, TC school blade).
Especially against mobs, only using stackable zero-pip buffs allows you to hit hard, hit often if needed, and finish the battle quickly.
Prioritize Other Buffs
Especially against bosses, you’ll want to prioritize casting other buffs so that you’re hit(s) will have enough damage, ideally for a one-hit knock out (OHKO).
Feint is your highest priority. Got enough time to take out all enemies with a “Area of Effect” (AoE) spell that hits all enemies? Look at the difference between the health of the boss and minions. Less than double? Maybe you only need one Feint on the boss. More than double? Maybe you need 2-3 stacked Feints (e.g., Regular Feint, Potent Feint, TC Feint, etc.) on the boss.
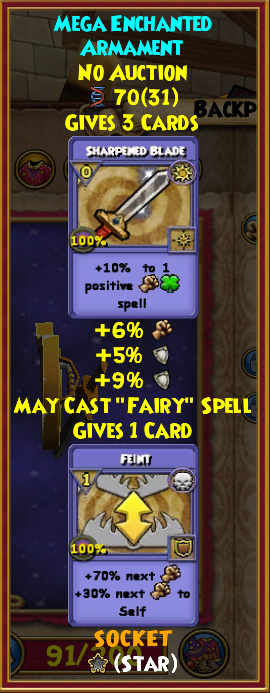
Elemental or spirit blades are also good choices (but lower priority than the zero-pip blades!). Any Wizard can train these spells from Niles the Balance Tree, thus having at least two more buffs to stack (regular and sharp tri-blades).
If you use an Enchanted armament pet, you even can use one of their Pet Sharpen Blades on your school blade and another on your tri-blade, giving you two stackable blades.
Some pets that come with good buff cards
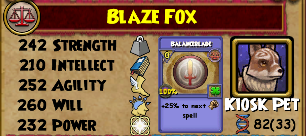
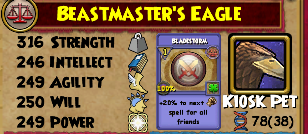
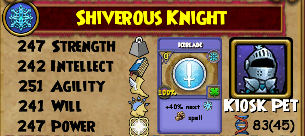
You can find these pets (and many more) in the Hatchmaking Kiosk in the Pet Pavilion.
Try Not to Hit Short
It can be tempting to hit without enough buffs to take out your enemy (i.e., hitting “short”), especially if you’ve got a lot of pips or can’t find a useful card that round.
But did you know that hitting “short” typically ends up being a slower way to finish the battle? Let’s take a look at an example of a mid-level Storm Wizard fighting a boss with 20,000 health. Notice how one battle only takes 8 rounds, while the other takes 19!
Consider Taking Minions out Early
In some boss battles you’ll have enough time to take out the boss and their minions in one hit if you want to, which is good since it’s the quickest approach. But in other instances, the boss and the minions can hit pretty hard, and may take you out before you have time to set up your OHKO.
![]()
For these battles, a much safer option can be to handle it in four steps:
- Stack enough buffs to take out the minion(s)
- Take out the minion(s) as quickly as possible (using an AoE if there are multiple minions)
- Stack enough buffs to take out the boss (healing or shields if necessary)
- Take out the boss
Remember that once you get the boss one-on-one, you have a significantly higher chance of achieving victory.
Handle Shields and Weakness
Ever set up the perfect OHKO, only to have you enemy cast a school shield, weakness, plague (or even worse an Efreet)?
For these situations, especially against bosses, we suggest carrying some Pierce TC, some Cleanse Charm TC, and a Shatter TC in your side deck. In most cases, you can remove the damage reduction item without taking away your buffs.
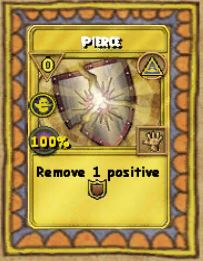
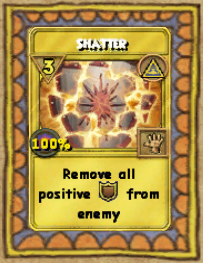
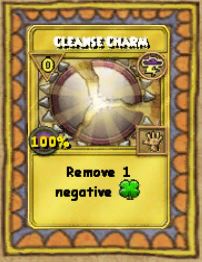
Pierce is used to remove one shield from the opponent. Shatter will remove all shields from the opponent. Cleanse Charm will remove a weakness from an ally (for example if the boss casts efreet on you and you need to remove the -90% weakness). You can find all three in the Bazaar.
Coordinate & Communicate
If more than one wizard is present in a battle, the fight will be far easier and far faster if you coordinate!
If you’re using team up for battles, try communicating with the others in the dungeon with you about the strategy. By not just running into battle, your team can save significant time and avoid issues.
One benefit of good coordination is that the schools of the Wizards on the team often don’t matter much:
- Especially at higher levels, any school can achieve a high damage boost and play the hitter role in most situations*
- Any Wizard can have plenty of stackable buffs for the hitter by:
- Training Feint, Elemental Blades, and/or Spirit Blades
- Buying TC
- Using an amulet and/or pet so they have a few stackable buffs for the hitter
- Any Wizard can be an effective healer by having high outgoing healing boost, training heals, crafting Pigsie, or using TC heals
Yes, there are certain times where having a specific school can be helpful or even critical, but with a well-coordinated team they are far fewer than you think!
* Unfortunately except for Balance, since there are far fewer buffs for the support Wizards to use to help them set up a OHKO hit.
Have the Right Cards at the Right Time
Your deck size will impact your ability to pull cards you need. Do you have too many cards? You’ll often find that you don’t have the card you want/need available, causing what is known as a “deck fail”.
Most seasoned Wizards have learned that using a small deck (i.e., with only the key cards they need) is much more efficient and effective than having a deck with many cards just in case you might need them.
Possible Deck Types
When it comes to creating your deck setup, you need to consider whether it’s a deck for killing mobs or for a boss. I’ll put some decks down as an example if you need help figuring out how to put a deck together. The less cards you have to go through to pull what you need the better the chances you pull that blade or attack you are looking for. Making the most of your treasure cards in the side deck is also useful. Placing attacks and other cards that may be harder to pull in the side deck can make pulling them a little easier.
Another helpful tip: give your decks a name! This is important because, once you have multiple decks, it can be confusing which one to equip when they’re all named the same way.
Solo Mob Decks
For fighting mobs going smaller is better. A good set up could include one or two hits (preferably AOE hits), two enchants, one mass convert of your school, and maybe a blade or two if you require one. Most of the time the extra blade isn’t needed but sometimes it is.
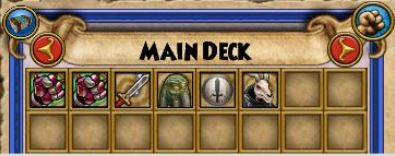
For more information about mob deck examples and the rationale for them, we highly recommend checking out the excellent guides at Mercenaries for Hire on Mob Decks for Below Level 86 and Mob Decks for Levels 86+.
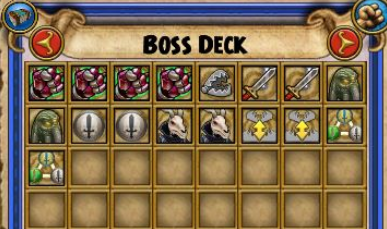
Solo Boss Decks
When it comes to a boss encounter: those decks contain more cards. Boss decks usually include multiple blade variations for blade stacking, feints, enchants, single target and AOE hits, and some treasure cards in the side deck. Converts may also be handy as you will face bosses of your school.
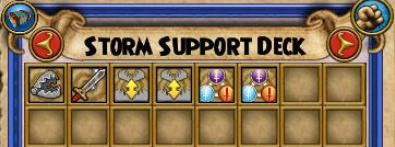
Support Decks
There are also support decks, used to support a hitter. Support decks are mostly used in a supporting role while questing with a partner. Support decks typically include two elemental or spirit blades (depending on who is the hitter), a sharpened blade and potent trap, and two feints. As a balance you can also carry your balance blade and blade storm.
Last Advice
The less cards you have to go through to pull what you need the better the chances you pull that blade or attack you are looking for. Making the most of your treasure cards in the side deck is also useful. Placing attacks and other cards that may be harder to pull in the side deck can make pulling them a little easier.
Don’t Let Them “Cheat” You Out of Victory
Knowing what spells can trigger a cheat on a boss can make the fight go so much smoother than running in blind. Once you understand the boss’ mechanics, they may not seem so hard anymore.
So next time you die on a cheating boss or don’t understand the cheats, trying to find a boss guide might be super helpful.

Some Boss Guides on Final Bastion
| World | Location | Boss | Type of Guide | Link |
|---|---|---|---|---|
| Aquila | Tartarus | Hades | Dungeon Guide | Link |
| Aquila | Mount Olympus | Mount Olympus | Dungeon Guide | Link |
| Azteca | Black Sun Pyramid | Ixcax Cursedwing | Cheats & Strategy | Link |
| Empyrea Part 1 | Aeriel Shores | Beastmen | Speed Run | Link |
| Empyrea Part 1 | Sepidious | Medulla | Cheats & Strategy | Link |
| Empyrea Part 2 | Southwest Aeroplains | Neumian Lion | Cheats & Strategy | Link |
| Empyrea Part 2 | The Reverie | Shadow Belloq and Jabberwock | Cheats & Strategy | Link |
| Empyrea Part 2 | The Reverie | The Headmaster | Cheats & Strategy | Link |
| Empyrea Part 2 | Zanadu | Tumbler | Cheats & Strategy | Link |
| Housing item | Ultra Exalted Dungeon | Rattlebones | Cheats & Strategy | Link |
| Khrysalis | Central Keep | Ghost Dog | Cheats & Strategy | Link |
| Khrysalis | Shadow Palace | Morganthe | Cheats & Strategy | Link |
| Marleybone | Barkingham Palace | Barkingham Palace | Dungeon Guide | Link |
| Mirage | Aggrobah | Verboten Mimic | Cheats & Strategy | Link |
| Polaris | Forlorn Tayg | Baba Yaga | Speed Run (2 rounds) | Link |
| Polaris | Borealis Peaks | Rasputin | Speed Run (4 rounds) | Link |
| Wizard City | Darkmoor | Aphrodite II | Cheats & Strategy | Link |
| Wizard City | Darkmoor | Darkmoor | Dungeon Guide | Link |
| Wizard City | Darkmoor | Graveyard | Solo Fight | Link |
| Wizard City | Darkmoor | Graveyard | Speed Run | Link |
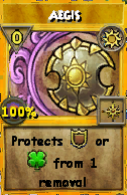
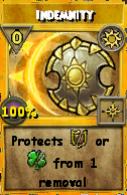
Two Great Spells for Cheating Bosses
Aegis and Indemnity
With the release of Mirage two useful spells became available at 110 and can be very useful against cheating bosses.
Aegis protects your blades while the spell Indemnity protects a trap, like a feint from being removed or switched. These are very useful spells to train.
Got any other advice for novice Wizards to help them with their Wizard101 questing strategy? Let us know in the comments below!