April 19, 2023 April 30, 2023
Aeon of Atavus Fight Guide
Included in the Wizard101 Fall 2022 Update was an upgrade to Merciless gear, Aeon, alongside the initial release of the Pin items and system. However, with all these excellent new items there of course needs to be a place to farm for them. The Aeon of Atavus is the final boss in the world of Novus, and is the best source of Sword, Pins, and Pixel reagents. Additionally, this nightmarish creature drops the Aeon Hat, Robe, and Wand, alongside the Masterpiece variants as well.

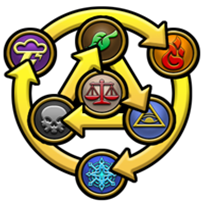
The name Aeon of Atavus means “Time of Ancestors”, and canonically resembles the Manticore’s perspective on what First World life looks like. Throughout the world of Novus, the concept of “blended magic”, otherwise known as dual school spells and pips, is tossed around as a property of the Novus creatures. This same notion applies at a much larger magnitude to this fight – you will encounter 4 “Atavus” bosses, each of a different school combination (except for balance, just being balance). As such, the fight is a full implementation of Rhoshambo utilities and counterplay.
This guide will explain to you the conventions of the fight; what the spells you get in polymorph form mean, their patterns, and how to effectively use them to defeat the boss!
Take me to the Strategies, I already know the spells and cheats!
The Polymorph Cheats
Immediately upon beginning the Aeon of Atavus fight, no matter what cards the players pick, they will be forced to pass. Then, the Aeon will subsequently “devour” all players, removing them from the battle and revoking their turn. Afterwards, all players will be transformed into either an Atavus Dog (Balance), Atavus Unicorn (Storm-Life), Atavus Monquistan (Fire-Myth), or Atavus Pingouin (Ice-Death). In order to tranform back, you must kill a boss. These polymorph forms come with 30,000 health, 170% damage, 70% resist, and cards unique to this fight. You’ll notice the polymorph spells have one thing in common – Rhoshambo.
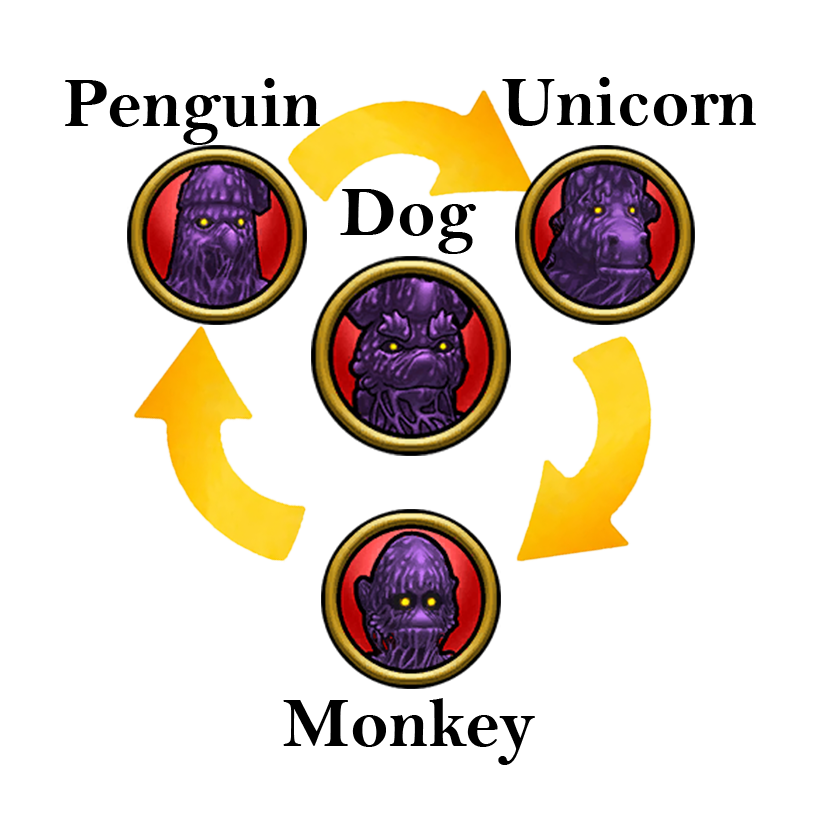
- Dog Polymorph (Balance) – You will boost against the Atavus Dog. No bosses will resist your spells (with the exception of the 4 school pip spells).
- Unicorn Polymorph (Storm/Life) – You will boost against the Atavus Monquistan. The Atavus Pingouin will resist your spells.
- Monquistan Polymorph (Fire/Myth) – You will boost against the Atavus Pingouin. The Atavus Unicorn will resist your spells.
- Pingouin Polymorph (Ice/Death) – You will boost against the Atavus Unicorn. The Atavus Monquistan will resist your spells.
What are my Polymorph Spells?
Helpful Terminology:
- “Mono” refers to mono-school, or only 1 school of pips required.
- “Dual” refers to dual-school, or multiple different school pips required.
- “Weak” is short for Weakness.
- “DoT” & “HoT” are short for Damage and Healing Overtimes respectively.
- “Ramp” spells convert hanging effect(s) each into a different hanging effect. A “Trap-Blade Ramp” will convert Traps (quantity specified on the spell) each into a Blade.
- Hits that mention a hanging effect (ex. “Blade Hit”) are conditionals. They deal extra damage if you have that hanging effect.
As mentioned above, each polymorph comes with a unique set of spells! These unique spells have the same animations as pre-existing ones, but with new utilities! Here is a chart of the spells each polymorph receives:
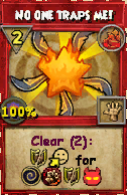
Here are the spells and how many copies you will receive with the Atavus Dog Polymorph form.
Utility
Spells
4x Damage Aura

18x Random Effect

6x Pip Utility
Small Conditionals

2x HoT Hit
2x Trap Hit
2x Weakness Hit
Small Conditionals
2x Shield Hit
2x Blade Hit

2x DoT Hit
Medium Conditionals

2x HoT-Shield Hit
2x DoT-Weak Hit
2x Trap-Blade Hit
Large Conditionals
2x Spiritual Hit

2x Elemental Hit
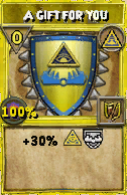
Here are the spells and how many copies you will receive with the Atavus Unicorn Polymorph form.
Utility
Spells

4x Damage Aura

6x Stormblade
6x Heal Overtime
Storm Mono
Spells

4x Storm Hit

4x HoT Ramp

4x DoT-Weak Ramp
Life Mono
Spells

4x Life Hit
4x DoT Ramp
4x Trap-Blade Ramp
Storm Dual
Spells

2x HoT Hit
2x Weakness Hit

2x Blade-HoT-Weak Hit
Life Dual
Spells
2x Blade Hit
2x DoT Hit

2x Blade-HoT-DoT Hit
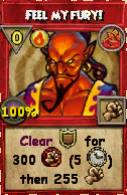
Here are the spells and how many copies you will receive with the Atavus Monquistan Polymorph form.
Utility
Spells

4x Damage Aura

6x Damage Overtimes
6x Myth Traps
Fire Mono
Spells
4x Fire Hit
4x Trap Ramp

4x Shield-HoT Ramp
Myth Mono
Spells
4x Myth Hit
4x Shield Ramp
4x Weak-DoT Ramp
Fire Dual
Spells
2x Trap Hit
2x HoT Hit

2x Trap-DoT-HoT Hit
Myth Dual
Spells
2x DoT Hit
2x Shield Hit
2x Trap-DoT-Shield Hit
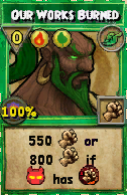
Here are the spells and how many copies you will receive with the Atavus Pingouin Polymorph form.
Utility
Spells
4x Damage Aura
6x Storm Shield

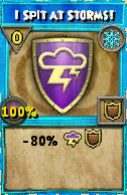
6x Infection (Weak)
Ice Mono
Spells
4x Ice Hit
4x Weakness Ramp
4x Blade-Trap Ramp
Death Mono
Spells

4x Death Hit

4x Blade Ramp

4x HoT-Shield Ramp
Ice Dual
Spells

2x Weakness Hit

2x Trap Hit
2x Weak-Trap-Shield Hit
Death Dual
Spells
2x Shield Hit
2x Blade Hit
2x Shield-Blade-Weak Hit
The Aeon of Atavus also has a minor cheat that deals damage to all wizards every few rounds. This can be ignored for the most part; it has little significance in the overall fight given augmented player health and resist.
So many spells… is there a way to organize them?
Additionally, here is a chart of the primary and secondary hanging effects each Aeon of Atavus polymorph form receives, and the main spells that apply them. You will also notice that the recommended boss to target is listed under each polymorph name. The forms will provide you with 0-pip spells for the primary hanging effects, while the secondary and tertiary hanging effects must be applied using the Ramp spells.
| Aeon of Atavus |
Primary Hanging Effects | Secondary Hanging Effect | Tertiary Hanging Effect |
| Dog
Balance (Hit Dog) |
All
|
n/a | n/a |
| Unicorn
Storm-Life (Hit Monkey) |
Blades, HoT’s |
Fire – DoT’s
|
Death – Weaknesses |
| Monquistan
Fire-Myth (Hit Pingouin) |
DoT’s, Traps
|
Ice – Shields |
Life – HoT’s
|
| Pingouin
Ice-Death (Hit Unicorn) |
Shields, Weaknesses
|
Storm – Blades
|
Myth – Traps
|
So… what does this mean?
Like many consistent Rhoshambo applications do, these Aeon of Atavus forms have patterns in their spells.
- Damage Auras
- Ramp Spells
- Damaging Utility Spells
- 2 School Pip Conditionals
- 3 School Pip Conditionals
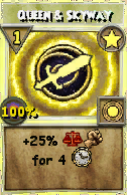
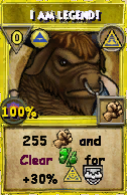
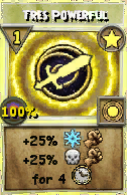
First of all, every form will receive a 1-pip 4-round Star spell – a damage aura that boosts the damage of the 2 schools of your form by 25%. All of these spells are shown above! This spell does not help set up any conditionals, but is a nice damage supplement. You will want to keep one in your hand the entire fight, saving it for the brief period before you use your highest damage conditional.
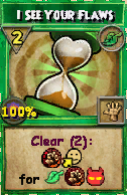
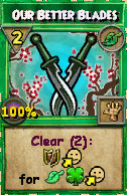
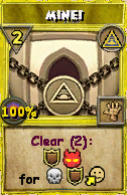
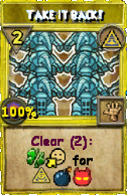
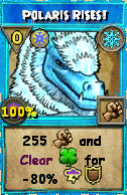
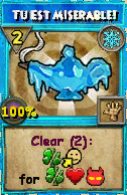
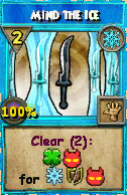
You will notice each form comes with 2-pip “clear” spells – these are called Rhoshambo Ramps, as mentioned before. They will clear up to as many of the designated hanging effect as specified, in exchange for one of the resultant hanging effect per cleared item. As an example, the Monquistan polymorph’s spell “Mine!” will clear up to 2 shields on the target, and provide 1 shield on self per shield cleared on enemy.
Take keen notice of your Secondary and Tertiary hanging effects – using these Ramp spells will be the only way to apply those hanging effects. The only ones of these spells that you should be using are shown above. Save one of each in your hand, you will need them for your highest damage conditional! I highly recommend discarding the ramps that focus on your polymorph’s primary school effects, as you have easy 0-pip nonconditional ways to apply these hanging effects.
Furthermore, each form has two damage+utility spells that cost one school pip. These spells will hit and then perform the direct convert of the school of the spell. For example, Death specializes in weaknesses and hard counters heal overtimes. As a result, the spell “Fell the Walrusks”, which is on the Pingouin polymorph and costs 1 death pip, will deal damage and then remove a heal overtime in exchange for an infection on the enemy. This pattern remains consistent for every 1-school pip spell the polymorphs have. They deal damage and then remove the hanging effect the school hard counters in exchange for their own hanging effect. Although useful for counterplay, these are useless in the fight for a quick and simple strategy. Discarding them is the best course of action.
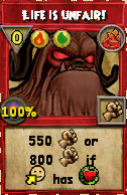
Next up on the spell list are the two school pip damage spells. These are the first sets of conditionals – you will notice that their condition has relations to the two school pips they require. The Monquistan polymorph’s spell “Life is Unfair!” is a heal overtime conditional, dealing extra damage if you have a heal overtime on yourself. The reason that it costs a Fire and Life pip is because those two schools synergize with Heal Overtimes. Furthermore, the Unicorn polymorph gets a similar storm spell titled “Creations Rebelled”, which has the same exact conditional.
Once you are able to distinguish and determine the uses for these spells, they will begin to make much more sense and your ease of card reading in the fight will improve drastically. Although an excellent learning curve, these two school pip spells, just like the single school pip spells, are fairly useless for an efficient farming strategy. You will want to discard them as well.
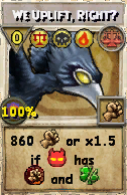
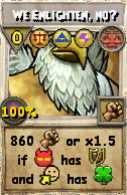
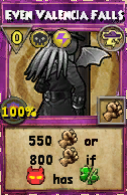
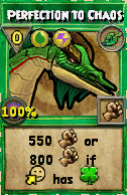
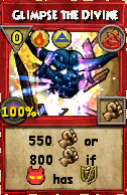
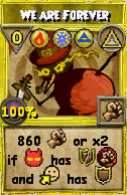
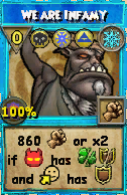
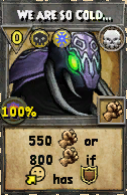
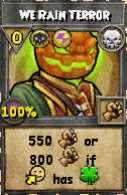
So, now that you are starting to get the hang of these spells and what they do, you probably also wonder what spells you should actually be using. Well, luckily enough, the final damage spells are the triple-school pip conditionals (with the exception of the Dog polymorph, which will be explained briefly later). These spells are very similar to gambits, which you may or may not know from the PvP Rhoshambo Initiative. All of these spells are shown above. You will receive the bonus damage just for having these hanging effects when you cast the spell. These are the main hits you will be using. If you pull multiple of the same one, you can discard the spares. Each form has two different attacks, so make sure you don’t discard all of one!
Both of these large hits will always require your two primary hanging effects (referring to the table above), alongside either your secondary or tertiary. Notice how the school pips the spell requires correspond to the hanging effects. A spell that requires a dot for its conditional will always cost a fire pip, a blade a storm pip, and so on. The premise of these spells is simple enough – get all 3 hanging effects on simultaneously, and then send the hit!
Uh oh… I got the Dog Polymorph!
What if you get the Dog polymorph? This is by far the most tricky one to manage, as there can be a lot going on. The most optimal boss to target is the Dog. Explanations for this form will be found in the tabs for each group of spells!
- Damage Aura
- Utility Spells
- 2 School Pip Conditionals
- 3 School Pip Conditionals
- 4 School Pip Conditionals
The Dog form’s auras is fairly simple. Just like the other forms, save it for use before hitting! It will ONLY boost outgoing damage for spells that deal balance damage.
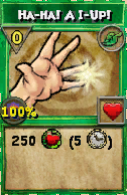
Considering how the most efficient strategy is to use your smaller conditionals (see next tab), you will want to keep your “For Science… Etc” handy! You should virtually spam it, allowing you to apply all the hanging effects you need. While doing so, you will need to manage your school pips. Every hit in this form requires a Balance pip and at least one other. “Pip, Pip, Cheerio” is a lifesaver if you accidentally mess up your pips and softlock yourself. However, you’ll want to minimize reliance on it by keeping an eye on your archmastery! You should start off with Balance pips, and then branch out to the pips corresponding to the hanging effects you apply.
These are the spells you will be using the most! Notice how the school pips of the spells coordinate with your conditional. Even if you have trouble reading the text, just remember that if costs a storm pip for example, it should be a blade conditional! Spamming these conditional hits on the balance boss should be simple enough to kill him quick. Use “For Science… Etc” (see previous tab) to meet these conditions.
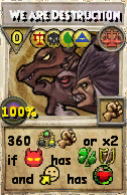
Occasionally, you may find yourself with appropriate conditions to cast these larger conditionals. As opposed to only requiring one school’s condition, these spells require conditions of schools opposite each other on the rhoshambo wheel. They deal significantly more damage; if you can meet both conditions, make sure you use these spells!
These are the most useless conditional spells in the entire Aeon of Atavus fight. Your highest school pip hit suffers from the fact that it doesn’t have that juicy 50% boost against the balance boss (being either elemental or spirit). It really is not worth using.
How do I farm the Aeon of Atavus?
There are a few things you must consider to optimize your farming!
1. ALWAYS target the boss you boost on! You only need to kill ONE boss while polymorphed in order to transform back with your original stats and cards. Then it is simple to blade stack and AoE hit to kill the remaining bosses. Refer to the table above to see what form boosts what boss.

2. The best and most efficient farming method is to use a coordinated team. Working together to set up a tri-school pip conditional as quickly as possible will always lead to fast kills!
3. Abstain from using enemy-target hanging effects. These include traps, dots, and weaknesses, which all hang on the enemy. Because one player can apply this and allow for all allies to meet spell conditions, just let your fellow wizards do it for you, while you set up other parts of your conditionals.

4. Following the same reasoning as the above advice, focus on self-centralized hanging effects first. This includes shields, blades, and hots, which all hang on your own wizard. Unless you have highly cooperative teammates, you’d have trouble getting someone else to use it for you.
5. As mentioned prior, always save one star damage aura in your hand. Once you have set up your gambit, go ahead and use it in order to gain that 25% boost before you hit!
6. You won’t be able to use your tri-school pip conditional hits without using at least one secondary or tertiary hanging effect Rhoshambo Ramp spell (refer to the table above). Make sure you heavily discard all unneeded spells to pull for these quickly – you can end up getting a full gambit by the 4th playable round in the fight if you play well and your deck doesn’t fail!
7. Manage your school pips wisely. Obviously you won’t know what polymorph you will get at first, and may end up with a useless school pip on the first round. However, make sure to change this immediately to begin acquiring efficient school pips. You’ll want the school pips of your primary schools first – a Pingouin polymorph will want to get an Ice and Death pip asap, a Unicorn would want Storm and Life, and so on. Once you have at least one of each, branch out to the schools of your secondary and tertiary effects.

8. If you happen to be on a school that has Blades or Traps as a conditional, try to use the tri-school pip hit that is of the school of the blades/traps you apply. This will allow your damage to be boosted by these blades and traps – although the spells do not specify what school of damage they will deal, it will always be the school of the spell itself.
If you follow these guidelines, you should be able to easily complete the Aeon of Atavus fight in about 10-15 minutes. You can reduce this time if you get the hang of the strategies. Let me know your shortest times in the comments below! When using a strong tri-school pip conditional, you should be able to do about 12,000 damage to the boss you boost on. From then on, it should be easy to finish it off! The Dog polymorph (balance) is slightly more difficult to master. However, it should still be possible to deal large amounts of damage with it nonetheless!
Complex Strategies
A bonus strategy you can try for full optimization is a Pet Willcast. A very interesting characteristic of this fight is how you get polymorphed and lose all your cards – but you won’t lose your pet willcast! You have many options to choose from:
1. Frozen Kraken / Earth Walker Trained – Your polymorph grants you universal damage! You don’t even need to be ice/life to make this work. Frozen Kraken is most efficient on the Unicorn boss because you boost, and least efficient on the Monquistan boss because of resist. Earth Walker is most efficient against the Monquistan boss, and least efficient against the Pingouin boss. A full team of 4 with these willcasts can ignore most rules of the fight and hit the boss they boost no matter their form, with the intent to kill as soon as possible.


2. Hex / Curse / Fuel Trained – Not only do these willcasts increase the incoming damage on the enemy, but they can also help set up your trap conditionals!


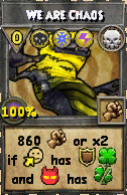
3. Sword and Shield Trained – This willcast is by far the best for completing the fight in accordance to its cheats. The fact that you can apply both a blade and shield to yourself sets up 2/3 conditionals of the Pingouin’s “We Are Chaos” tri-school pip conditional, and can simply just help you set up any shield or blade conditionals. That random blade can also buff your spells if you get lucky!

4. Link Trained – Just like the others, this can help you set up hanging effects for conditionals. This time, a dot and a hot! That’s 2/3 conditions met for the Monquistan polymorph’s spell “We Are All Life”, and the Unicorn spell “We Are Madness”. It also can remove those pesky weaknesses from Deer Knight.

5. Plague Trained / Cat Thug Trained – While seemingly not as useful as some of the others, this one can help you set up your weakness conditionals. Cat Thug gets the added bonus of being able to deal damage to remove weaknesses.


The BEST Strategy?
But what’s the most efficient farming method for the Aeon of Atavus? Well, there are several options to answer that question. Below will be the most efficient strategies, ranked by their efficiency.
- Willcast hit spamming is by far the easiest way to win the fight. A coordinated team of 4 with either the Frozen Kraken or Earth Walker willcast (and NO maycast talents, they activate too often!) can spam-hit the appropriate boost enemy to kill in just a few rounds.
- Setting up your tri-school pip hit is by far the next-quickest way to finish the fight. Coupling this strategy with beneficial willcasts like Link as well as Sword and Shield will accelerate the pace of the fight.
- Aimlessly hitting like you don’t know what you’re doing (I’m talking to you, teamup wizards!) will score you the slowest run times. I’ve seen people complain about having 30-45 minute runs, and that is because of a lack of cheat awareness and how to use conditionals. Be sure to put this guide to use; it has plenty of valuable information to help you defeat the Aeon of Atavus faster!
Aeon Drops
Okay, after all that – what do you get once you win the fight? The Aeon of Atavus will guarantee you at least 1 piece of gear, and 4 pixels. Whether that is Aeon (tier 1) or Masterpiece (tier 2), the hat, the robe, the wand, is entirely up to chance. But you are guaranteed at least one piece for your troubles. There is a chance to receive a 2nd as well, but no reports of a 3rd yet. Those pixels can help you craft your spare Masterpiece pieces into Aeon. You are also guaranteed 2 level 150-160 Sword pins to aid you on your new pin conquest to further dual school support!
Good luck in your farming the Aeon of Atavus, and may the dual school and Rhoshambo always be with you!
These tips will definitely speed up your run times. Let me know your shortest times in the comments below!
Looking for a different Boss Guide? Click the icons below.