November 27, 2016 October 15, 2022
Level 110 Hitter Gear Guide for Questing
For the Hitter
 Many players, including Final Bastion staff, have commented that questing in the beginning of Mirage can be more difficult than prior worlds (due to higher damage, pierce and/or criticals by the mobs). So what’s a wizard to do? One option is to acquire level 110 gear that will make questing easier for you.
The objective of this article is to show you various gear options. Want to spend a lot of time farming for the best gear possible? We’ve listed them below. Or would you rather craft or spend some crowns / gold on something? We’ve listed other good options as well, to give you a feel for how they compare.
Going Deep With One School
We recommend gear based on how obtained for one school and list links where you can check out similar options for other schools. We also include other gear that can be useful and compare the most important stats of all of them.
Stats Compared
- Accuracy
- Block
- Critical
- Damage
- Health
- Healing
- Pierce
- Power pips
- Resist
- Shadow
How Obtained
- Bundle
- Drop
- Crafted
- Crowns
- Gold
Variety is the Spice of Life
For the most part, this article focuses on gear that is helpful playing solo or playing a hitter role. We assume you may combine gear from the different objectives based on your specific role and how things are going. For example:
Please let us know if you identify something we missed or have suggestions on gear can have a good tradeoff between stats and how hard it is to get! Or if you have a different opinion on the framework or objectives, that’s cool too.
Hitter Gear Priorities
 Take ’em out before they take us out! Try to maximize damage without sacrificing other stats too much. Alternatively, you could target a high critical build (e.g., over 70%). It can make some fights faster but it’s not as reliable and harder to make work without top-tier gear. Our main priorities are:
- Damage, damage and damage (did I mention damage?)
- Power pips: having to wait a turn due to white pips can make your head spin
- Accuracy: fizzling on your hit is another way to make your head spin
- Resist
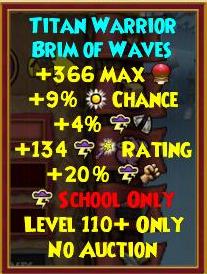
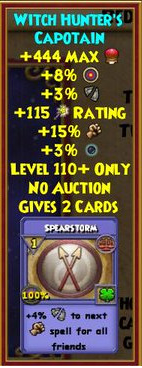
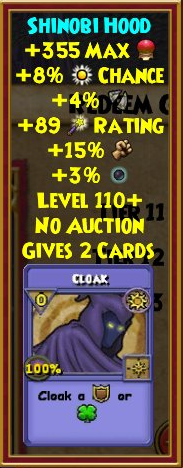
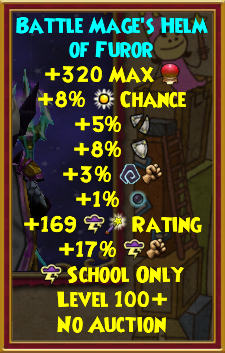
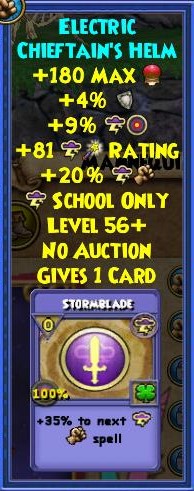
Hats
Most hat options are offensive, providing damage, critical and either pips, accuracy, resist (or all three). Newer ones also include pierce and shadow as well.
Friendly Reminder!!!
It was impractical to do the comparison for all schools (although it would have been nice). We picked Storm for the analysis since we had images for almost all of the gear. We tried to pick gear examples that had options for all schools and provide links for you to look up info for a specific school. Hopefully it works and is helpful…
Recommended Hats
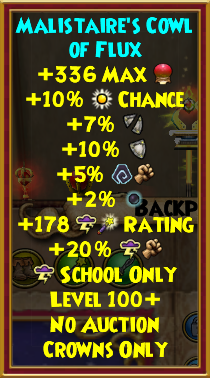

Crowns: Crown Shop Outfit
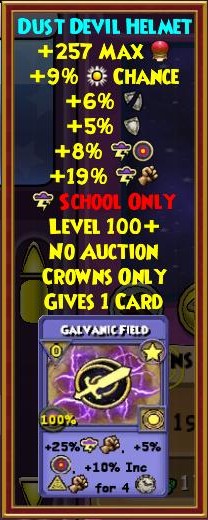
Source: Crown Shop (11995 crowns)
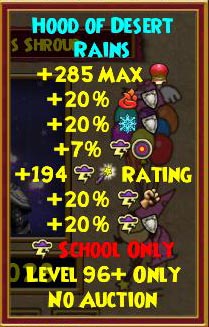
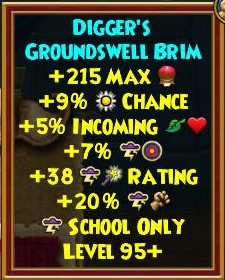
Other Hats
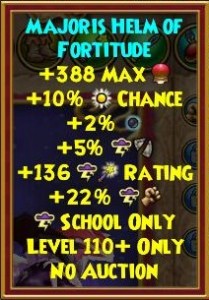
Crowns: Crown Shop Hat
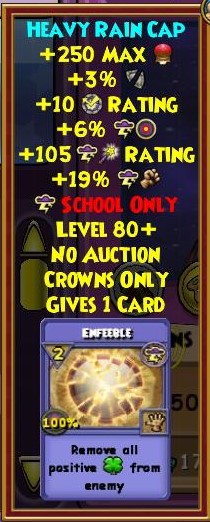
Source: Crown Shop (4500 crowns)
Drop: Waterworks

Source: Waterworks
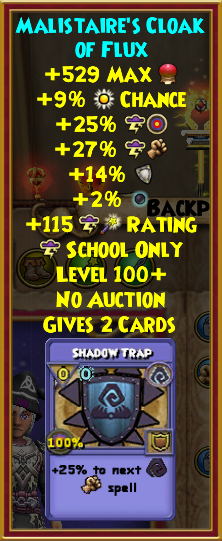
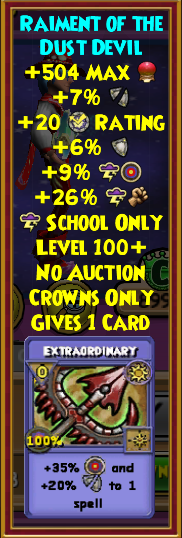
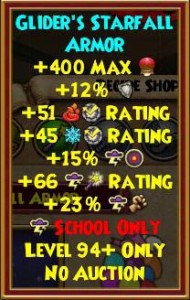
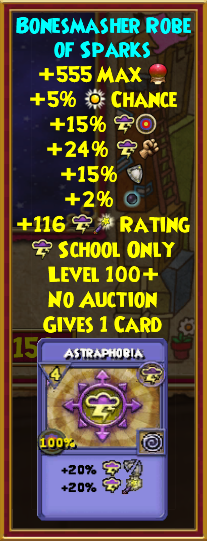
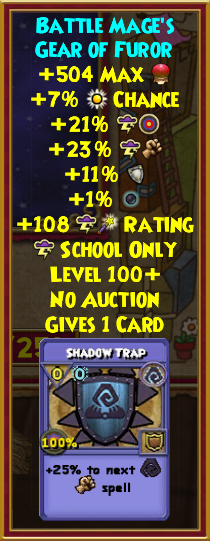
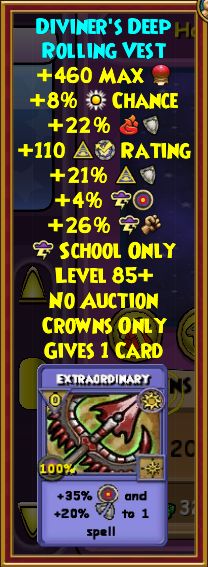
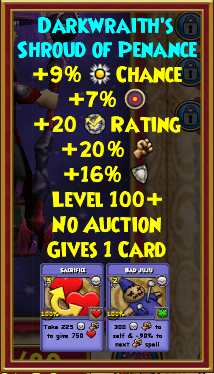
Robes
All of our recommended robes have damage, accuracy and resist. They also provide a combination of critical, pierce and pips (but not all!). Schools with low accuracy, like Storm, usually focus on robes that improve it.
We also list some “glass cannon” robes, which skip the resist and provide everything else.
Note that if you are dying often due to criticals and you don’t have a good high-block athame or amulet, you may want to consider a high-block robe. Check out the Tank role for options.
The Rattlebones robes are typically very similar to the Darmoor Tier 1 robes. Some KI developer decided that the Storm would be the exception and a bit worse. Must be the same developer currently balancing the classes in PvP…
Recommended Robes
Crowns: Crown Shop Level 100 Outfit
Source: Crown Shop (11,995 crowns)
Other Robes
Gold: Khrysalis Vendor
Source: Jentink SmallEars / Bazaar
Crowns: Level 80 Robe
Source: Crowns Shop (6,000 crowns)
Crowns: Level 85 Robe
Source: Crowns Shop (6,000 crowns)
Crowns: Nightmare Pack
Source: Nightmare Pack
Crowns: Phoenix Hoard Pack
Anybody got an image? 🙂
Source: Phoenix Hoard Pack
Drop: Waterworks

Source: Waterworks
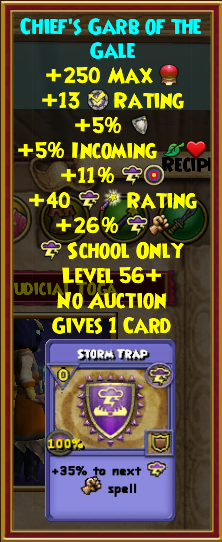
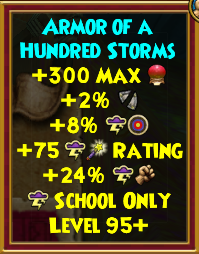
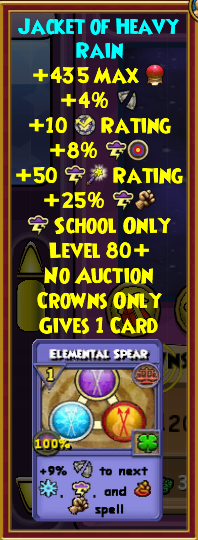
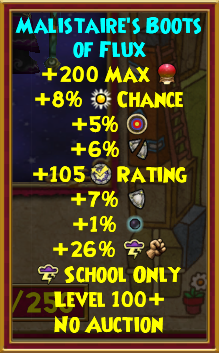
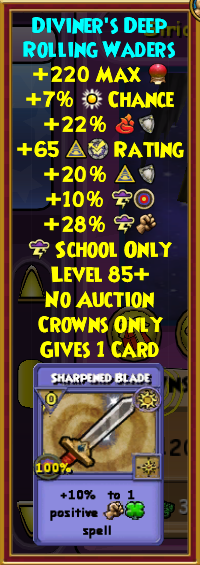
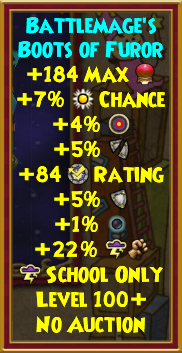
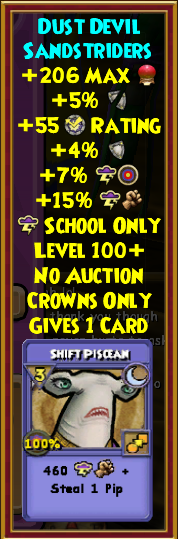
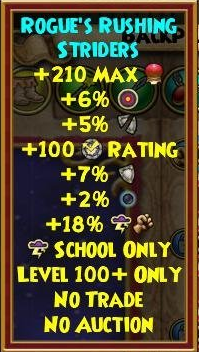
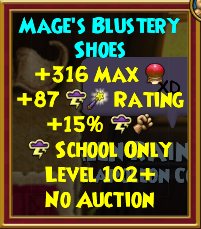
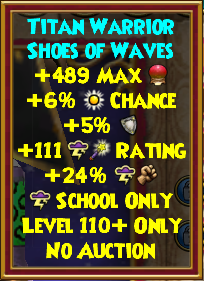
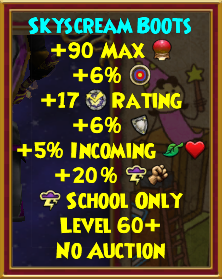
Boots
Almost all of our recommended boots are a source of high damage, high block and some accuracy.
For those that prefer a high critical build, the Polaris vendor and Rasputin offer some with high damage and critical.
Recommended Boots

Crowns: Level 85 Boots
Source: Crown Shop (4,500 crowns)

Other Boots
Crowns: Level 100 Outfit
Source: Crown Shop (11,995 Crowns)
Crowns: Phoenix Hoard Pack
Anybody got an image? 🙂
Source: Phoenix Hoard Pack

Drop: Waterworks
Source: Waterworks
Crowns: Witch’s Hoard
Anybody got an image? 🙂
Source: Witch’s Hoard Pack
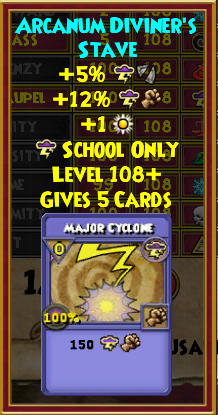
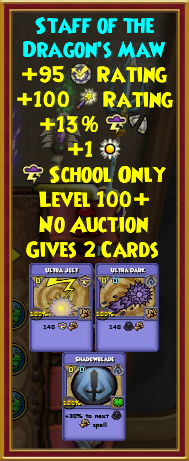
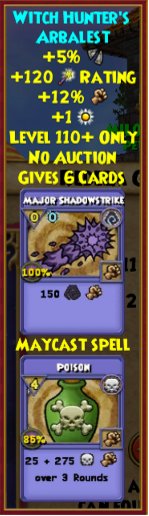
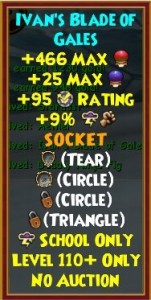
Wands
The best wands come from packs (Road Warrior and Terror’s Hoard), offering damage, critical, block and pierce/pips (along with a may cast spell).
There are other good options, although you’ll have to give up 1-2 of these stats.
Recommended Wands
Gold: Bazaar Level 108
Source: Bazaar
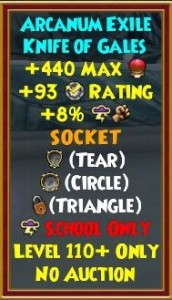
Other Wands
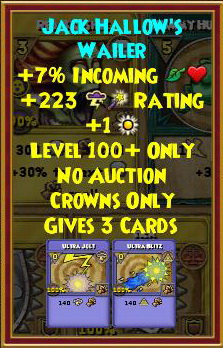

Crowns: Sidhe Staff
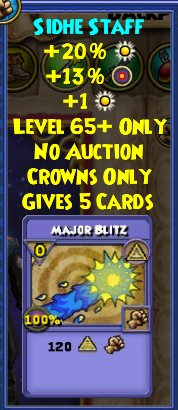
Source: Crown Shop (4,495 crowns; also dropped)
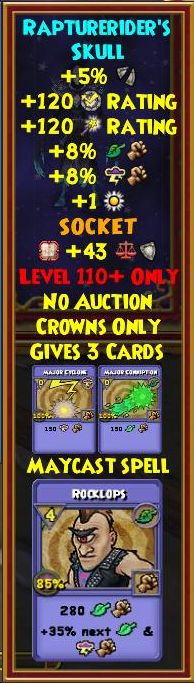
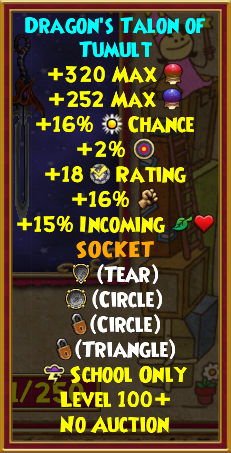
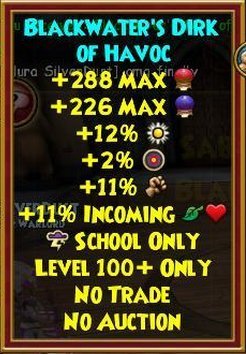
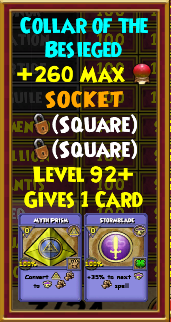
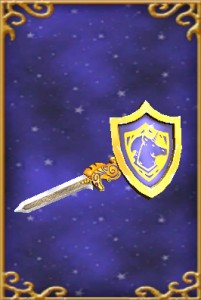
Athames
Our recommended athames provide a healthy amount of damage, pips, 2 circle slots (usually for pierce jewels) and a triangle slot (usually for pips or accuracy). Many have an incoming heal boost as a bonus!
If you are dying often due to criticals and you’re using high block boots and a high block amulet, you may consider switching them with a high block athame. Check out our level 110 tank gear guide for more info.
Recommended Athames

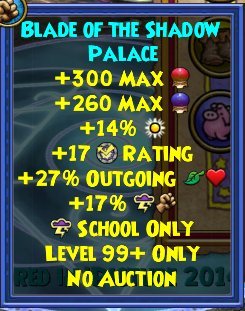
Other Athames
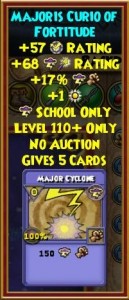
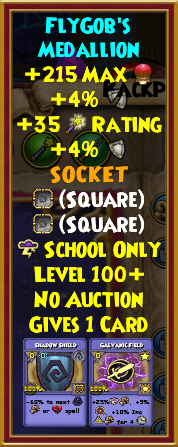
Amulets
Our recommended amulets are focused on providing 1-2 stackable 0-pip blades, since stacking several blades and hitting quickly is typically more helpful than the stats you get from your amulet. The Morganthe amulet also provides some critical, pierce, resist and block.
If you are dying often due to criticals, check out the high-block amulets in our Level 110 Tank Gear Guide. If you use them, you could use TCs to replace the stackable blade (e.g., 0-pip school blades sold by the vendor in Bastion).
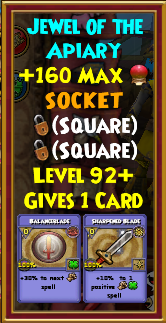


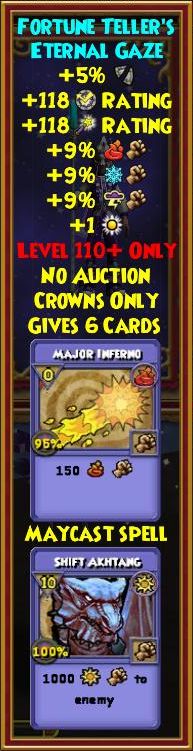
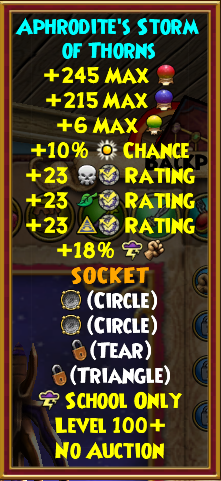
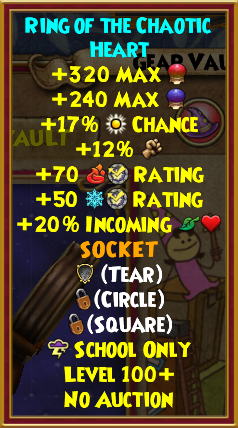
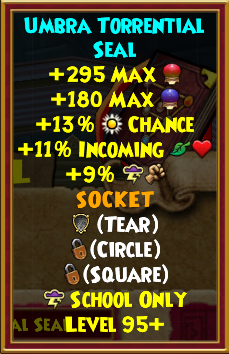
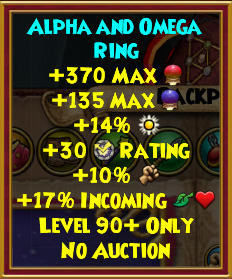
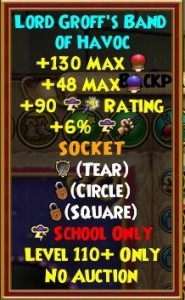
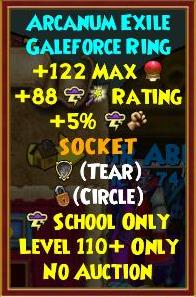
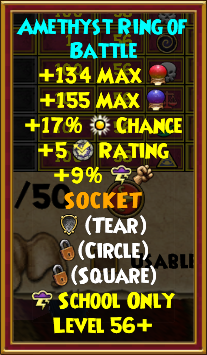
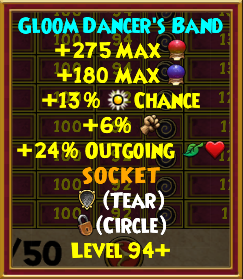
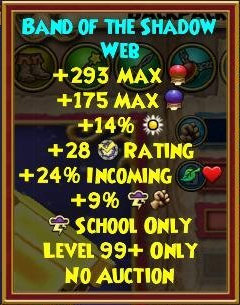
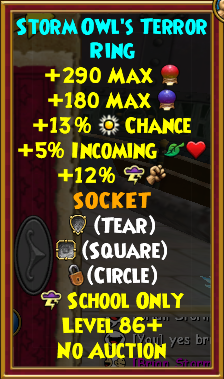
Rings
The best ring in the game currently comes from Aphrodite, providing damage, pips and incoming healing. The other recommended rings aren’t too far behind though.
Note that your ring should provide a circle slot, which often is used for a pierce jewel.
Recommended Rings

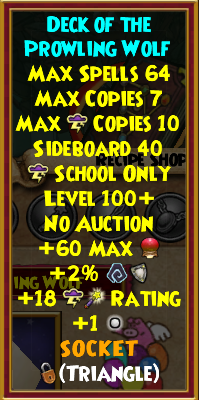
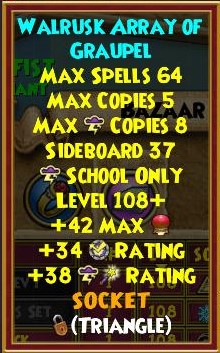
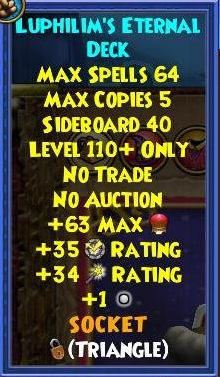
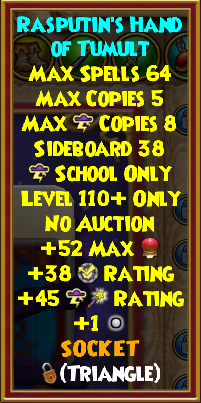
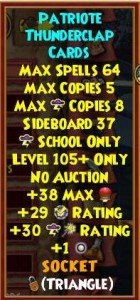
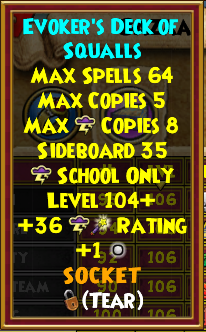
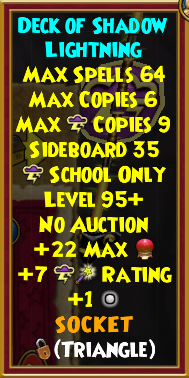
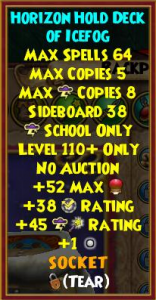
Decks
The best decks in the game give you a pip, a triangle slot and some helpful stats (critical, health and block typically). The triangle slot typically is used for pips, accuracy or a spell.
For the other decks, you’ll have to give up one of these things.
Recommended Decks
Gold: Bazaar Level 108
Source: Bazaar
Pets
Pet Card
 For the hitter, we suggest a pet that provides a 0-pip blade that stacks with their regular and sharp school blades. This can include:
- Sharpened Blade (e.g., Enchanted Armament) – this is the best option if you can stand the looks!
- School Blade (e.g., Spark Beast)
- Dragonblade (e.g., Polar Cat)
High Priority Talents
Just having two damage talents and spell proof can give you 15% damage and 10% resist, which is huuuuuge.
- “Dealer” (up to 9% school damage)
- Spell proof (up to 10% resist)
- “Giver” (up to 6% school or universal damage)
Other Useful Talents
You can target other useful talents depending on your specific build and stats. Helpful options include:
- More damage (mooooar!)
- More resist
- Healing (e.g., pixie)
- Critical
- Block
- Pips
- Accuracy
- Pierce
Jewels
 We suggest the following for jewels for the hitter. Note that the triangle and circle jewels are the most important.
| Slot | Jewel | Good Source Besides Drops |
|---|---|---|
| Triangle | Pips | Jordo Mistborn (275 tickets) |
| Accuracy | Jewel Packs or, for universal, Jordo Mistborn (250 tickets) | |
| Circle | Pierce | Jewel Packs |
| Tear | Health | Polaris Vendor, Jordo Mistborn (275 tickets) |
| Square (lower priority) | Block | Jewel Packs |
| Universal Resist | Jordo Mistborn (275 tickets) |
What are your thoughts on the gear options? Did we miss anything? Let us know in the comments!