January 27, 2018 January 7, 2023
Found Housing Items
all over the Spiral
There are plenty of found housing items available for you to collect throughout the Spiral – over 100 to date! They’re spread over all the main and side worlds, plus a few gauntlets. Thank you, Alex Thunderstaff, for coming up with the punny descriptions!
To make it easy to find all the items, this article is divided by Arcs, and then by Worlds. Follow the links below to jump to a specific section:
Arc 1
- Wizard City
- Krokotopia
- Marleybone
- Mooshu
- Dragonspyre
Arc 2
- Celestia
- Zafaria
- Avalon
- Azteca
- Khrysalis
Arc 3
- Polaris
- Mirage
- Empyrea
Arc 4
- Karamelle
- Lemuria
- Novus
Side Worlds and Gauntlets
- Grizzleheim and Wintertusk
- Wysteria
- Aquila
- Darkmoor
- Gauntlets
Arc 1 Found Housing Items

Wizard City
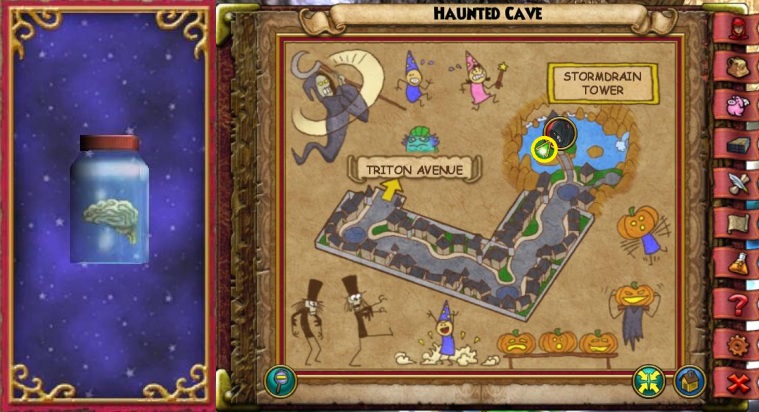
- Description: It’s a jar, don’t over THINK it (hehe puns)
- Location: Haunted Cave – Stormdrain Tower (on the table)
- Requires: one battle
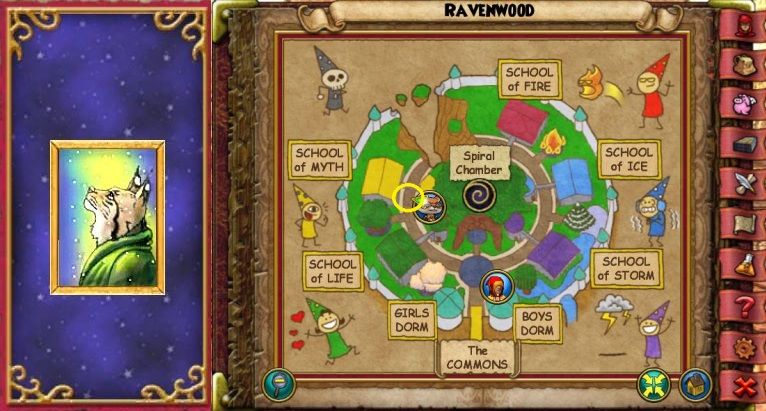
- Description: What exactly could it be gazing at?!
- Location: Ravenwood – School of Myth (on the right wall)
- Requires: nothing
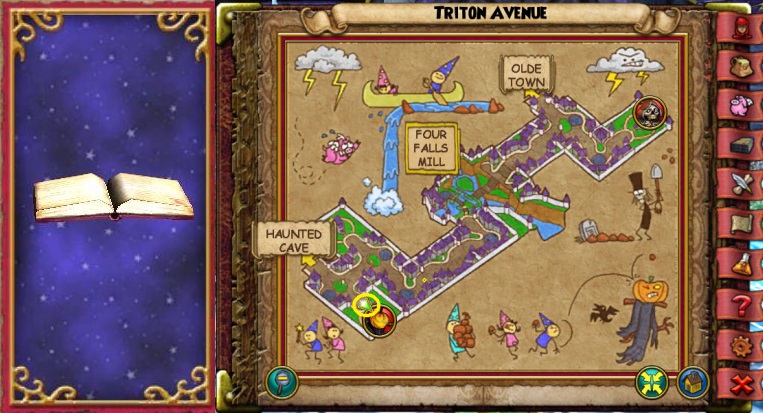
- Description: It’s equally exciting as a closed book.
- Location: Triton Avenue – The Harvest Lord’s Tower (near the door)
- Requires: one battle
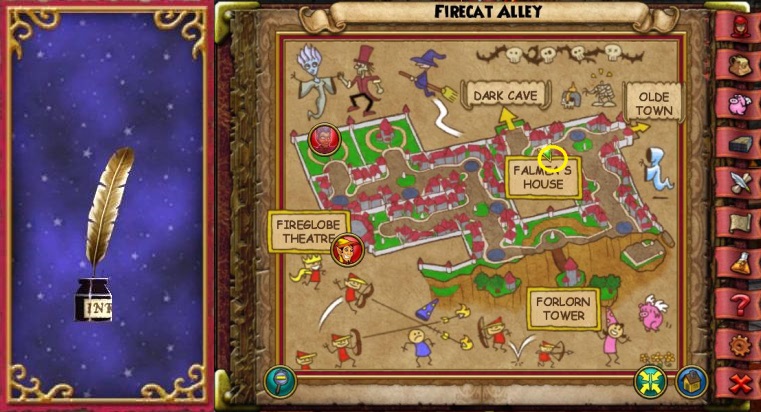
- Description: Be careful not to spill the
milkink bottle - Location: Falmea’s House – Firecat Alley (on the little table)
- Requires: nothing
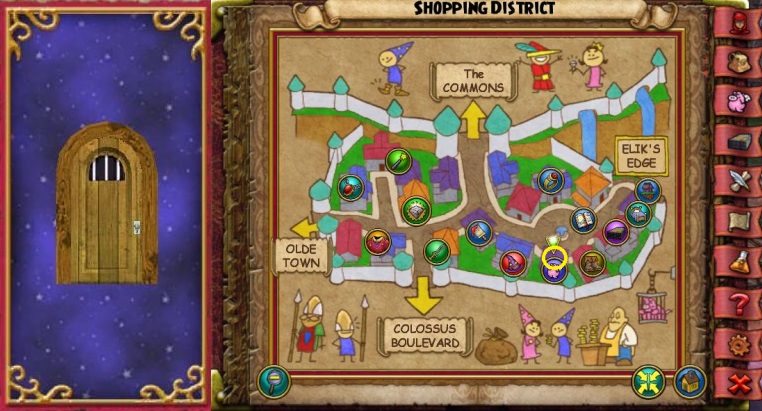
- Description: It’s so adorable!!
- Location: Shopping District – Wizard City Pet Shop (next to the shelves on the right)
- Requires: nothing
Krokotopia
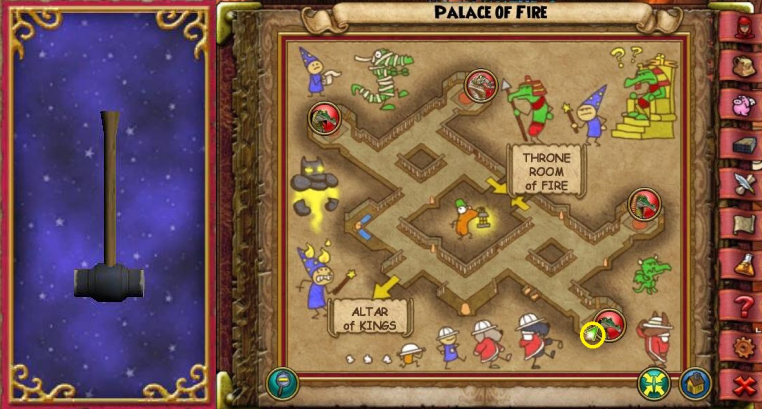
- Description: I’m gonna fix it!
- Location: Palace of Fire (near the sigil of Nebit Nirini)
- Requires: nothing

- Description: Great for short people, not so much for tall people..
- Location: Chamber of Fire (on the lowest level, leaning against a wall)
- Requires: nothing

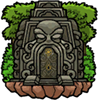
- Description: Simply carve a face and wear it on your head.
- Location: Hall of Champions (near Rami and his hammock)
- Requires: nothing
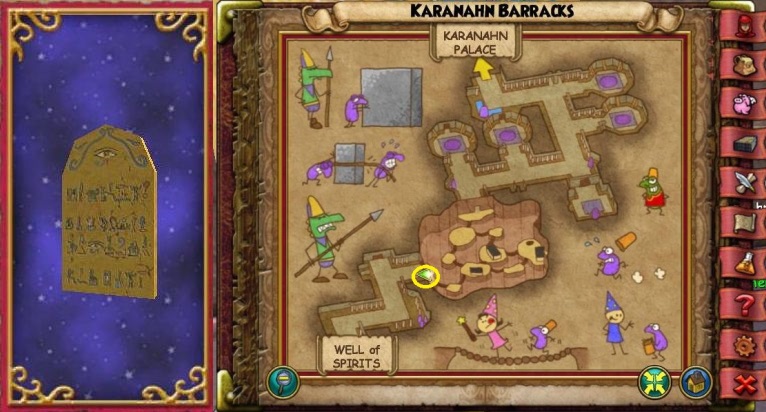
- Description: It’s basically a list of chores
- Location: Karanahn Barracks (near the little islands, against a wall)
- Requires: nothing
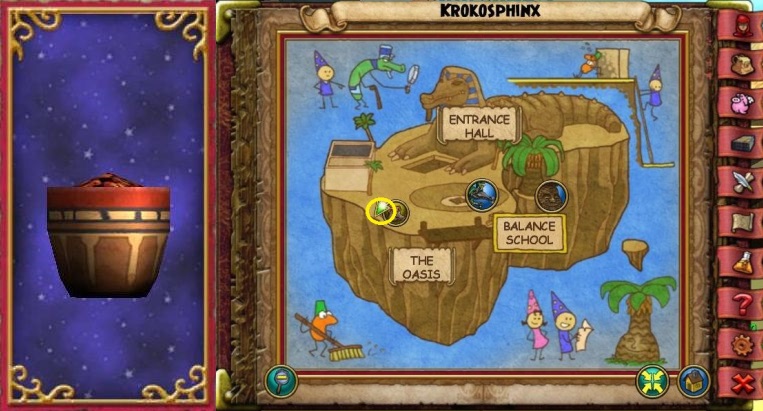
- Description: They say tomatoe and I say tomato.
- Location: Krokosphinx (next to Rehim Bashala)
- Requires: nothing
Marleybone
- Description: A cat’s best friend
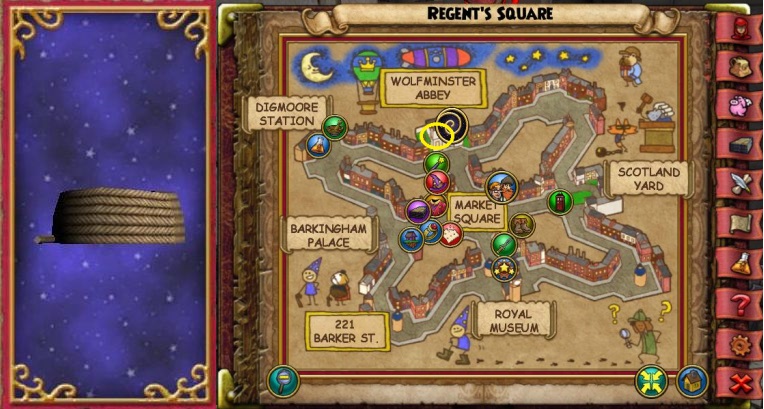
- Location: Wolfminster Abbey (behind a pillar)
- Requires: nothing
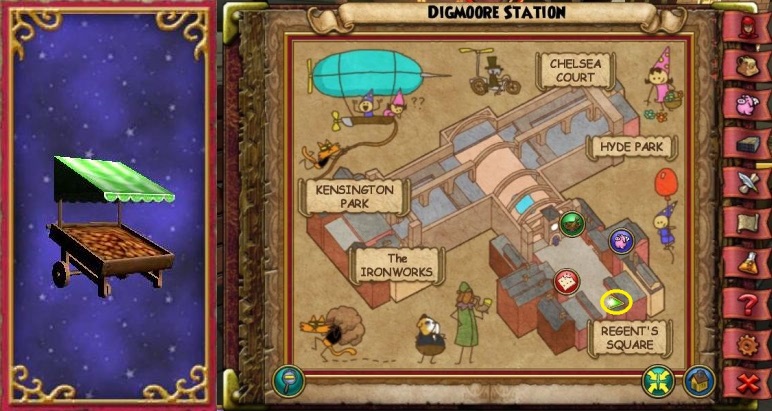
- Description: I believe they are selling oranges
- Location: Digmoore Station (right at the entrance of the area)
- Requires: nothing
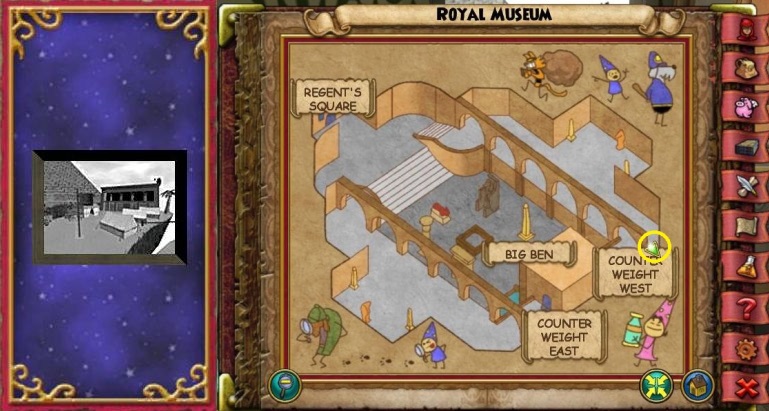
- Description: They should really go back and retake this old gal
- Location: Royal Museum (next to Counterweight West)
- Requires: nothing
- Description: Dogo spy
- Location: Scotland Yard (on the wall facing the cells, behind Officer McRuff)
- Requires: nothing
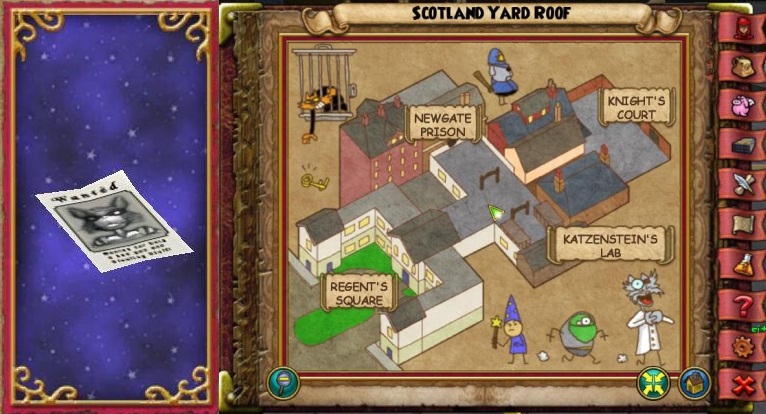
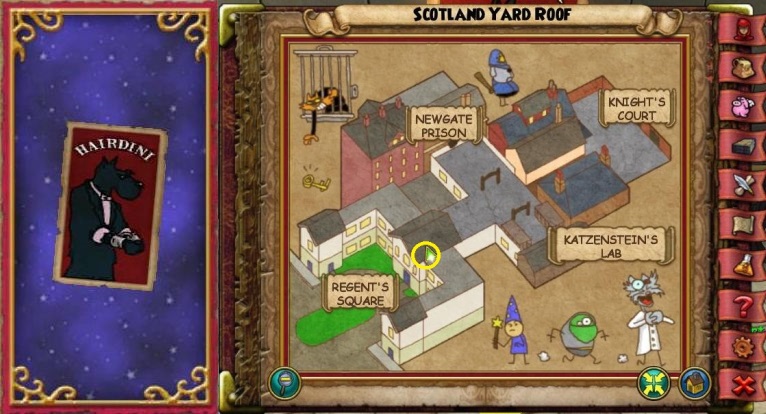
- Description: I would have named it “wanted poster”
- Location: Scotland Yard Roof (next to the stairs)
- Requires: nothing
Mooshu
- Description: Gather a few and you’ll have a stone ton
- Location: Mooshu Spiral Chamber (on the middle island)
- Requires: nothing
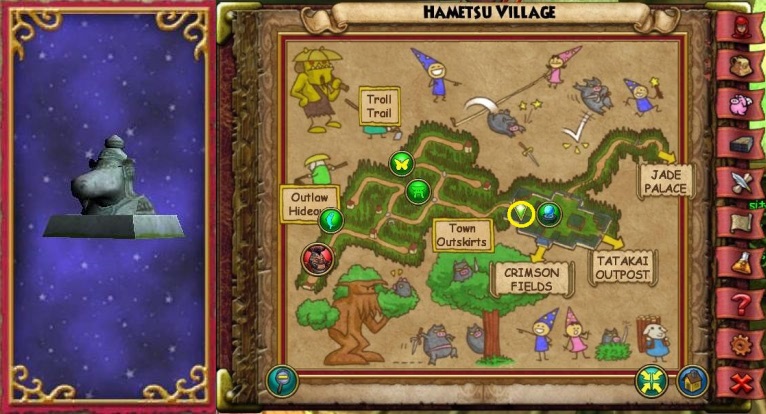
- Description: This mighty samoorai is in shambles
- Location: Hametsu Village
- Requires: nothing
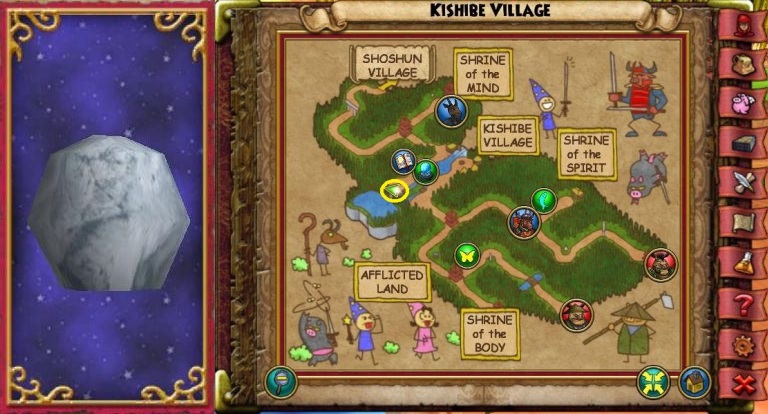
- Description: Rock on?
- Location: Kishibe Village (next to Tu Luk Kwo)
- Requires: nothing
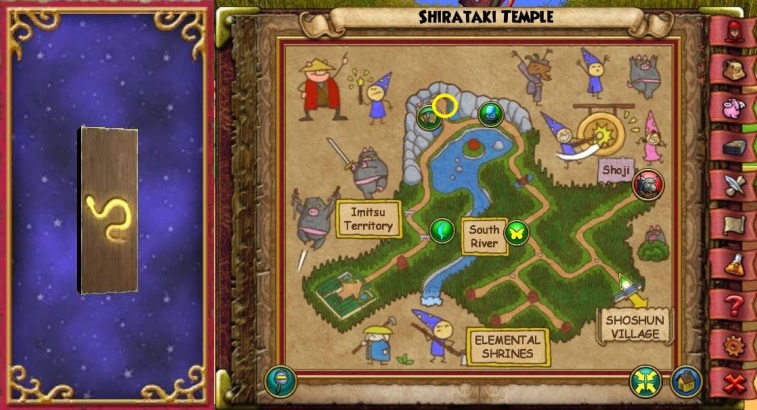
- Description: Ssssssssnake
- Location: Shirataki Temple – River Temple (on the wall in the final room)
- Requires: nothing
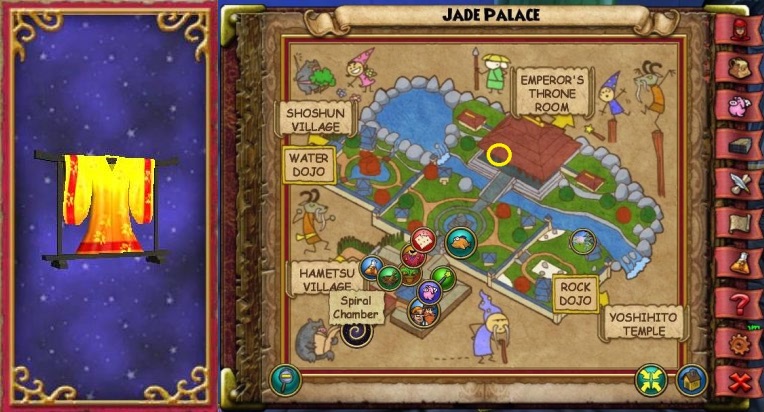
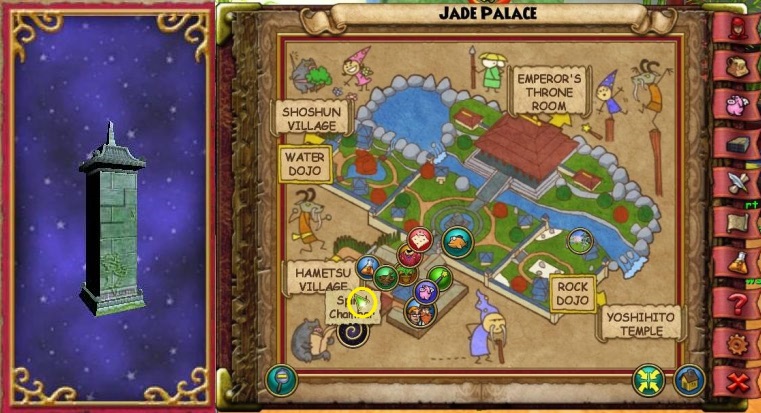
- Description: Available for a limited amount of time!
- Location: Emperor’s Throne Room, by the entrance
- Requires: nothing
DragonSpyre
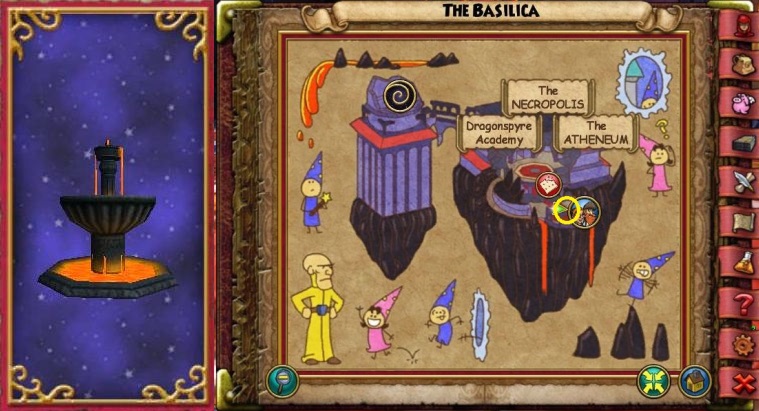
- Description: Don’t mind the lava!
- Location: The Basilica (Next to Zeke and Eloise)
- Requires: nothing

- Description: Super Shiny.
- Location: The Atheneum – Dragonspyre Library (in the back of the library, up the stairs, turn right)
- Requires: nothing
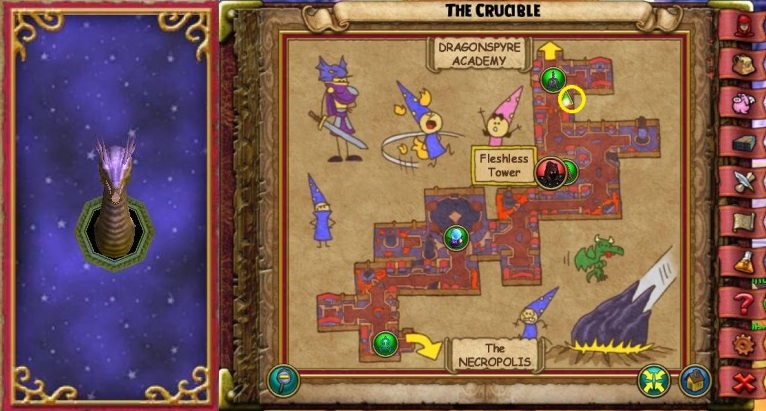
- Description: That’s 1 out of 3 heads you’ll want
- Location: The Crucible (above a doorway)
- Requires: nothing
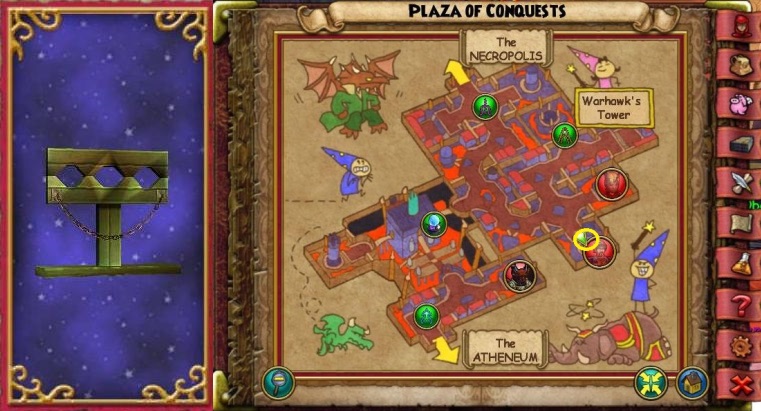
- Description: It’s a neck sore!
- Location: Plaza of Conquest – Spearcaller’s Tower
- Requires: one battle
Arc 2 Found Housing Items
Celestia
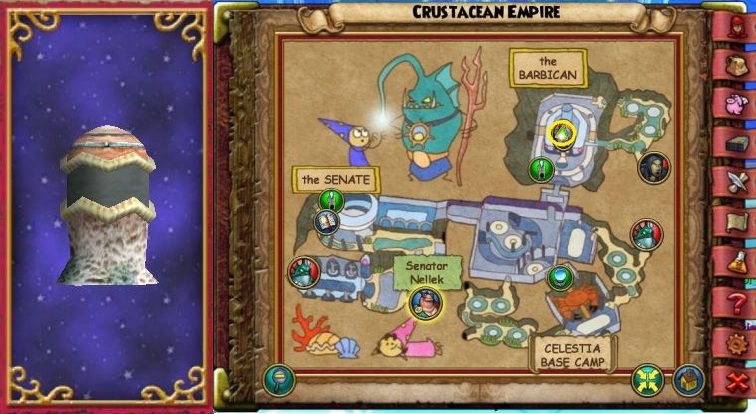
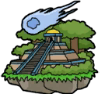
- Description: It’s lit
- Location: Crustacean Empire – The Barbican (inside the instance)
- Requires: one battle
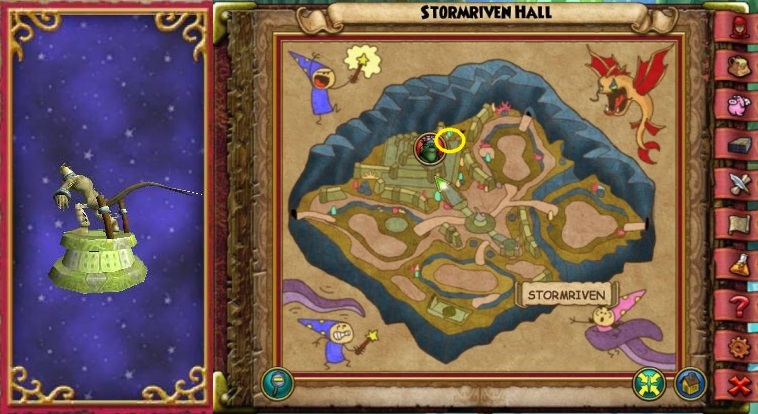
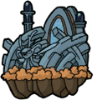
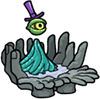
- Description: Release the kraken!
- Location: Stormriven Hall – Stormriven Temple
- Requires: two battles, third (boss) battle can be skipped
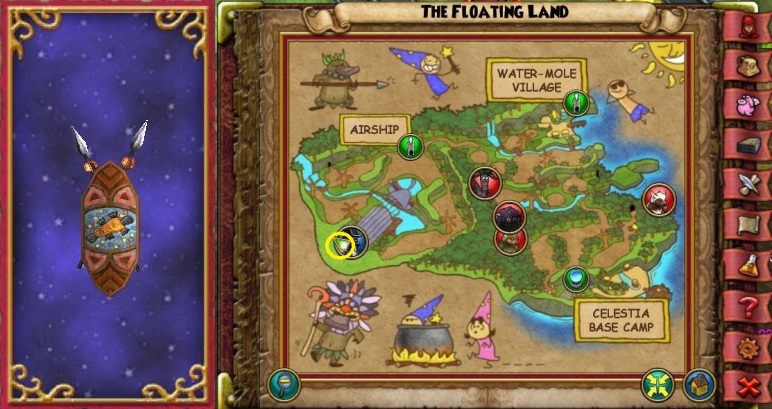
- Description: Mighty indeed
- Location: The Floating Land (inside the stranded ship, next to Captain Fogg)
- Requires: nothing
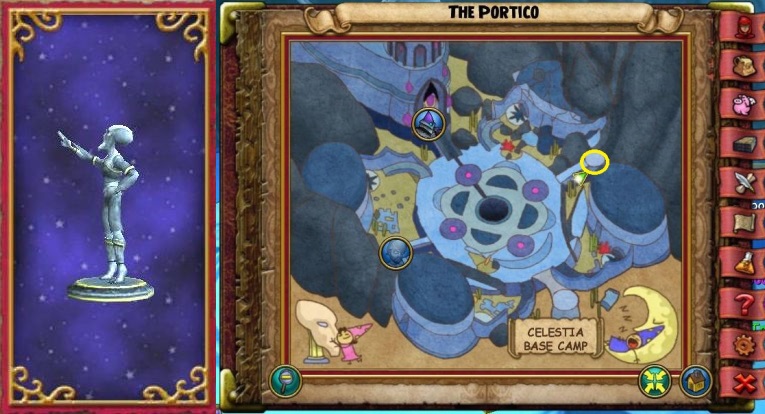
- Description: Saluting the mighty lords of storm
- Location: The Portico (on the right side in the first area of the instance)
- Requires: nothing
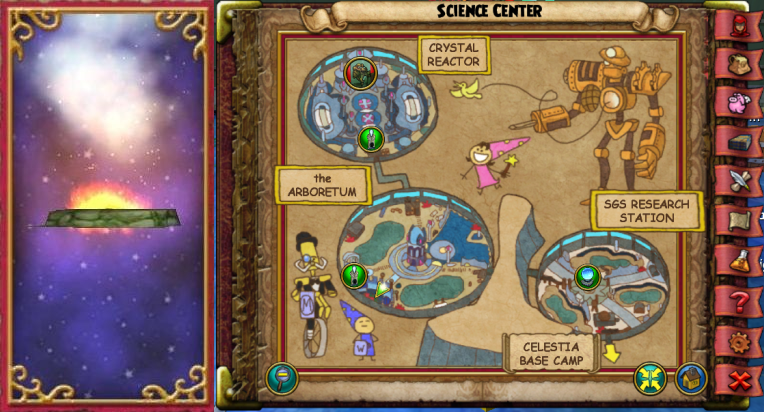
- Description: Great for bonfires!
- Location: Science Center (next to Engineer Montgomery)
- Requires: nothing
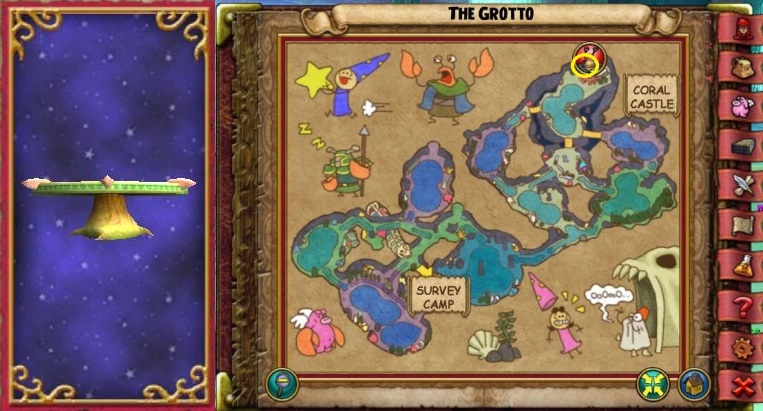
- Description: Chairs not included
- Location: The Grotto – Coral Castle
- Requires: nothing
Zafaria
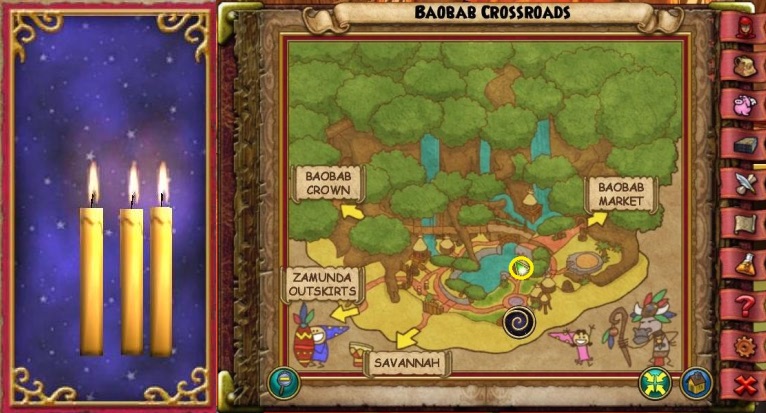
- Description: For keeping the boogie monsters away
- Location: Baobab Crossroads – Inyanga Whitestripes’ Hut (inside the little hut!)
- Requires: nothing
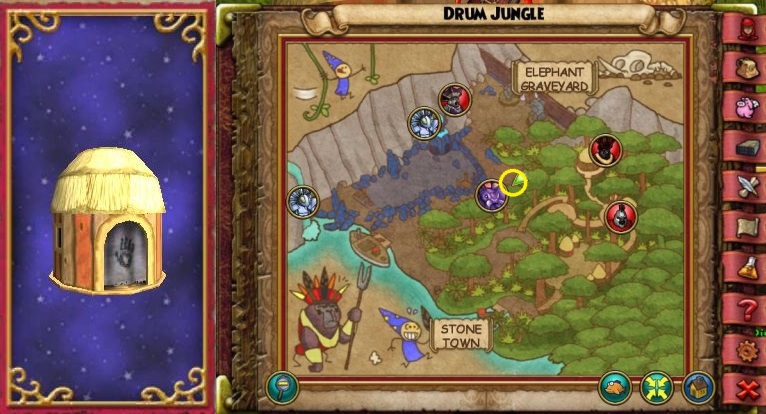
- Description: Never forget
- Location: Drum Jungle
- Requires: nothing
- Description: Made from authentic pelts
- Location: Waterfront – Aisley’s Tea Shop (not everyone can enter this room, not sure why not)
- Requires: nothing
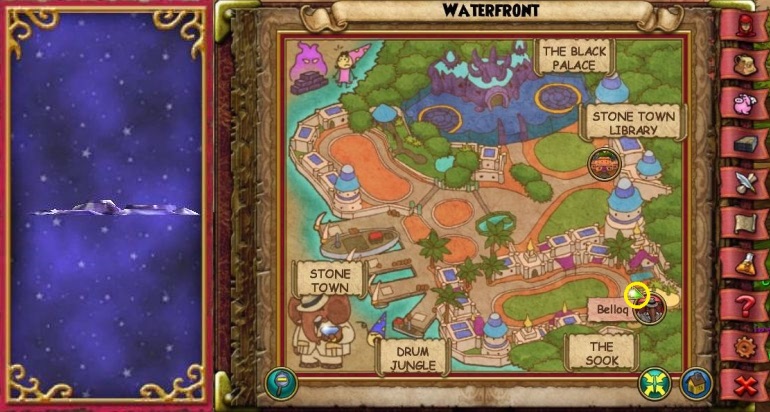
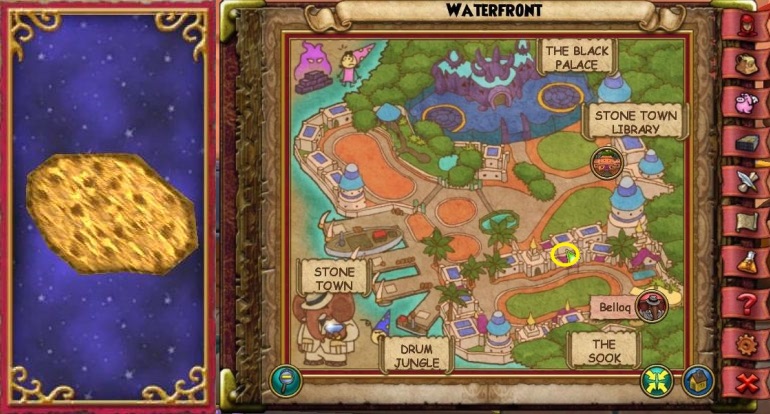
- Description: It’s a little flat but not in person
- Location: Waterfont – Belloq’s Tent
- Requires: one cheating boss battle
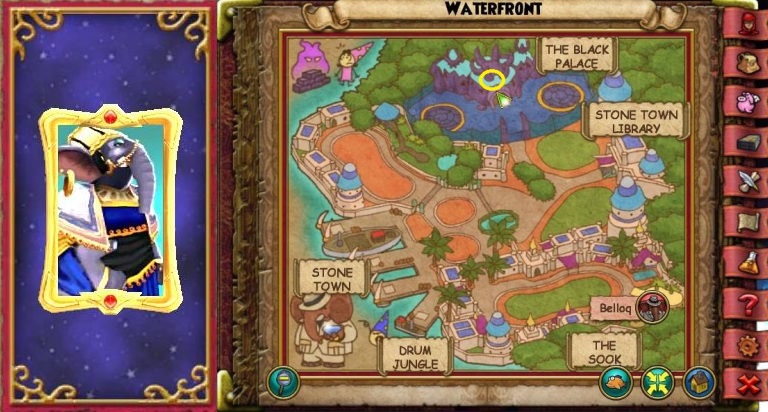
- Description: Bask in her radiance and melt at her beauty
- Location: Waterfont – Black Palace (in the last room on the wall)
- Requires: you have to do the whole instance
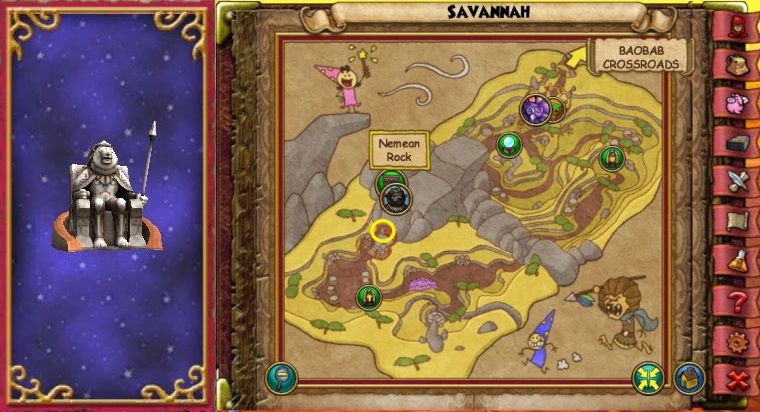
- Description: Simba
- Location: Savannah – Nemean Rock instance
- Requires: one mob battle + one cheating boss battle
Avalon
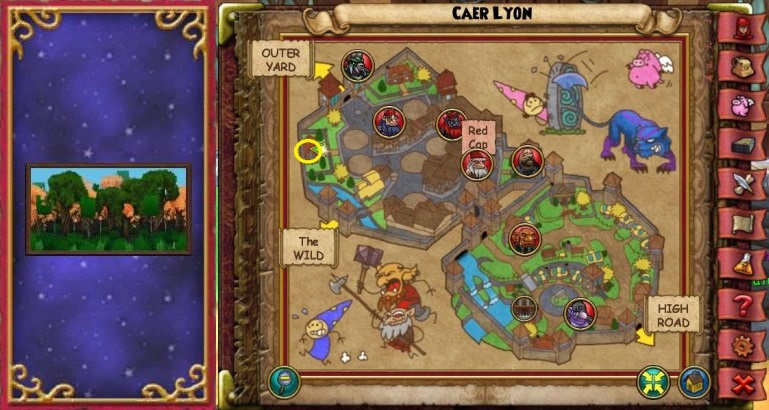
- Description: Yay more paintings ._.)
- Location: Caer Lyon (on the wall on ground level)
- Requires: nothing
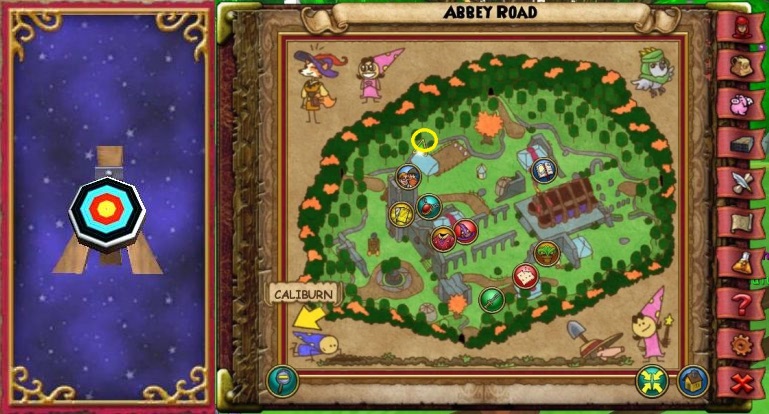
- Description: Robin Hood, I choose you!
- Location: Abbey Road (at the shooting range)
- Requires: nothing
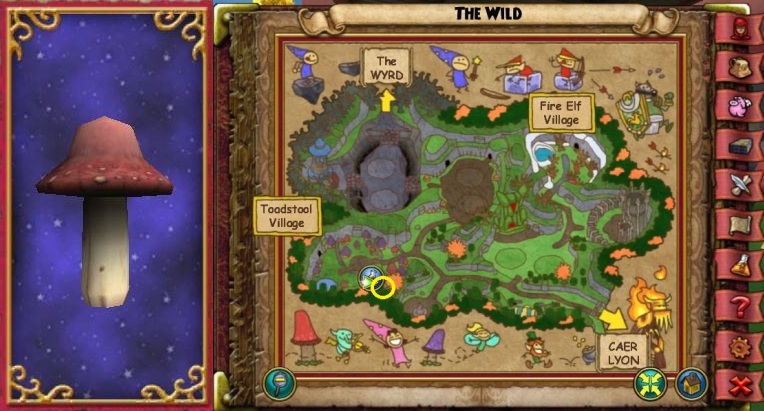
- Description: Makes a great seed vault
- Location: The Wild – Toadstool Village
- Requires: nothing
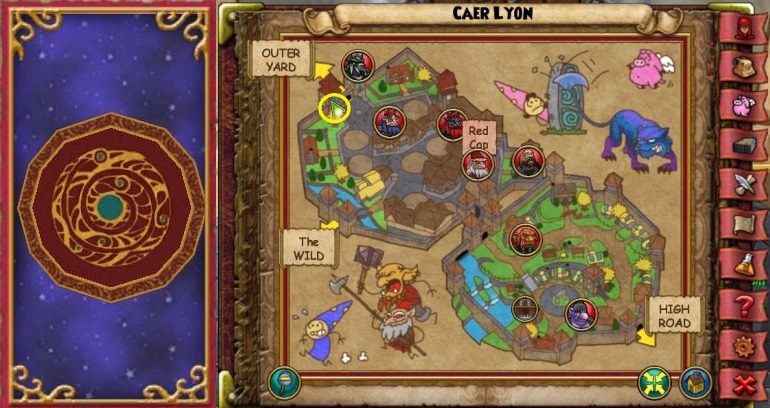
- Description: A very lovely rug
- Location: Caer Lyon – Malgrin’s Tower (all the way up the stairs)
- Requires: nothing
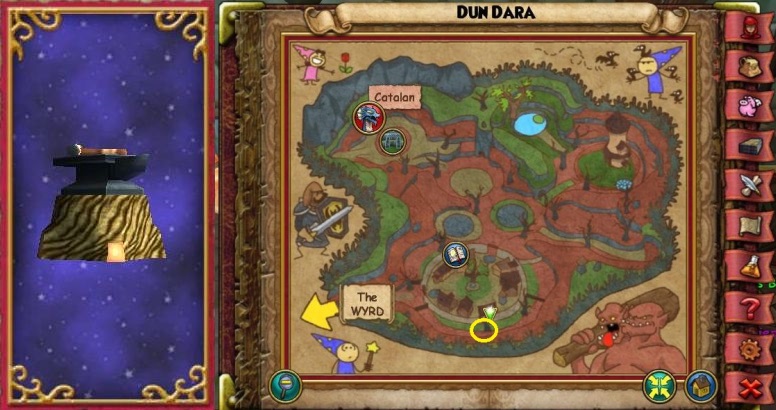
- Description: Time to craft myself a Thor Hammer
- Location: Dun Dara
- Requires: nothing
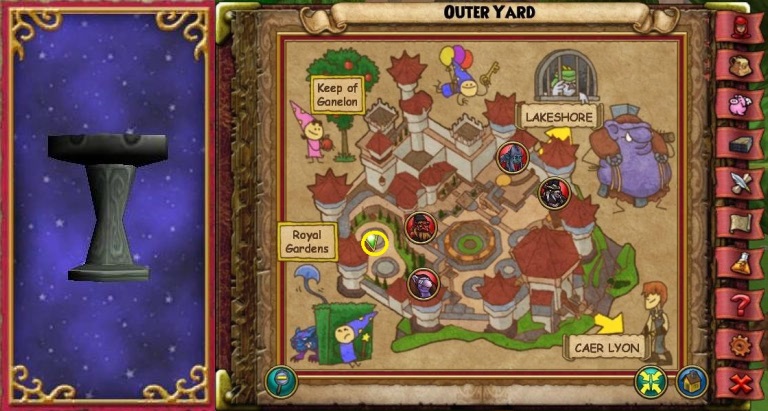
- Description: Watch out for the chicken hawks! (If you’re a chicken.)
- Location: Outer Yard (near the Trendkill Pantera)
- Requires: nothing
Azteca
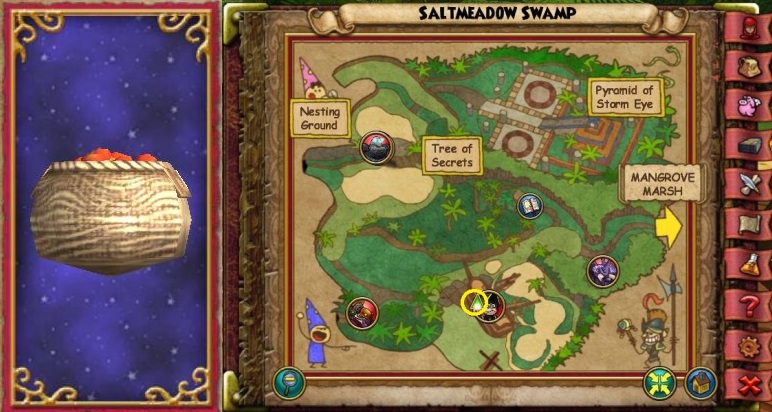
- Description: Highly recommend skipping this item if find yourself being able to pick it up an infinite amount of times.
- Location: Saltmeadow Swamp – Ship Hold
- Requires: nothing
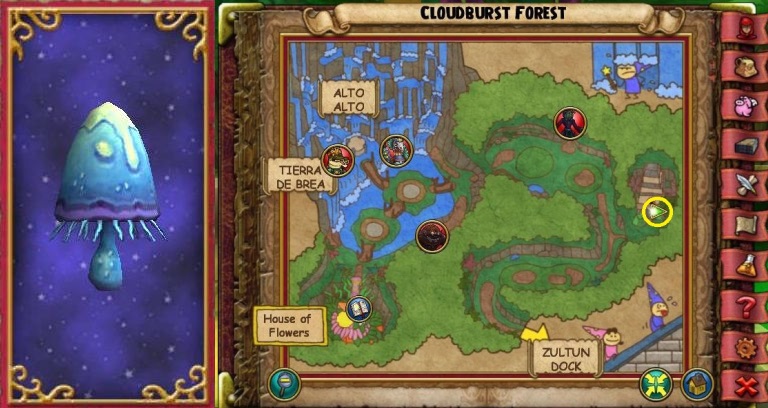
- Description: Expose to light for 15 minutes for full glow in the dark experience
- Location: Cloudburst Forest
- Requires: nothing
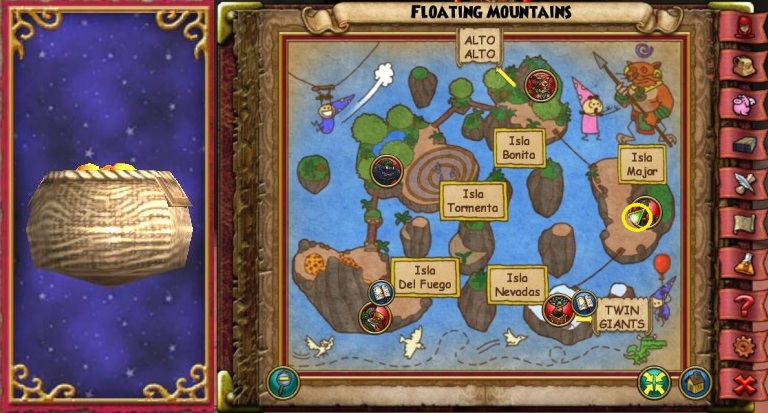
- Description: It beats having to deal with tomatoes
- Location: Floating Mountains – Turquoise Cave (on the table, walk around the creatures)
- Requires: nothing
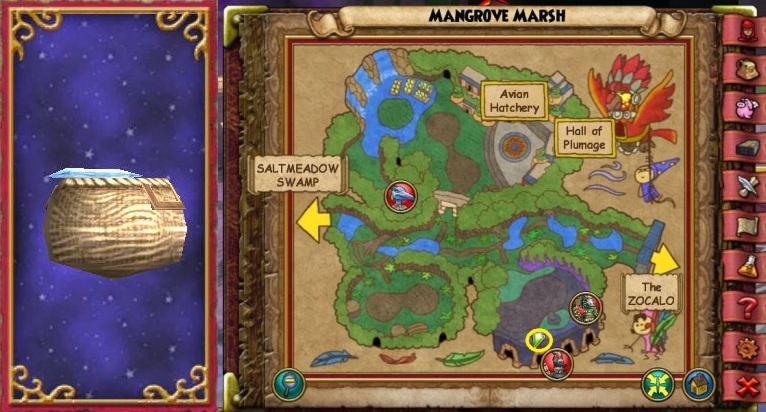
- Description: It beats having to deal with both oranges and tomatoes!
- Location: Mangrove Marsh – Mozar Turtle Hunter’s Tomb (in the back of the room, walk around the creatures)
- Requires: nothing
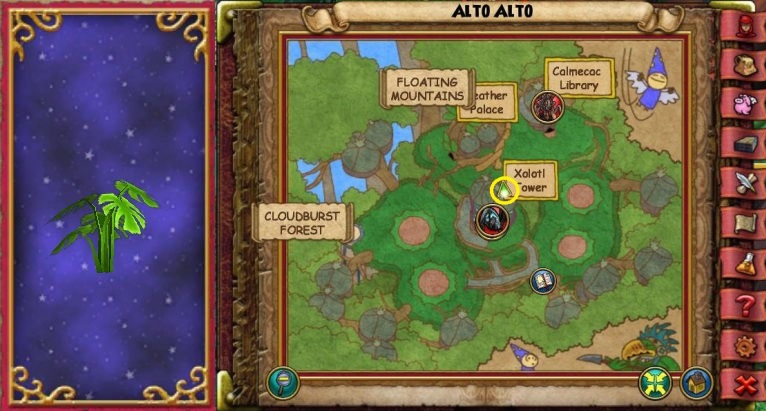
- Description: It’s so dull, it’s cute
- Location: Alto Alto
- Requires: nothing
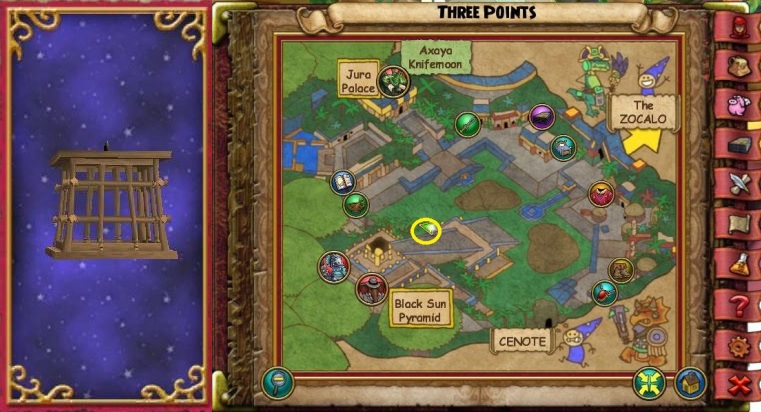
- Description: Good for trapping mistheads
- Location: Three Points – Black Sun Pyramid Lower Chamber
- Requires: two mob battles (You need to actually have quested up to here to enter.)
Khrysalis
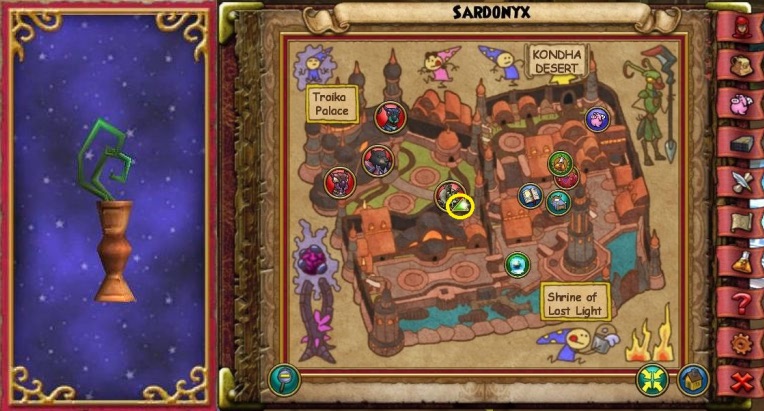
- Description: It’s a piece of grass!
- Location: Sardonyx – Tower of Pale Beauty
- Requires: one boss battle
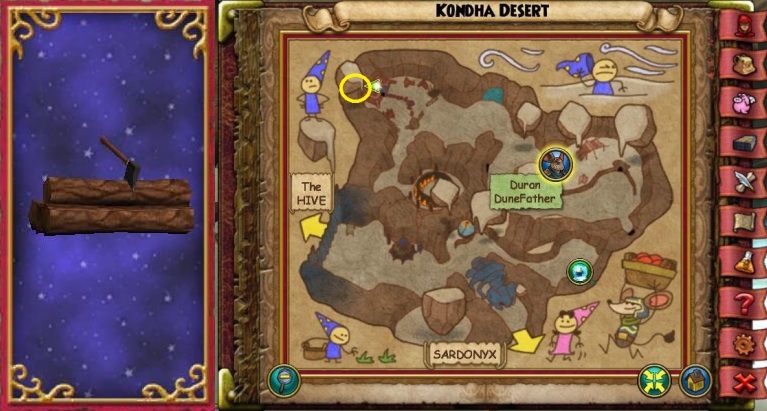
- Description: Keep that log away from any rage potions! -the lumberjack
- Location: Khonda Desert – Barrow Tent
- Requires: one boss battle
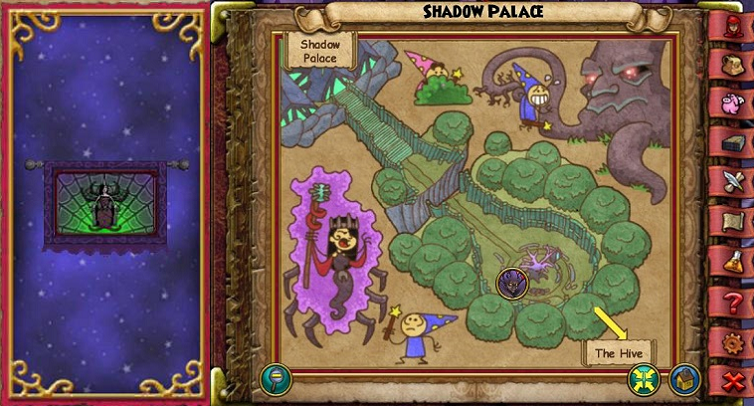
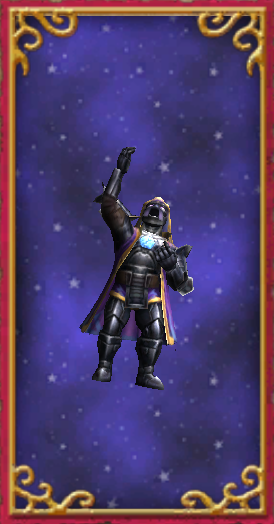
- Description: Lovely, isn’t she!
- Location: Shadow Palace – Morganthe’s Chamber
- Requires: One Epic Battle 🙂
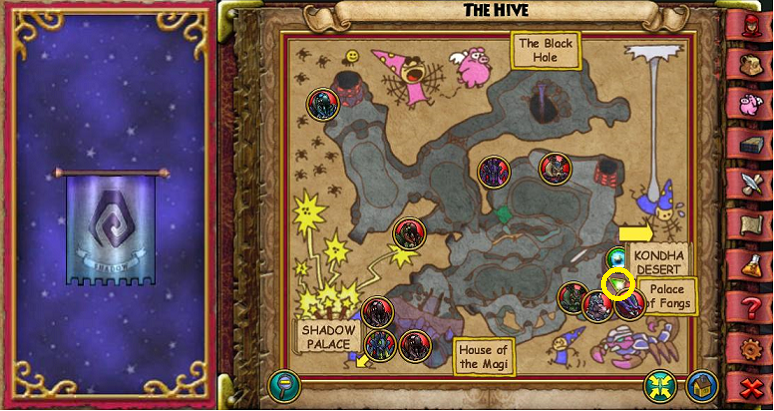
- Description: It’s a dark spiral, nuff said
- Location: The Hive – Chamber of the Shadow Smith
- Requires: one battle

- Description: Do not try sitting on this!
- Location: The Hive – Mutation Chamber B (walk around the mob)
- Requires: nothing

- Description: Check mate you evil devil !
- Location: Crescent Beach (via Fort Rachias) – Skull Rock Cave
- Requires: nothing
Arc 3 Found Housing Items

Polaris
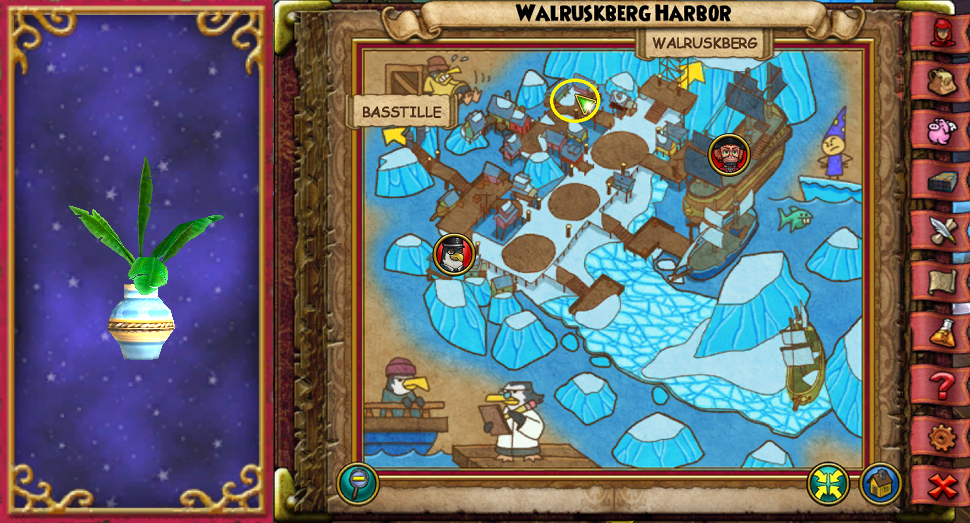
- Location: Walruskberg Harbor – Torcido’s Office
- Requires: one battle
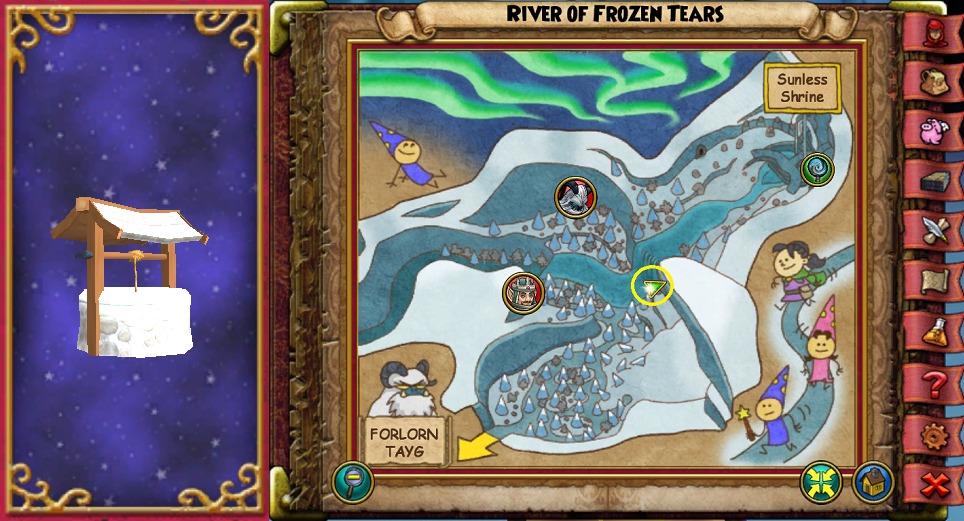
- Location: River of Frozen Tears
- Requires: nothing
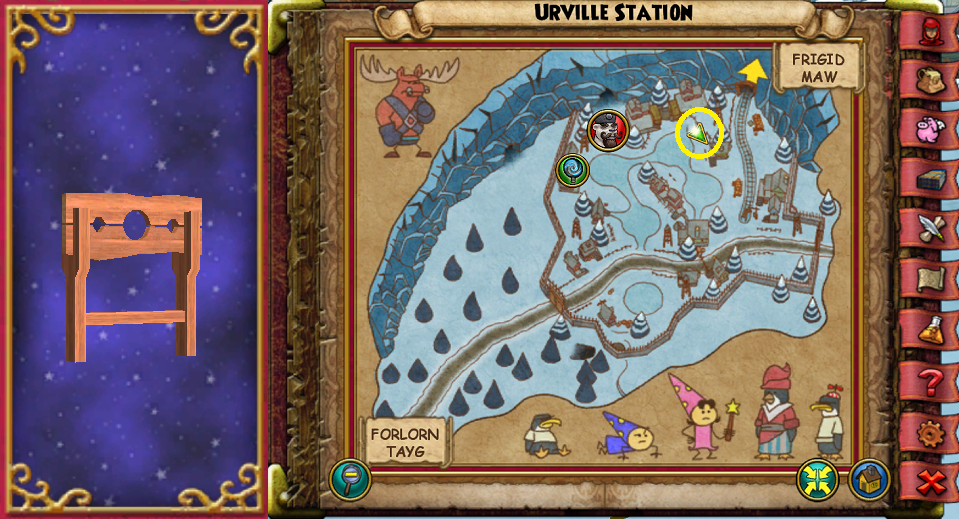
- Location: Urville Station
- Requires: nothing
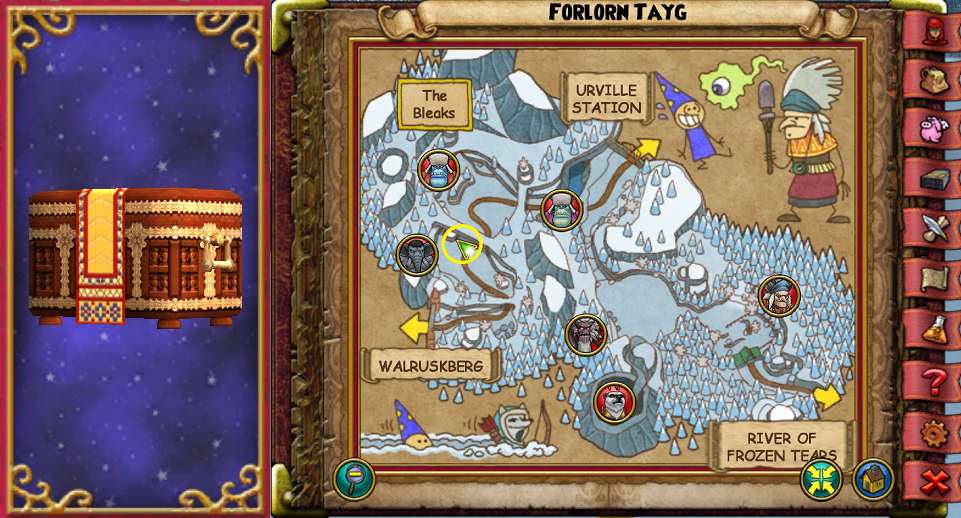
- Location: Forlorn Tayg
- Requires: nothing
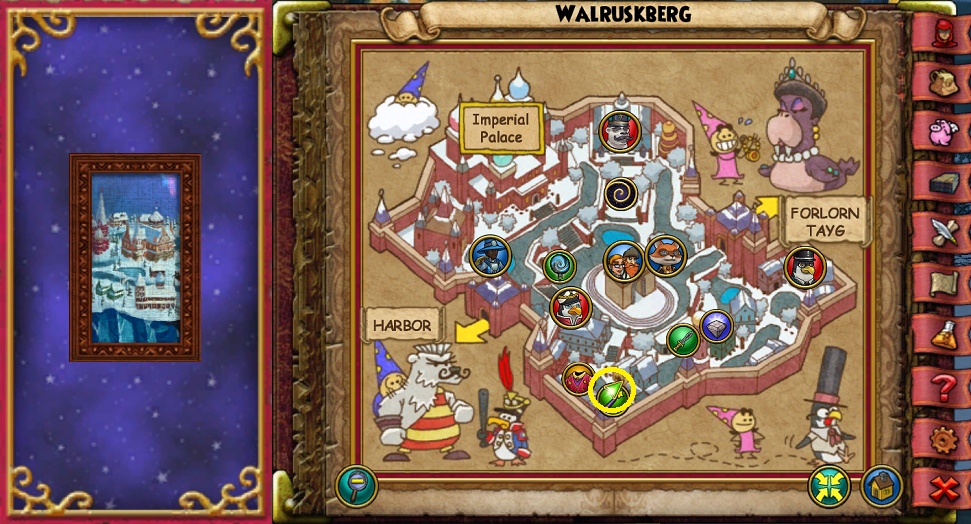
- Location: Walruskberg – Surveillance House
- Requires: nothing
Mirage
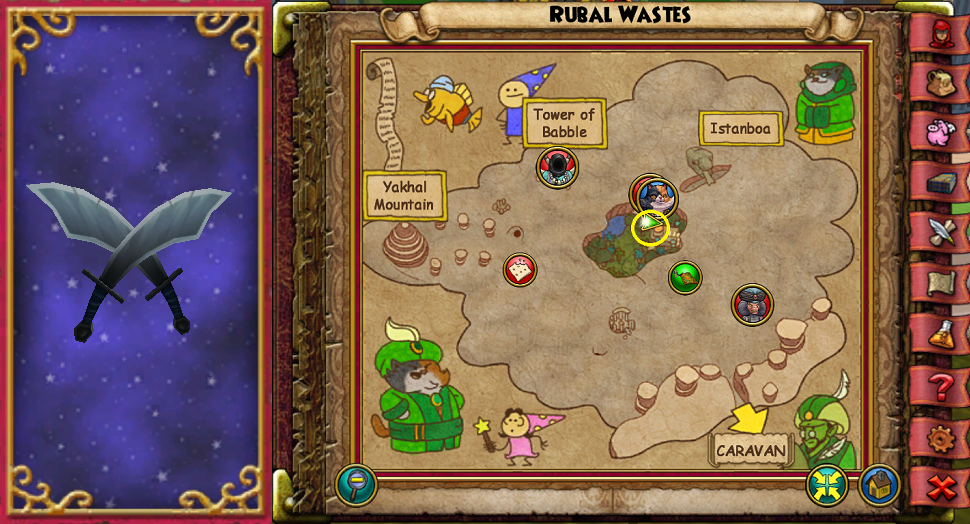
- Location: Rubal Wastes – Calixco Manor
- Requires: nothing
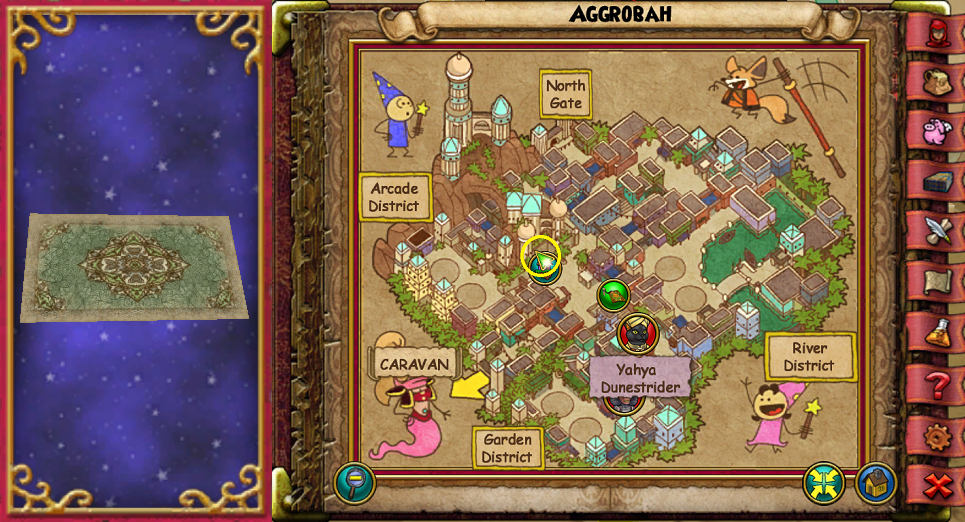
- Location: Aggrobah – Palace Treasure Vault
- Requires: nothing
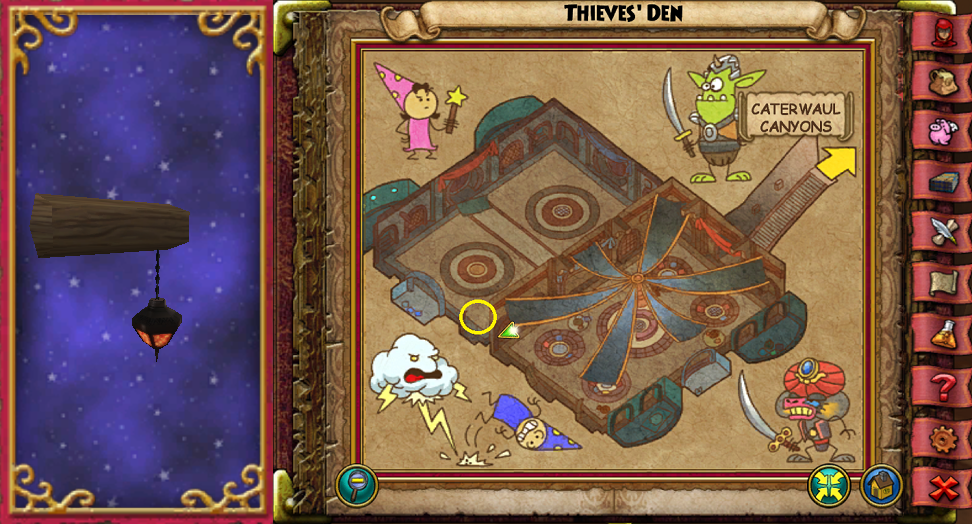
- Location: Caterwaul Canyon – Thieves’ Den
- Requires: nothing
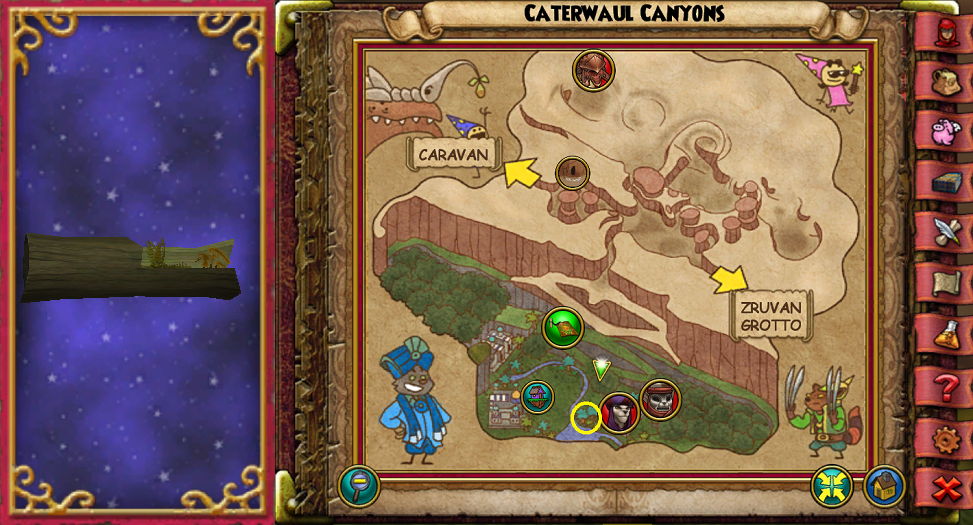
- Location: Caterwaul Canyon – Agouti Rift
- Requires: nothing
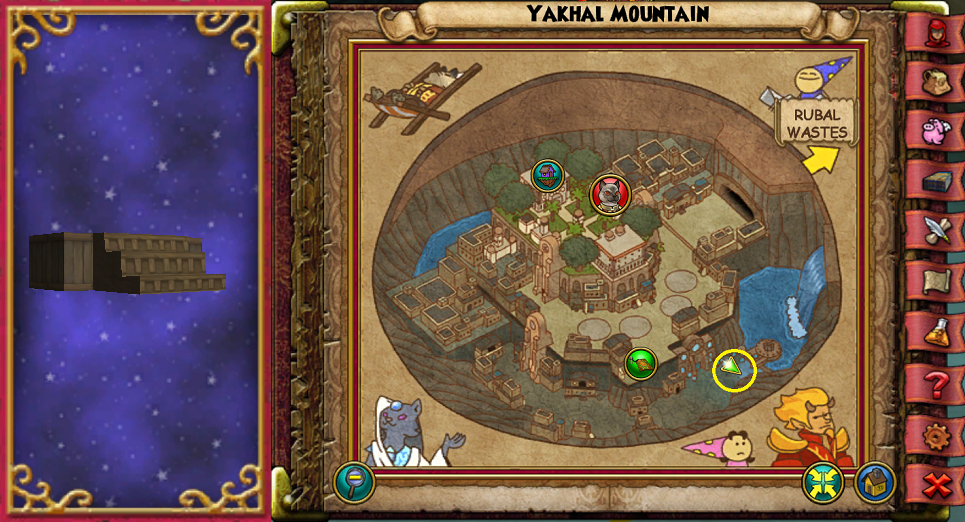
- Location: Yakhal Mountain (lower level)
- Requires: nothing
Empyrea
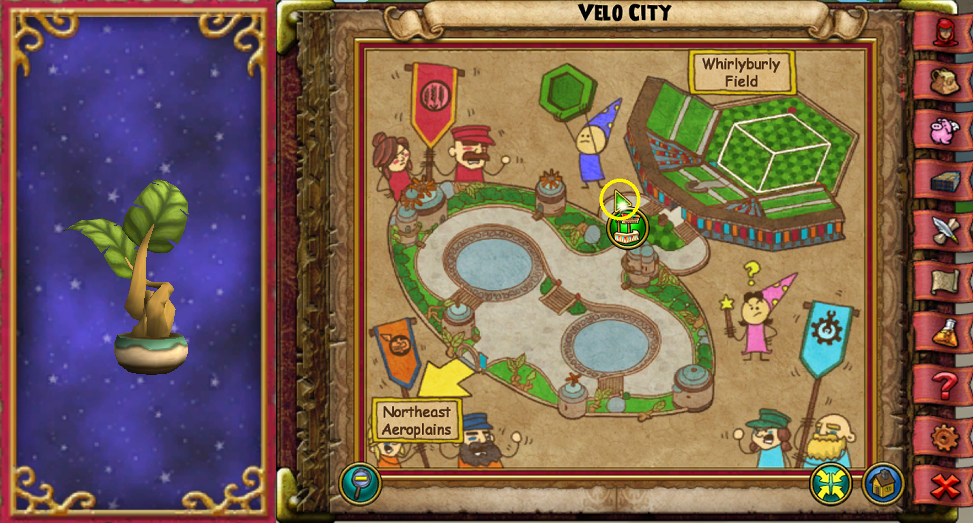
- Location: Velo City (next to Wirlyburly)
- Requires: nothing
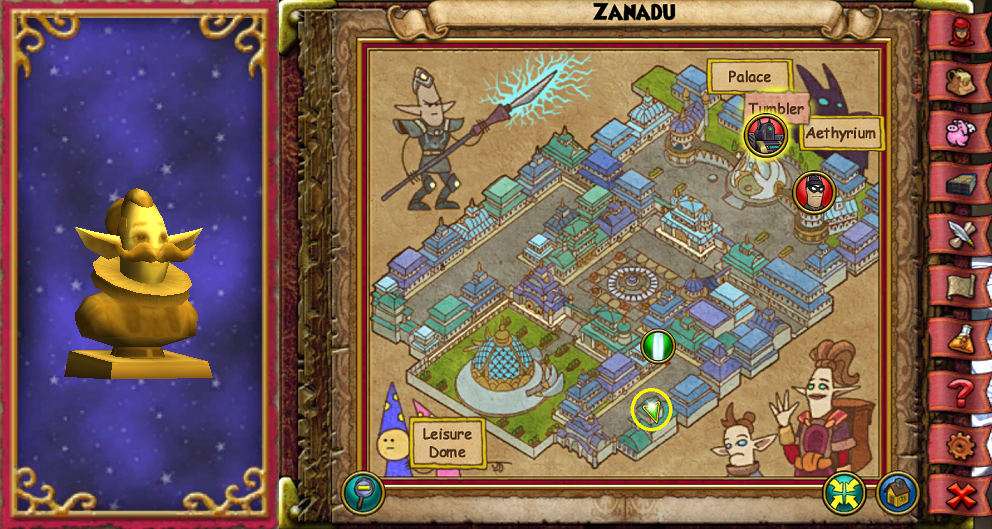
- Location: Zanadu – Byrin’s House (in the back room)
- Requires: nothing
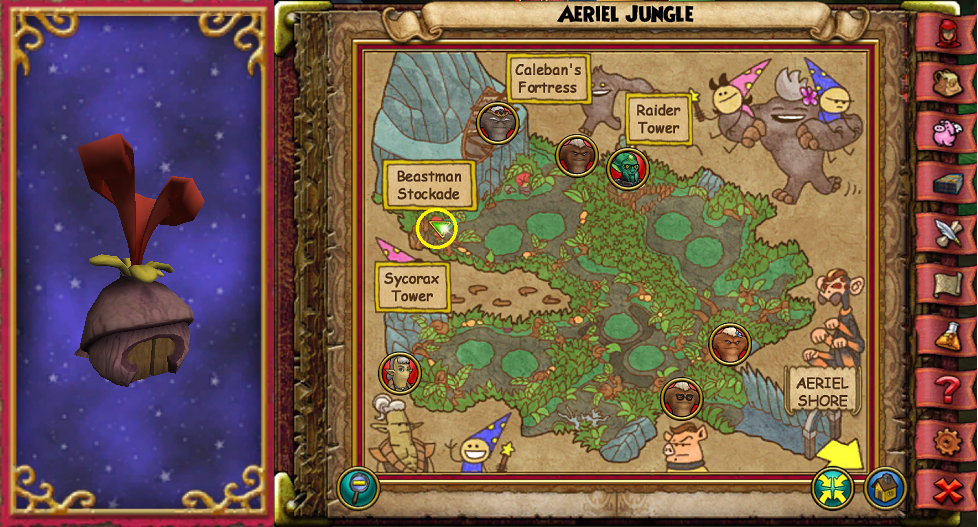
- Location: Aerial Jungle – Beastman Fort (at the back right)
- Requires: nothing
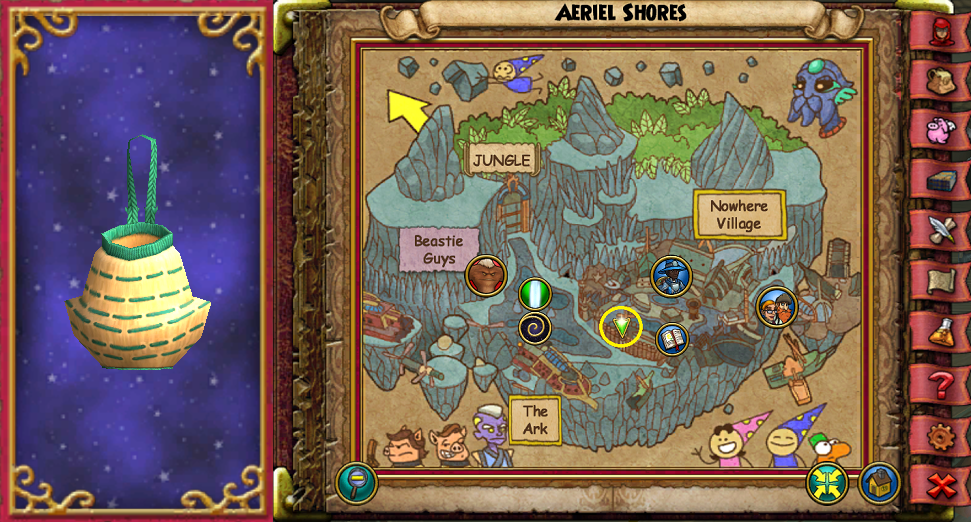
- Location: Aerial Shores – Nowhere Village (up first ramp on the right)
- Requires: nothing
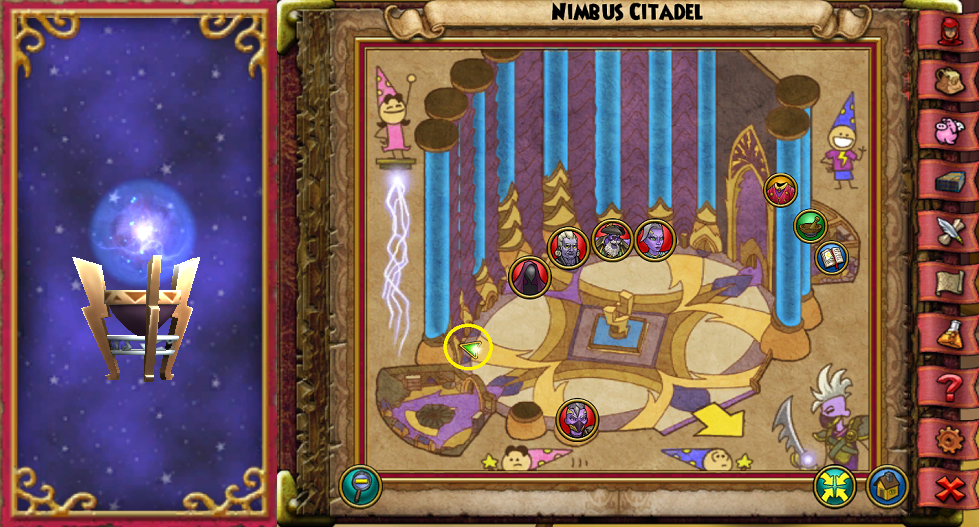
- Location: Nimbus Citadel – New School of Magic (accessed by Academy of Technologists)
- Requires: nothing
Arc 4 Found Housing Items
Karamelle
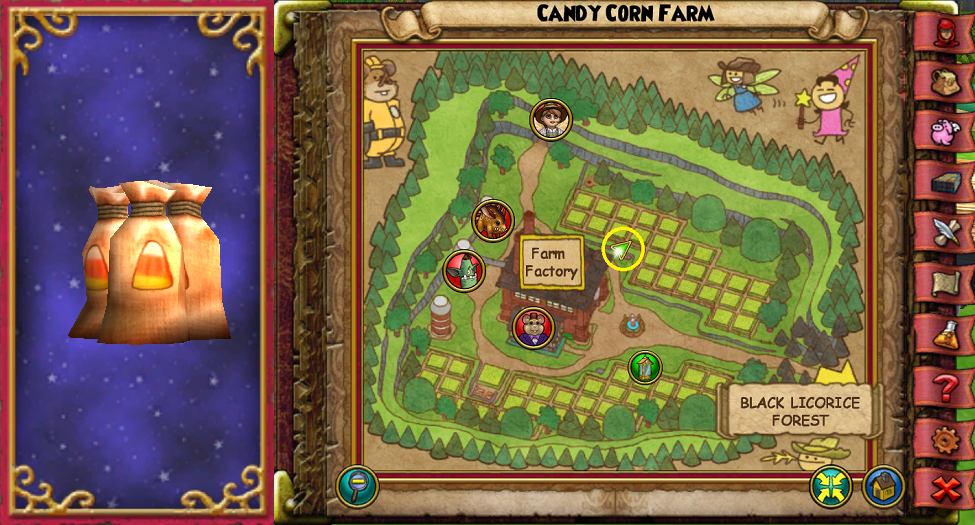
- Location: Candy Cane Farm
- Requires: nothing
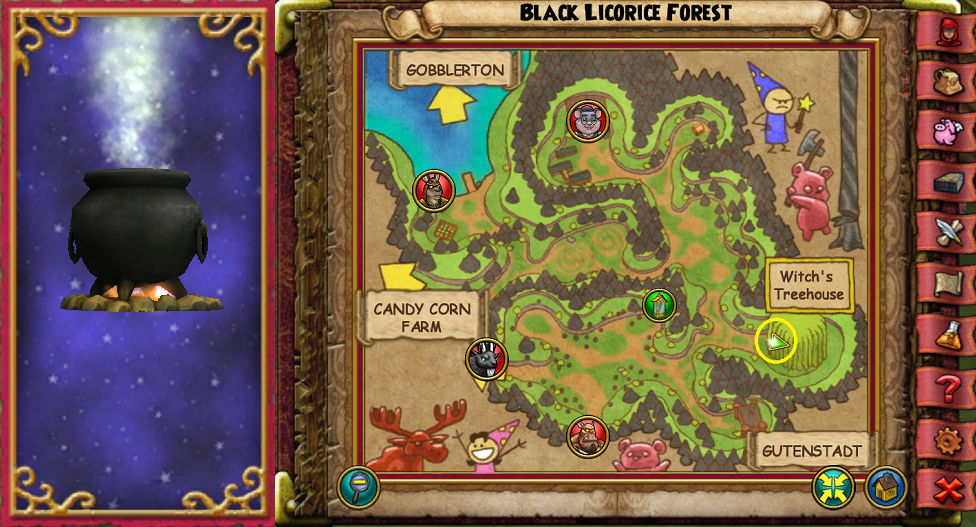
- Location: Black Licorice Forest – Witch’s Treehouse (top of stairs)
- Requires: nothing
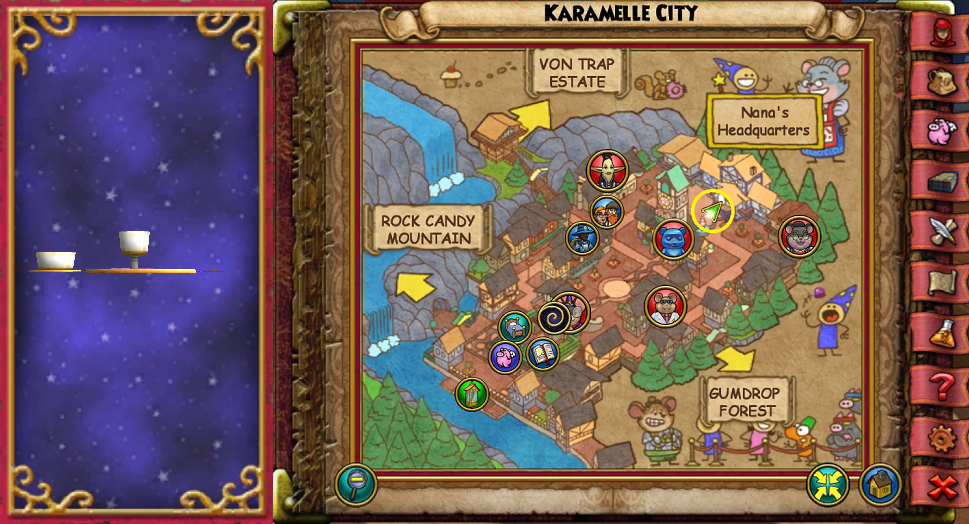
- Location: Karamelle City – Nana’s Office (on desk)
- Requires: nothing

- Location: Sweetzburg – Gummy Plant (on left side)
- Requires: nothing
Lemuria
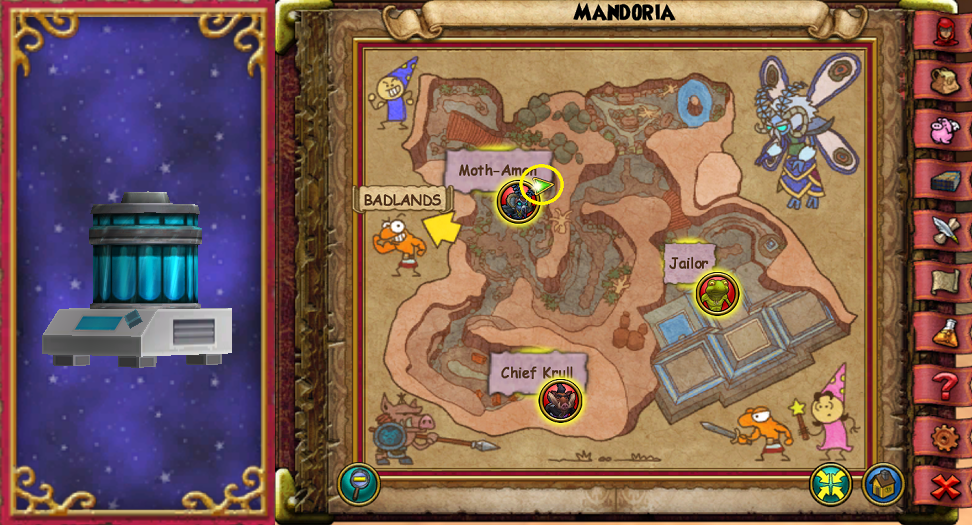
- Location: Mandoria Monitoring Station (accessed through Lab Entrance instance)
- Requires: Lab Entrance instance
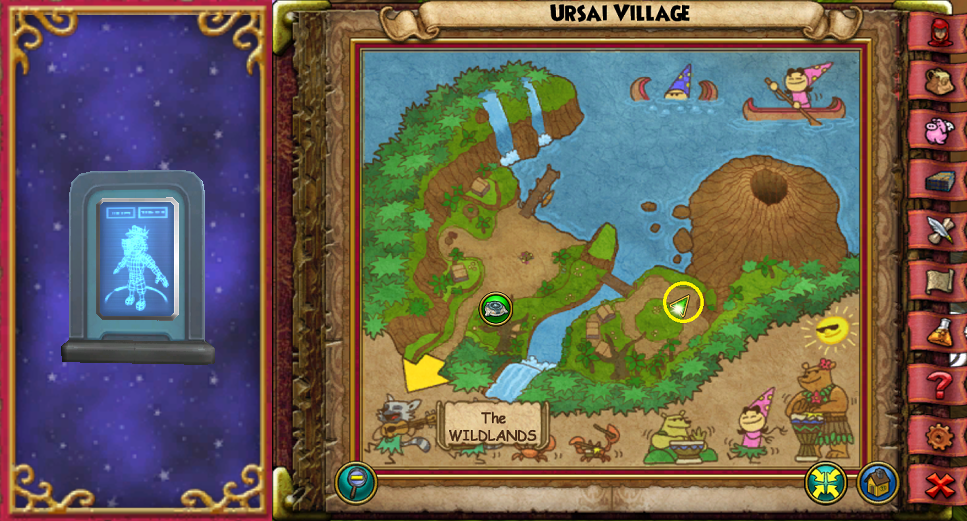
- Location: Ursai Village Monitoring Station (accessed through Killawahoo instance)
- Requires: Killawahoo instance (remains open after completing quest)
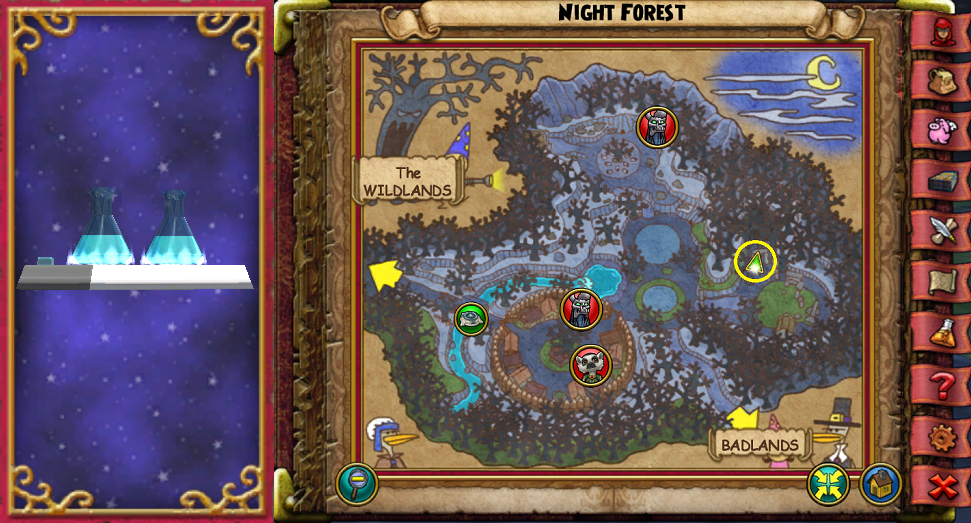
- Location: Night Forest Monitoring Station
- Requires: one battle
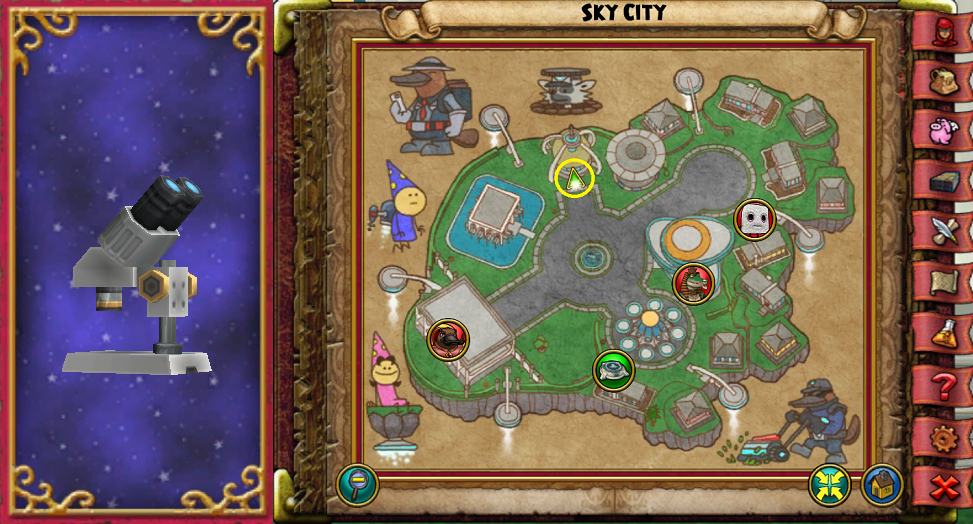
- Location: Sky City Monitoring Station
- Requires: nothing
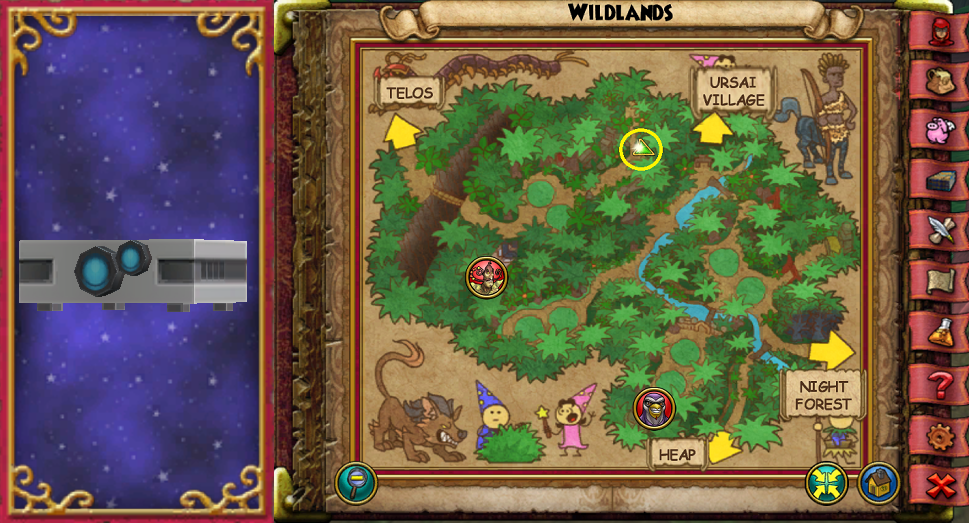
- Location: Wildlands Monitoring Station
- Requires: nothing
Novus
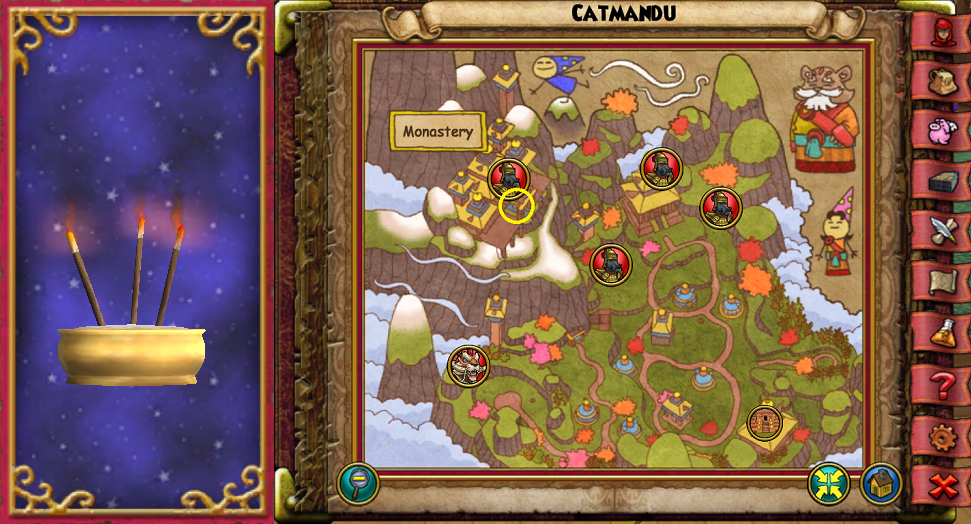
- Location: Catmandu – Monastery second level
- Requires: one battle
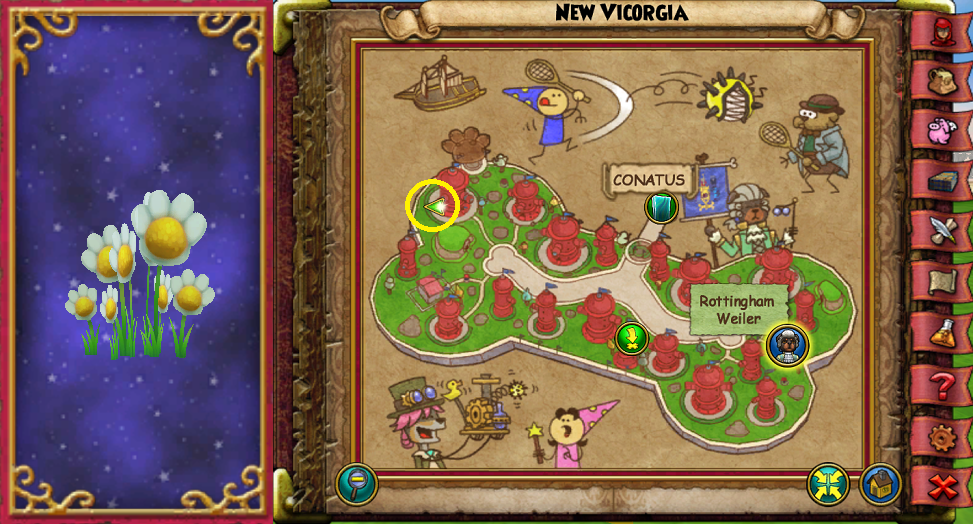
- Location: New Vicorgia
- Requires: nothing
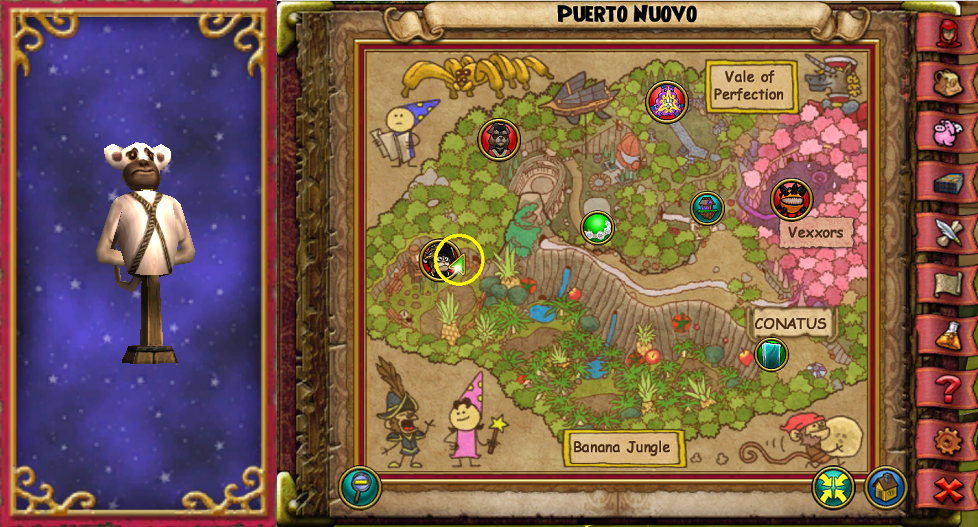
- Location: Puerto Nuovo
- Requires: nothing
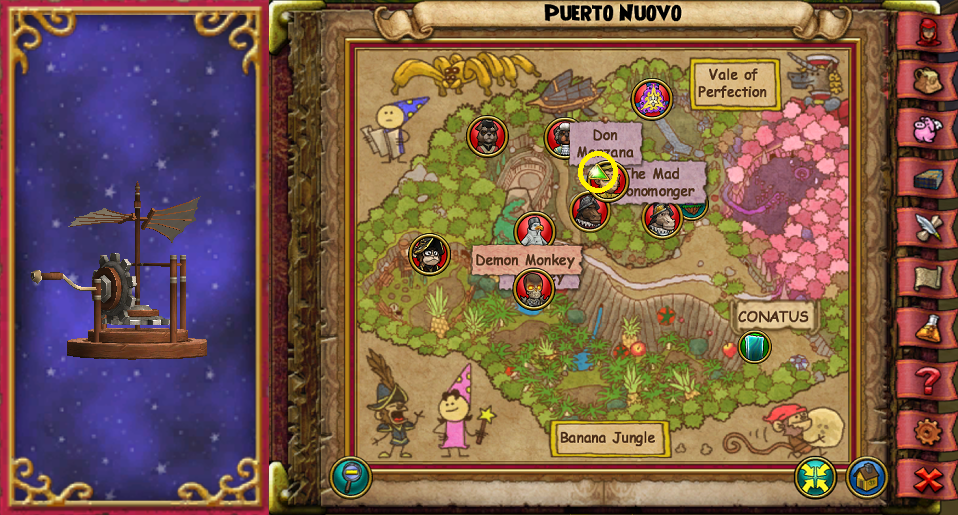
- Location: Puerto Nuovo – Governor’s Saferoom
- Requires: Bad Manzana quest
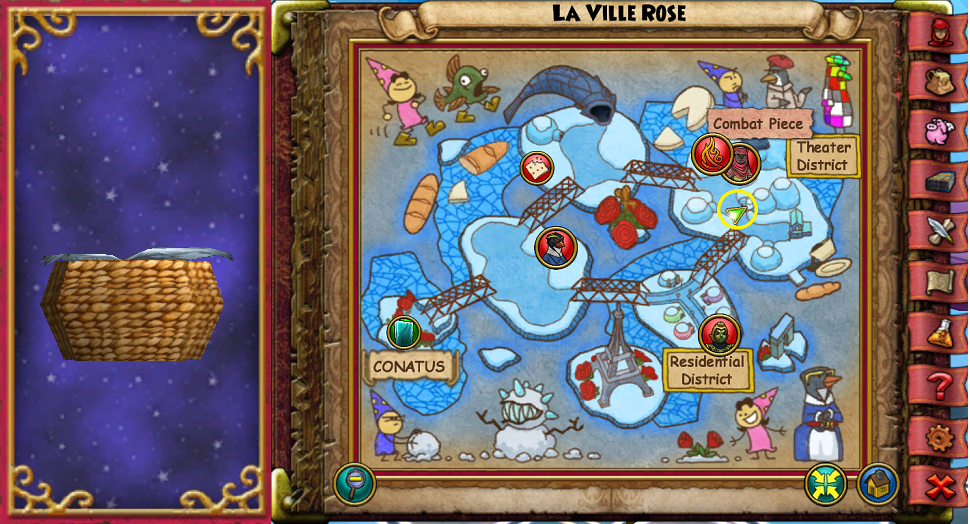
- Location: La Ville Rose – Theater of the Absurd, second room
- Requires: Two battles
Side Worlds and Gauntlets Found Housing Items


Grizzleheim
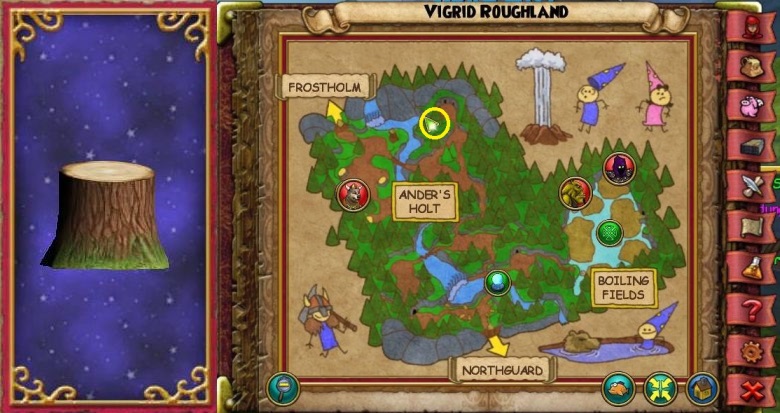
- Description: Don’t tell the Lorax
- Location: Vigrid Roughland (near the yardbird, up the slope behind Hans)
- Requires: nothing
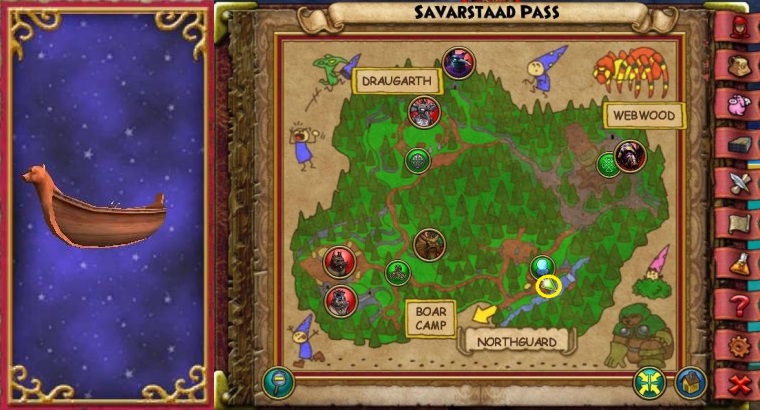
- Description: Sturdy and powerful
- Location: Savarstaad Pass (in the water next to another boat)
- Requires: nothing
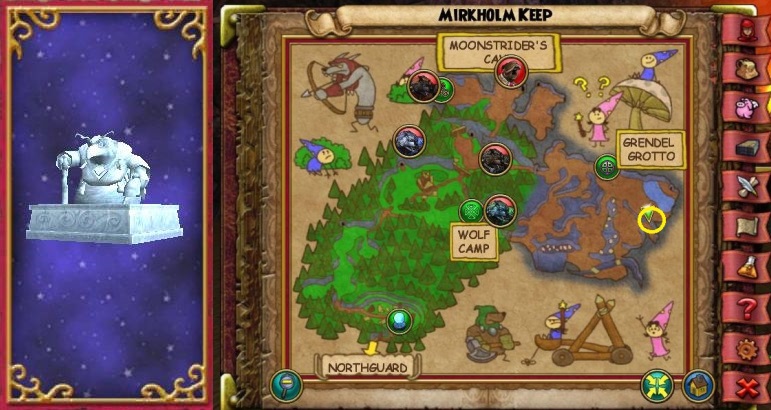
- Description: You traitor!
- Location: Mirkholm Keep (use the red teleporter, behind the howling banshees)
- Requires: nothing
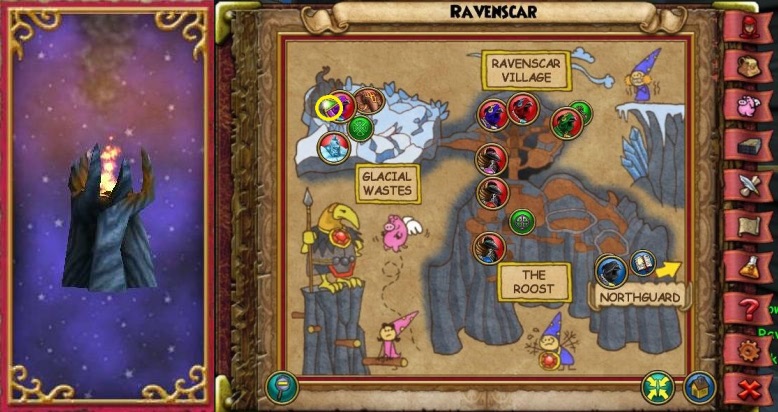
- Description: Really cool flames to chase the night
- Location: Ravenscar (next to the Raven Fortress, use the green teleporter)
- Requires: nothing
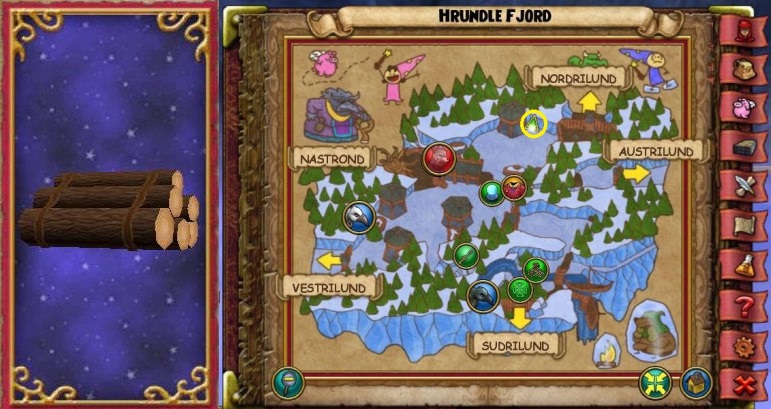
- Description: I repeat, keep them away from rage spells!- the Lumberjack
- Location: Hrundle Fjord (behind the Frost Goblins at the side of the house)
- Requires: nothing

- Description: Smells a little fishy
- Location: Austrilund (between the two tents)
- Requires: nothing
Aquila
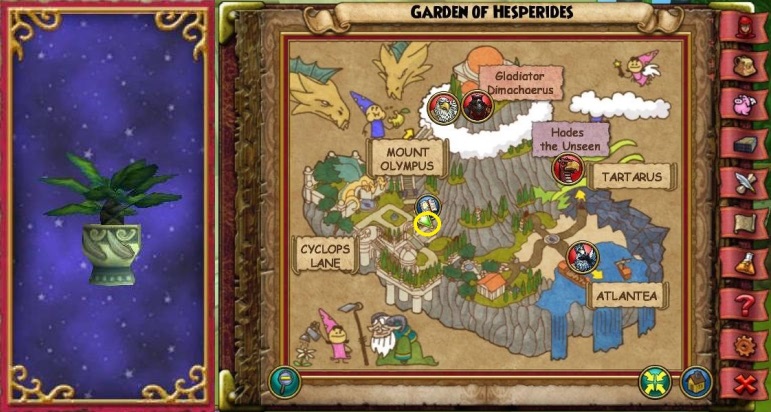
- Description: It’s a great gift for any gal
- Location: Garden of Hesperides (next to Khalkos Coppersmith)
- Requires: nothing
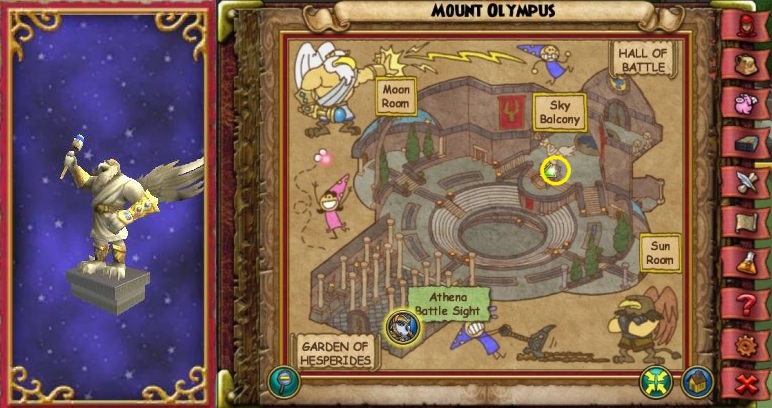
- Description: Praise the man
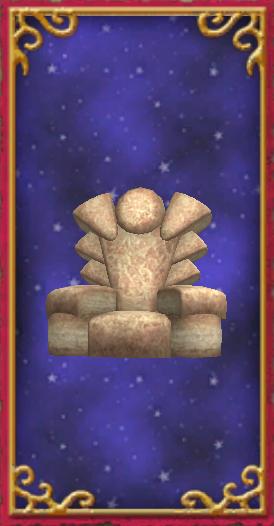
- Location: Mount Olympus (up the stairs, giant statue)
- Requires: nothing
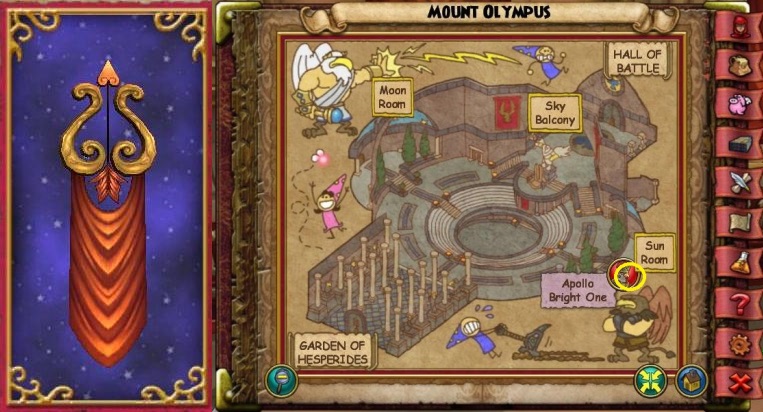
- Description: Careful! It’s a little sharp you see
- Location: Mount Olympus – Sun Room (you don’t have to do the battle)
- Requires: nothing
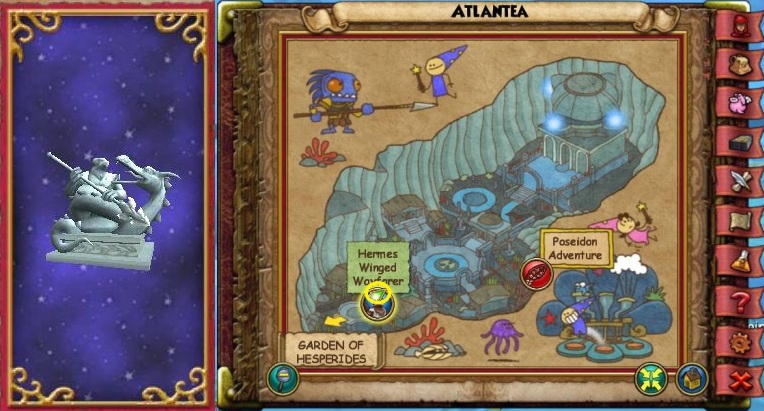
- Description: Man Bird vs Beast of the Sea
- Location: Atlantea (right at the entrance of the instance)
- Requires: nothing
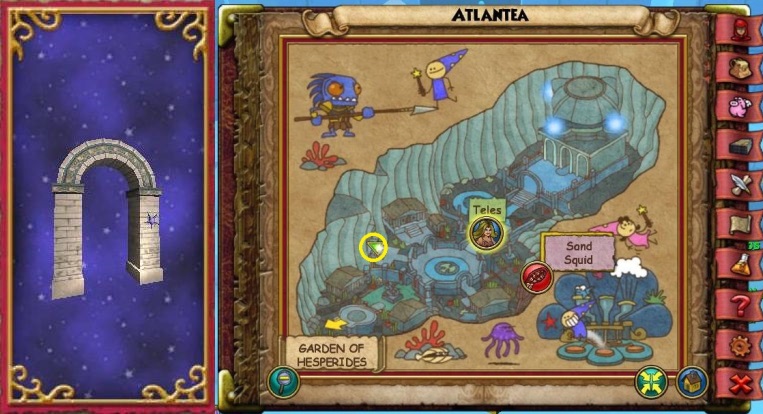
- Description: Works well with housing magic
- Location: Atlantea – Akheilo’s Sanctum (on the left)
- Requires: one mob, two bosses
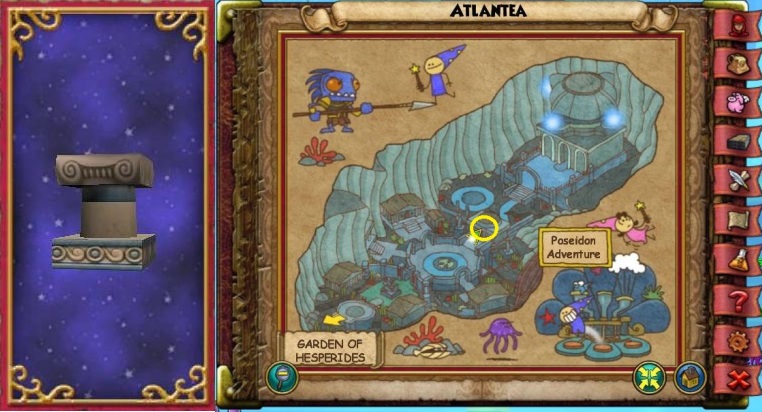
- Description: Place all the bobble heads you want
- Location: Atlantea – Akheilo’s Sanctum (on the left)
- Requires: one mob, two bosses
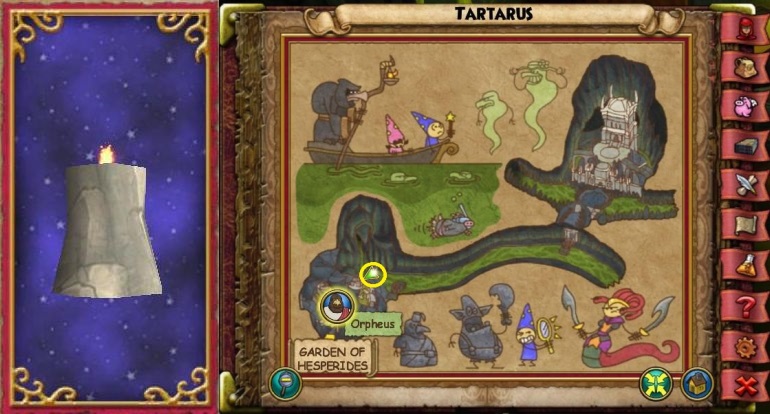
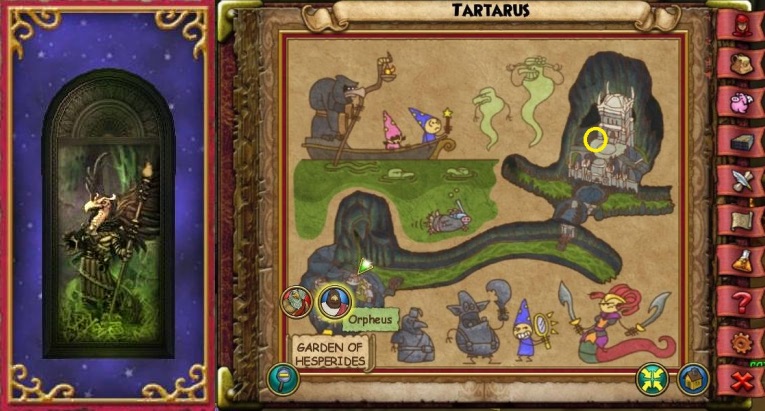
- Description: Tiny flame, great power
- Location: Tartarus, near the River of Spirits
- Requires: access to Tartarus
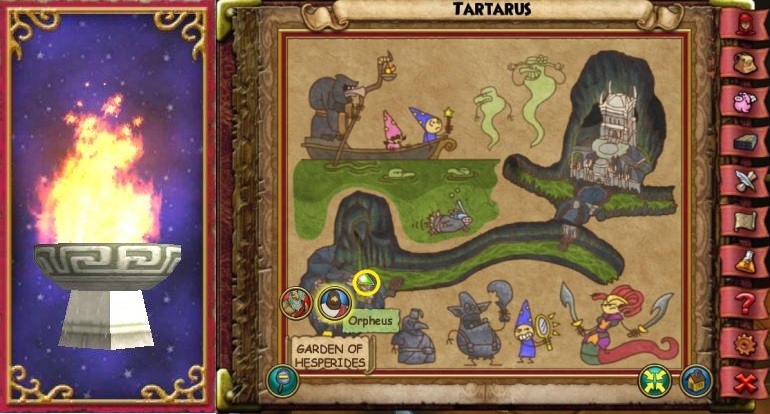
- Description: Bigger flame, even greater power
- Location: Tartarus, near the River of Spirits (close to the Bronze Hoplights)
- Requires: access to Tartarus
- Description: I cannot unsee this art
- Location: Tartarus, on the wall in the last room
- Requires: doing the whole dungeon
Wysteria
- Description: A sturdy ship indeed, again.
- Location: Wysteria Ring & Amulet Shop (up the stairs, next to the plant)
- Requires: nothing
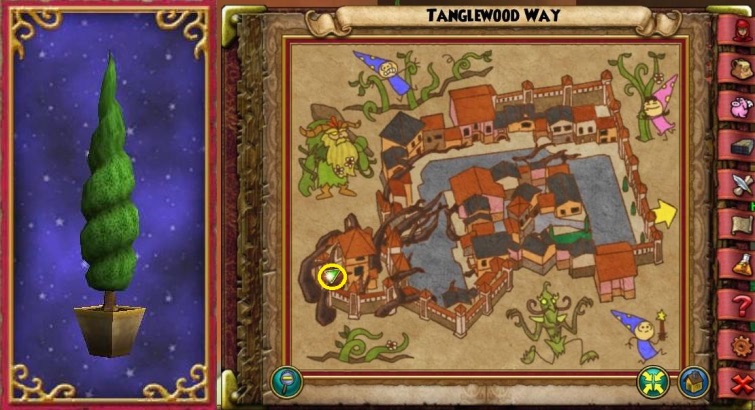
- Description: Don’t get too dizzy staring at it
- Location: Tanglewood Way (behind the tower building)
- Requires: nothing
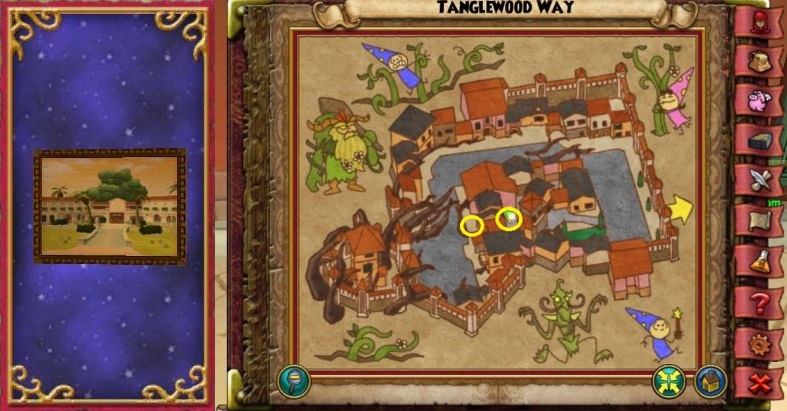
- Description: Right before the plant nation attacked
- Location: Tanglewood Way – Quentin Burble’s House (can be entered from two directions)
- Requires: nothing
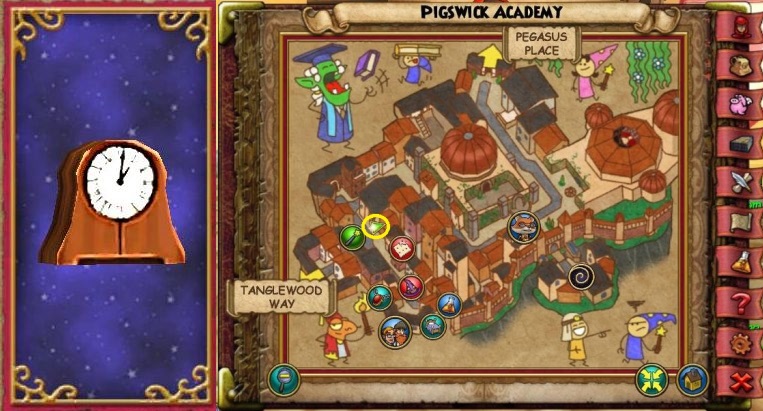
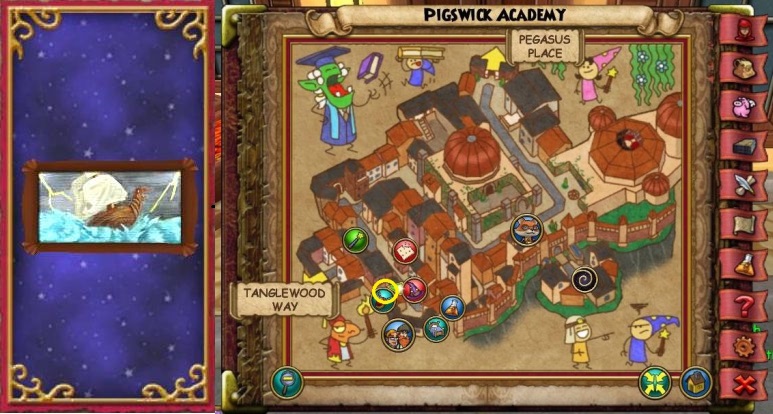
- Description: Tick-tickity-tock
- Location: Pigswick Academy – School of Equilibrium (on the professor’s table)
- Requires: nothing
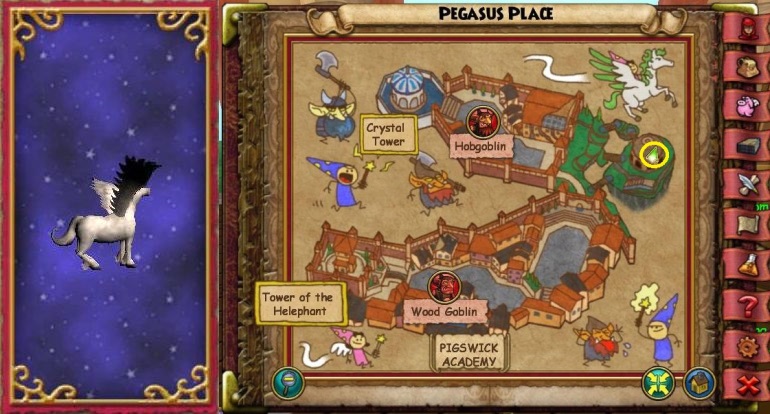
- Description: Proud and stuck up!
- Location: Pegasus Place (in the stables)
- Requires: nothing
Darkmoor
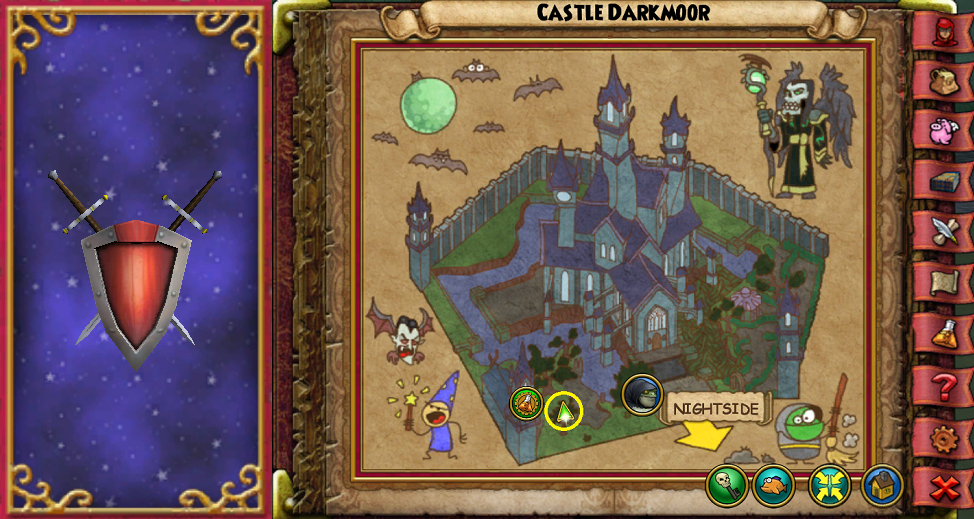
- Location: Castle Darkmoor – Graveyard (next to throne, at end of instance)
- Requires: Full Graveyard instance
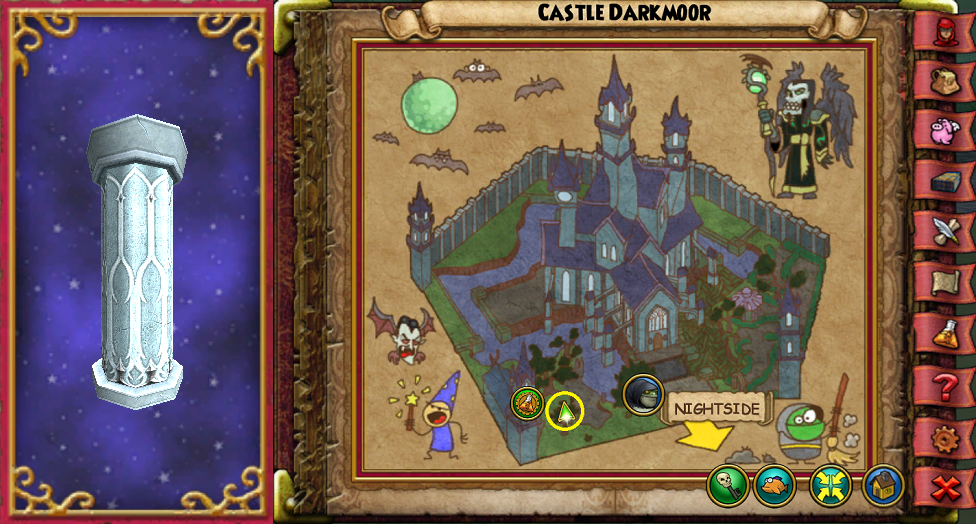
- Location: Castle Darkmoor – Graveyard (next to building)
- Requires: nothing
Gauntlets
- Location: Sinbad & The Iron Sultan Gauntlet (at end of dungeon)
- Requires: Full instance
- Location: Unforgiven Dead Gauntlet (at end of dungeon)
- Requires: Full instance