December 8, 2014 November 12, 2023

Advanced Exalted Level 100
Ice PvP Guide
By Alexander LionHeart
Ice has an arsenal of gear and spells to unleash an icy force both foul and fair in the arena. This guide will list not one, but TWO strategies that you may use in the arena to dominate the playing field, and show the others that ice can be the most powerful class.
~Born of cold and winter air…~
Let’s start with the most important factor of Frozen Heart, gear. This chart shows a majority of gear dropped in the dark depths of Darkmoor.
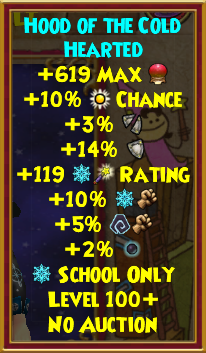
The Hood of the Cold Hearted is an amazing hat that grants a tremendous stat boost in everything, (after all cold hearted is similar to a frozen heart, right?)
Dropped by: Malistaire the Undying in Darkmoor
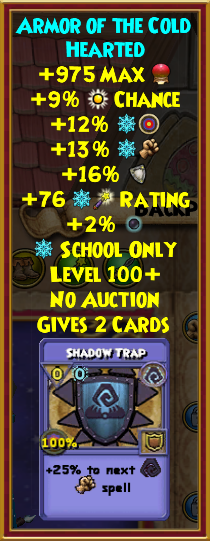
The Armor of the Cold Hearted without a doubt is a phenomenal robe that grants a massive plethora in ice stats.
Dropped by: Malistaire the Undying in the Darkmoor
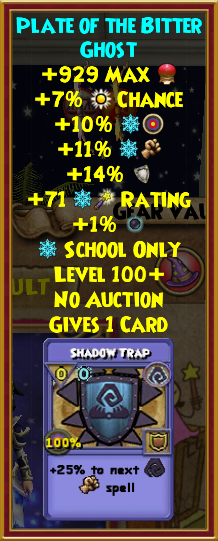 The Plate of the Bitter Ghost is an alternative from Armor of the Cold Hearted if you have yet to receive it.
Dropped by: Shane Von Shane v2.0 in Darkmoor

Unseen Lord’s Chill Armor is a great alternative to these robes due to the extra Armor piercing and Block. These can add a good amount of stats for a small defensive, yet offensive side. (Please note I would recommend Armor of the Cold Hearted if you have yet to receive it).

Shoes of the Cold Hearted gives a tremendous boost in stats. Having critical block, resistance, ice damage, and more stats compared to the boots ice has been given in the past.
Dropped by: Malistaire the Undying in Darkmoor

Wolf’s Lancet of Shivers give a great amount of health compared to other athames, letting you become an eye catcher with tremendous health.
Dropped by: Yevgeny Nightcreeper in Darkmoor
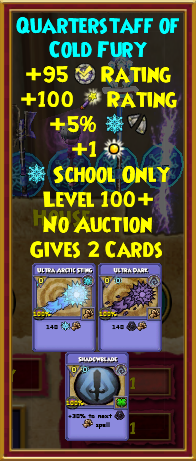
The Quarterstaff of Cold Fury can act as a great wand, as it grants wonderful stats for a dropped wand.
Dropped by: Malistaire the Undying in Darkmoor
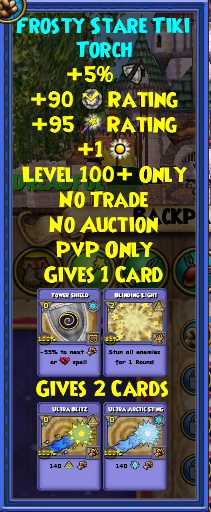 Frosty Stare Tiki Torch is a very interesting wand, granting a massive boost in stats, and giving a few extra cards that can be more useful than Shadow Blades.
This is available in the Islander’s Hoard pack in the Crown shop for 399.
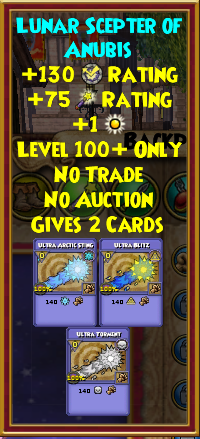 Lunar Scepter of Anubis is a great wand that gives a great amount of Critical Block, and Critical.
Available in the Pharaohs Hoard Pack in the Crown shop for 399.
 Amulet of Neverwhere adds a grand amount of stat boost to your main stats with the added resist and armor piercing. The extra Sleet Storm can come in handy when you have a shrike, or fighting an opponent with low resistance.
Dropped by: Shane von Shane’s first fight.
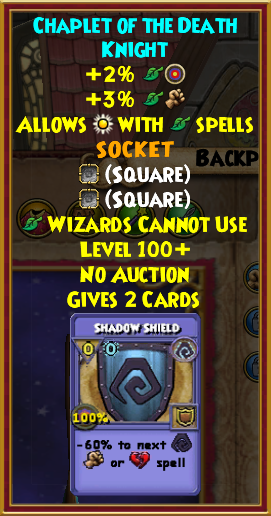 Chaplet of the Death Knight is a useful Life Mastery amulet since it grants life accuracy. If you don’t have this, you may use the Exalted Life Amulet, or Life Mastery Amulet.
Dropped in the Golden Key chest in Darkmoor Part one.
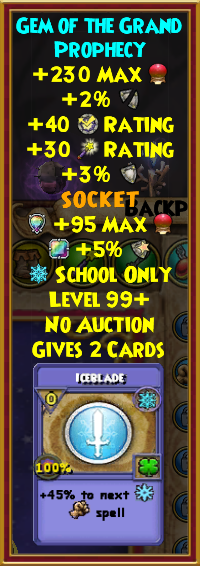
Gem of the Grand Prophecy can be useful as it gives you an added 40 critical block.
Dropped by: Morganthe.
 The Amulet of Divine Influence can be very useful with its added stat boost and critical block. This amulet will always remain a true staple in the game, as one of the best amulets in the game.
Dropped by: Hades the Unseen in Tartarus.
 The Duelist’s Daredevil Ring is very good as it grants 6% Armor piercing, which will help you reach a large amount of Armor piercing for an ice.
Sold for 5000 Arena tickets.

The Band of the Cold Grave ring, although does not give universal block, can give you an incredible amount of health, you can potentially hit 7000 health with this ring.

The Village of Carpathes Case is a very useful deck, as it gives you 50 more health than a normal deck, more critical, Shadow Resistance, and a White pip.
Crafted.
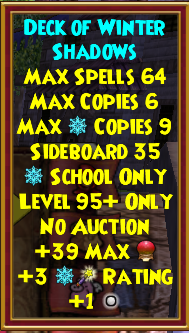 The Deck of the Winter Shadows can act as an alternative, as the extra white pip at the start of combat will be helpful.
~Strike for love and strike for fear…~
Your pet will always be your trusty friend to give you a boon in stats. Choose talents wisely, here are an example of pets that you may use if you have these talents mixed together on a pet.
 CHECK THIS:‚
Other talents that can be useful for this strategy:
Ice Striker + Critical Hitter + Critical Striker
May cast Balefrost
Other pets that can help in this strategy
Rain Beetle
Lord of Winter
~There’s beauty and there’s danger here…~
A deck setup, and the perfect gear setup will be crucial to Frozen Heart; However this strategy has not one, but two types of strategies, choose your path wisely.
A Mending Heart
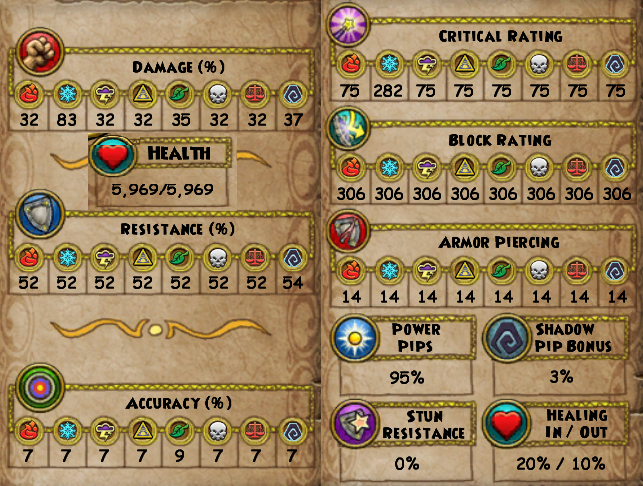
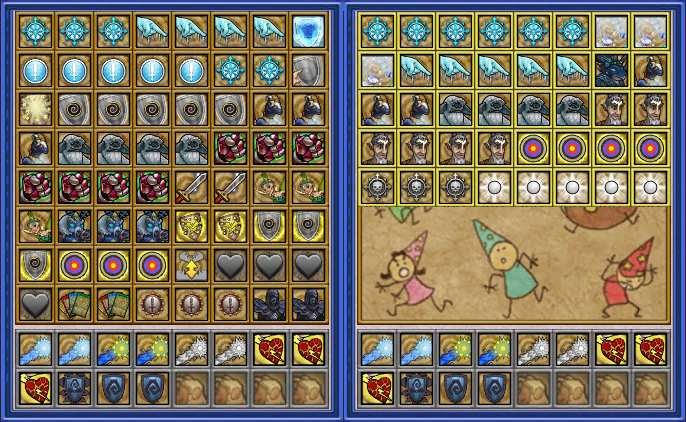
HAT – Hood of the Cold Hearted
ROBE – Unseen Lord’s Chill Armor (recommend Robe of the Cold Hearted)
BOOT – Shoes of the Cold Hearted
WAND – Lunar Scepter of Anubis
ATHAME – Wolf’s Lancet of Shivers
AMULET – Chaplet of the Death Knight (Or Life Mastery Amulet, or Exalted Mastery Amulet)
RING – Duelist’s Daredevil Ring
DECK – Village of Carpathes Case
This Setup will allow a cautious wizard to stay healthy as you can still dish out hits, and maintain healing. The life mastery will help you with casting heals and more.
A Piercing Heart
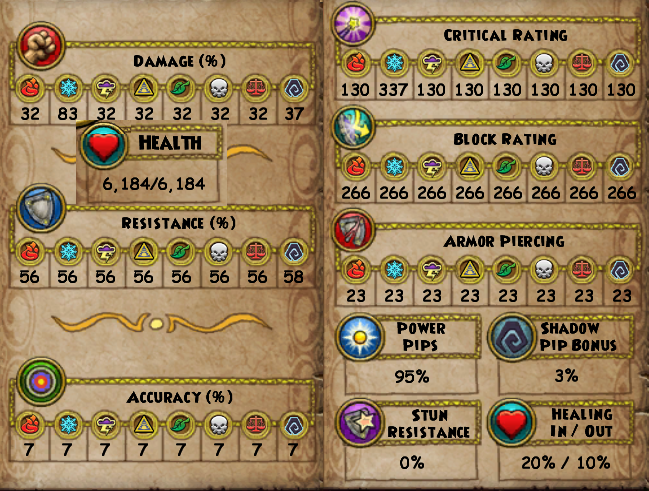
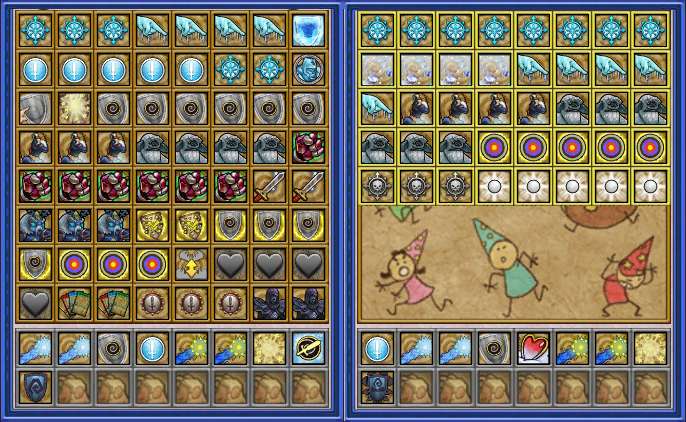
HAT – Hood of the Cold Hearted
ROBE – Unseen Lord’s Chill Armor (recommend or Robe of the Cold Hearted)
BOOT – Shoes of the Cold Hearted
WAND – Frosty Stare Tiki Torch
ATHAME – Wolf’s Lancet of Shivers
AMULET – Amulet of Neverwhere
RING – Duelist’s Daredevil Ring
DECK – Village of Carpathes Case
Although more risky, this setup focuses more on the offensive, allowing you to have a massive amount of armor piercing, resist, and damage. The only drawback is that you are limited on healing.
~Split the ice apart..~
Now for the most important trick, learning combos. First, let’s look at a few spells that will be extremely helpful, and allow you to get your opponent’s head spinning in the end. Be sure to stay defensive at the beginning using Tower Shields and Fortify, until you are ready to execute a combo.
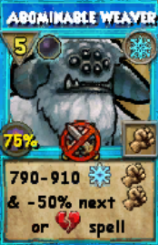
The Abominable Weaver is your main source of damage. This high hitting spell can allow a minimum of 1600 damage, with enchants, and with your damage. The tower shield will help you, as it’ll give you an extra round or more on defending yourself until you prepare for your next hit.
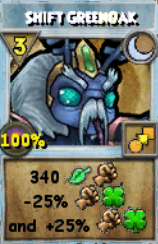
Shift Greenoak acts as a more powerful, trainable Storm Beetle card. This spell, not only can remove Tower Shields and Weaknesses, but can also place a Weakness onto your opponent, and grant yourself a Balanceblade. This spell will synergize well with your combos, and can be a powerful game changer.

Frostbite will be a great spell to peel your enemy’s health until you can execute them with an Abominable Weaver. This spell will also allow the breaking of shields, and also deal extra damage while you prepare.

Granted that you hit with one of these two auras, you can unleash a massive amount of damage with your spells. Keep at least one up and get ready to use it when you know you can execute your combo.
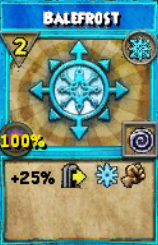
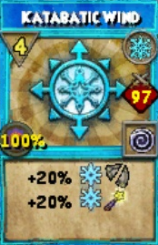
Balefrost or Katabatic Winds will help grant a massive edge in your battle against another wizard. A permanent buff will help you achieve maximum damage output. I would recommend Balefrost frequently and always keep it up, and Katabatic is good against those who stacked Ice resistance.
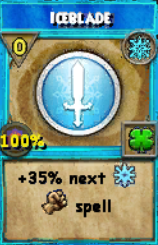
Iceblade will always be a great spell that will be a great combo starter. The extra 40% will be beneficial to achieving maximum damage output.
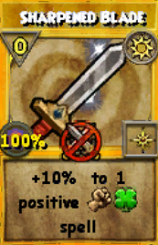
Sharpened Blade will be very helpful as it’ll help boost your blades to their highest effect, including the Shift Greenoak spell.
The many combos, in order from left to right:
The Ice Breaker
Weaver Fever
CHECK THIS:‚
There are many more combos that you can try on your own, do your own sequence, and dominate the arena.
Difficulties against (from Normal-Hard-Difficult-Challenging):
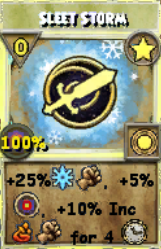
- Fire (Normal): Fire spells normally take a bit to prepare, whereas your combo will be more simple to prepare. If you do however fight a fire that spams DoT spells, they won’t be able to kill you fast enough as you should have over 6500 health. Even if a Fire does Efreet you to interrupt a potential combo, you can still use the Greenoak spell to remove the Efre-eakness. Follow up with a Frostbite if possible as fires do have their own source of Ice shielding. Stick with Infallible instead of Sleet storm, as the extra 10% increased fire damage can be risky, and can turn the tide into their favor. -Use a Mending Heart setup if necessary. CHECK THIS:‚
- Ice (Hard): Fighting ice wizards can put you at a disadvantage, as they can also have access to the Abominable Weaver spell. This can break your combo sequence if they time it right. Another disadvantage is, odds are no one will cast an Ice Global, lowering your damage. Your combos may not fully execute an ice wizard, as they have a massive amount of Health. Play your cards carefully, as you will have to combo your spells perfectly if you want to perfectly kill an ice wizard in one single combo or spell. Keep infallible up to pierce through an ice’s high resist, and slowly lower an ice’s health until they’re dead. -Use a Piercing Heart setup if necessary.
- Storm (Hard): Storms can chunk anyone down until their head is spinning. Trying to complete your combo can be risky if you don’t stay at a defensive at the beginning. Stay at a hard defensive early game until you have enough pips to build up your combo. Once you can get your combo off, you should be able to kill a storm easily. Just be careful as they CAN chunk your health extremely early and remove your blades with the use of Glowbug Squall. -Use a Mending Heart setup if necessary. CHECK THIS:‚
- Life (Difficult): A Life wizard’s healing, and potential to hit high damage can be very irritating, and can drone on until you have no cards left. Prepare for a hit and try to use Doom & Gloom if you choose to pack it. Add a Doom into your combo to ensure that you can reduce a life wizard’s healing, and finish the battle faster than needed. -Use a Piercing Heart if necessary.
- Death (Normal): Death can regain their health from the damage of the collateral damage you applied onto them using Frostbite or other spells. Frozen Armor will be useless in this fight, so instantly discard that. Other than that, treat a death as a fire (Bad Juju and follow up with Shift Greenoak) and you should be fine. -Either strategy works fine.
- Myth (Normal): Although a myth wizard can shred through your defenses from Weaver’s shield using pierce or a double hit, you should be able to execute a combo onto them. Stun Block and Conviction can be extremely helpful as stopping a Medusa stun can drastically turn the tides into your favor. -Either strategy works fine.
- Balance (Challenging): With the amount of versatile spells that a Balance has, such as Mana Burn, it will be hard to build up for a combo. Be prepared for Mana Burn, and try to execute slivers of your combos early. Balance’s early game is weak, but after a few turns, that can change instantly. Be prepared for Mana Burn, and any other spell they dish out at you. Frostbite and Winter Moon are still viable for you in these fights, so keep them handy. -A Mending Heart works if necessary.
Extra tips:
- You can Sharpened Blade Shift Greenoak. If you have treasure cards for it, use it on the Greenoak as an emergency find in your side. A 35% blade will be more useful than a bit more life damage.
- Your amulets will offer you a Shadow Shield card, which will instantly shut down a Dark Nova strategy.
- Winter Moon is still a very good spell, use it to your advantage!
- Storm Beetle pets will also be helpful, as they cost less pips, and potentially pull off a combo easier. The only drawback is that this spell has a good change to fizzle.
Use these tips to your advantage, and unleash a winter’s fury in the arena. Show everyone who’s the real head of class! (As a bonus, can you spot the small easter egg?)
~Beware the Frozen Heart…~