August 6, 2021
Pirate101 Privateer PvP Guide
By Guest Author, Michael
Welcome to a Final Bastion guest post! This time, we are featuring Pirate101 community member Michael’s privateer guide. Note that this Pirate101 Privateer PvP guide assumes you have a very basic knowledge of PvP, including how concepts like movement work. If you do not have this basic knowledge through experience or reading guides, you may not get as much from this guide as you could otherwise.
Finally, this guide is focused on “fair” or Spar chamber PvP. Loadouts that involve broken companions and abilities like Old Scratch, Time Warp, or Fall Trees will not be discussed. The reader should be able to figure out how to use these effectively without assistance.
Without further ado, let’s introduce Michael!
Navigating the Privateer PvP Guide
Practice Points
For Privateer, the best use for your 21 total training points is as follows:
- 9 points into Swashbuckler Trainer: Fast 2, Walk in Shadows, Sneak Attack, Hurl Knife (Sneak Attack, Walk in Shadows, Stabby Weapons 1, Fast 1, Rough 1, Dodgy 1, Stabby Weapons 2, Fast 2)
- 5 points into Witchdoctor Trainer: Ghostwail, Spooky 2 (Ghostwail, Staffy Weapons 1, Spooky 1, Staffy Weapons 2, Spooky 2)
- 5 points into Buccaneer Trainer: Smashy Weapons 2, Mighty Charge (Mighty Charge, Smashy Weapons 1, Big Choppy Weapons 1, Armored 1, Smashy Weapons 2)
- 2 points into Secret Trainers (Lost Hoplite, Kurotadori): Relentless (Smashy Weapons 2 required) and Witch Hunter (Staffy Weapons 2 required)
Why these abilities?
Now, it wouldn’t be right of me to show you what powers to train, without telling you why you should train them.
Fast 2
The reason you should train Fast 2 for Privateer (and for every class) is so you are able to catch and attack Swashbucklers, who have Fast 3 already trained, or others who would have Fast 2 trained. If you do not train Fast 2 on Privateer, Swashbucklers (and other classes) will simply be able to run away from all of your buffs, waiting them all out. This is obviously not good for you, so by training fast 2, you can prevent them from running away for too long. Swashbucklers will still be able to out-distance you, as their movement is 7 (yours will be 6.5 with fast 2), but it is A LOT better than 7 movement vs 4.5 movement (the base distance).
![]()
Walk in Shadows + Sneak Attack, Hurl Knife
The reason for training these powers is pretty simple: a free attack to use during the late game and a 3 turn hide to match with one of your opponents hides (typically your opponent’s 3 turn hide), so that you can avoid a hidden attack. Currently, I have Kraken’s coils trained on my Privateer, but after thinking about it for a while, Hurl Knife would be a more useful thing to train. This is because you can cut your opponent’s movement in half for 5 turns, allowing you to run away to wait out their buffs, or keep them from running away from your own. (I must clarify however that it should not be the card you should need to use every match, I just believe it is more useful in general than training Kraken’s Coils).
Ghostwail + Spooky 2
Spooky 2 is perhaps the most important/useful thing you can train as a Privateer. As a Privateer, one of your greatest assets is your large amount of heals. Training Spooky increases the amount that your Single and Group heal will heal you for, which is obviously very beneficial. Not only that, Spooky increases your damage from cards like Big Guns and Ghostwail, which are great sources of damage in the early game. It also increases damage to your Assassin’s Strikes’ Bleeding (used on gear), and your Soul Shroud damage, which I’ll get into later. I should also mention it increases the amount your Valor Armor protects. With base Spooky, the valor armor protects 1190, but with Spooky 2 (and Naturally Spooky as your origin), it protects 1430 (1370 without Naturally Spooky). As you can see, it is a very useful thing to train as it buffs several things that Privateers will use in every matchup.
![]()
Staffy Weapons 2 + Witch Hunter
Staffy Weapons 2 is a requirement to train Spooky 2, but it is also handy for its own reasons. Staffy Weapons 2 will increase your weapon power by +8 for the Haywire Warmage Regalia, which is one of the better weapons for Privateer. It also allows you to train Witch Hunter, which is a very powerful talent to have trained vs Witchdoctors. Witch Hunter, it halves incoming damage from Magic attacks like Ghostwail, Mojo Storm, and Soul Shroud, provided you are standing right next to the pirate.
Mighty Charge, Smashy Weapons 2 + Relentless
Mighty Charge is a useful attack for the late game, as it has double movement, which can be used to catch up to your opponent who has run away, or simply as a finishing blow. Smashy Weapons 2 is mostly to train Relentless, however it can also buff weapons such as Haywire Armada Halberd, which is another strong weapon for Privateer. Relentless is a simple yet useful talent. It’s main usage is to simply increase the amount of damage you can do per turn. With a Relentless pet, you can have relentless 2, which gives you 3 extra potential hits per attack. Now, your accuracy as a privateer is pretty bad, but with buffs like Espirit or Call to Arms, you are able to land those attacks much more reliably.
![]()
I should mention here that you can obviously train differently than what I have shown above. For example, you can train Kraken’s Coils like I did if you prefer to use Buccaneer Companions in your setup like Baar, Temujin, or Goronado. You can also choose to Train Barricades which is 4 points (using the leftover point for maybe something like Wind Spirit), in case you don’t want to train Relentless, which is understandable since Privateers have bad accuracy.
That is a short rundown of Training Point usage. Obviously, just telling you what to train offers no real advice, so hopefully with the explanation, you’ll better understand why those are optimal things to train for PvP.
Companions
Privateer has access to the most companions in the game naturally through Questing. However, if you do PvP, you’ll notice that some of these companions are better suited for it than others. I’ll be listing the best companions for PvP here.
Free To Play
Commander Emmett
Commander Emmett is a very useful companion in PvP. His slows offer great protection against the more aggressive classes like Buccaneer and Swashbuckler, as it hinders their movement and gives you time to use your buffs and set up. He has a 50% slow that lasts 3 turns, a 33% slow that lasts 5 turns, and a 25% slow that also lasts 5 turns. You will need to understand the movement system and the various ranges for companions in order to accurately calculate how far each companion can move after being slowed. Emmet also comes with a Super Strike (ranged) and a ranged attack called Musketeer’s Mettle, which decreases the target’s Will and Weapon Power by 50% for 3 turns. Last but not least, Emmet comes with a free group heal, Regroup, which is excellent for healing your other companions that may be damaged.
Emmet’s main setup has 2 options. Either Overwatch 3 Double Tap 3 Return Fire 1 or Overwatch 3 True Grit 3 Return fire 1. I much prefer using Double Tap 3 myself, to maximize his damage output, however True Grit 3 can be more useful in Team PvP. I would not recommend him to use vs Musketeer’s in 1v1, as he has low agility and will get shredded by Chantal because her range is superior (5, compared to Emmett’s 4). His talents are as follows: Accurate 4 Dodgy 4 Rough 4 Tough 4 Spirited 1. This is to maximize his survivability, which I think is better than giving him Spirited 4 as he does not have Burst Fire.
El Toro
El Toro isn’t a very popular companion in Privateer PvP, as most players will look at him and go “I already have one Espirit, I don’t need another”. While it is true you already have one and do not need El Toro, bringing him against a Swashbuckler or Buccaneer can provide a substantial advantage. The extra esprit can be used to deal a lot of heavy damage to a Buccaneer or Swashbuckler, as an El Toro buffed with Espirit will easily outmatch an unbuffed pirate or one of their unbuffed companions. It is worth noting however that his damage isn’t as reliable vs Musketeer companions, which is a popular choice to bring vs Privateer, as they have low agility.
El Toro has 2 main setups. Either First Strike 3 Relentless 2 Riposte 1 (more popular) or First Strike 3 Riposte 2 Relentless 1. That choice comes down to preference. His talents are as follows: Tough 4, Accurate 4, Dodgy 4, Rough 4, and Agile 1. This talent setup holds for ALL swashbuckler companions.
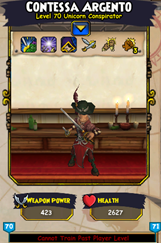
Contessa Argento
Contessa Argento is a staple companion on all 5 classes. Her 5 turn hide, Gallant Defense, and Back Stab are all extremely useful powers to have. Using her hide and Back Stab together is often a very easy 1500-1600 damage (provided the target doesn’t have first strike 3) and can be coupled with buffs such as Battle Zeal and Enduring Discipline to increase her damage even more. Her Gallant defense is also very useful against Swashbucklers and Buccaneers, as you can guard your other companions while having them focus on only your Contessa.
Her main setup has 2 options. Either First Strike 3 and Riposte 2, or First Strike 3, Relentless 1, and Riposte 1. That choice is based on preference. Her talents are as follows: Tough 4, Accurate 4, Dodgy 4, Rough 4, and Agile 1.
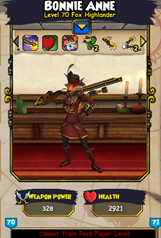
Bonnie Anne
Bonnie Anne is a companion whose best usage is against Musketeers or Witchdoctors, as well as Team PvP. As a Privateer, you have companions like Commander Emmett, El Toro, and Contessa to use against Swashbucklers. Furthermore, since Bonnie Anne won’t last very long against a Buccaneer because of her low strength, her best usage is against the ranged classes. By giving her the setup Quick Draw 3, Burst Fire 2, Double Tap 2, Return Fire 1, you make her as anti-musket as possible. She can be used to counter a musket’s best companion, Chantal, snipe Ratbeard from a distance, and even damage the enemy pirate as well. She comes with ScatterBlast, which resembles Canister Shot trained by Musketeers, but it reduces dodge by 25. Her Second Wind is also very useful, as it can heal up to 25% of the target’s max HP. She also comes with Stock Assault, which is not as great, but can be used effectively in rare situations as a guaranteed finishing blow on a critically injured unit.
The main setup for Bonnie Anne is the Epics listed above, along with the talents: Tough 4, Rough 4, Agile 4, Accurate 4, Dodgy 1 to maximize her damage output. This setup holds for ALL Musketeer companions.
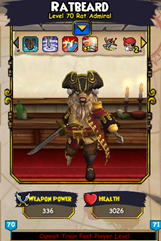
Ratbeard
Ratbeard is a great asset to use against Buccaneers, and a decent companion choice vs Swashbucklers. His main usage for fighting Buccaneers is to stop their charge with Hold The Line 2 and Repel Boarders 3 (giving him First Strike 3 as well for maximum defense). He comes with Super Strike (melee) which is a simply a nice source of damage. Buccaneer’s Smash, which reduces the target’s accuracy and agility by 50% for 3 turns. It can be used in conjunction with Contessa for a combo attack (low accuracy and agility means higher crit and more ripostes for Contessa). He also has his own Triton’s Song, a nice bit of defense, and Sweep The Decks, a knockback card that can be used in a variety of situations.
The main setup for Ratbeard is the epics listed above. Talents are best chosen as: Dodgy 4, Accurate 4, Tough 4, Rough 4, and Strong 1. Dodgy 4 maximizes his defense and keeps him alive for as long as possible.
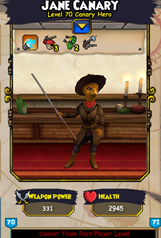
Jane Canary
Jane Canary is an excellent companion to use against Muskets as she can train True Grit 3 and has the same range as Chantal. Her main usage is against Musketeers because of her true grit, and vs the melee classes there are simply better companions to use in her place. She comes with an attack called Musketeer’s Mastery, which is an Epic Strike (ranged) that reduces the targets Will by 25% for 3 turns. Not extremely useful, but a guaranteed critical is a guaranteed critical.
Her Main setup is Overwatch 1, Double Tap 2, True Grit 3. Talents: Tough 4, Rough 4, Accurate 4, Agile 4, Dodgy 1.
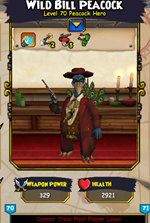
Wild Bill Peacock
Wild Bill Peacock is also a solid companion to use against Musketeers as he can train True Grit 3. Although his range is worse than that of Jane Canary, he can train Burst Fire. Wild Bill also comes with Musketeer’s Mastery.
His main setup is True Grit 3, Burst Fire 2, Double Tap 1. Talents are Tough 4, Rough 4, Accurate 4, Agile 4, and Dodgy 1.
Bought Companions
Bought companions are a big part of PvP, as companions that you buy can be significantly better than ones you get from the story. There are a whole bunch of companions you can buy from the crown shop, but I will only be covering the ones I have bought, and what I think their uses are for PvP. Note that you should purchase these companions at max level to take advantage of their recruiting at higher levels, if at all possible.
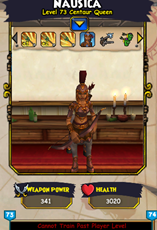
Nausica
Nausica is one of the best companions in the game. I won’t be able to fully explain her usage in this guide, but I will give a basic idea. The unique thing about Nausica is that she’s a musketeer that can move and attack at the same time. Her “melee” attacks are still considered ranged hits, so they will trigger ranged counter-epics like Quick Draw and True Grit. She comes with 4 powers: A Super, Mega, and Epic Strike (all ranged), and Centaur’s Charge, which is a basic attack with double movement. All of these attacks (along with her 7 base movement) make her a very powerful offensive unit to have. She’s best used as an anti-musketeer companion, as she comes with True Grit, but she is also very good against Swashbucklers because of her high movement. The only class I would not recommend her against is Buccaneers because of her low strength.
She has 3 main setups. True Grit 2 Burst Fire 2 Double Tap 1 Quick Adjust 1 (the most popular), True Grit 3 Burst Fire 2 Quick Adjust 1 and Burst Fire 2 Double Tap 2 Quick Adjust 2. These come down to preference but the one I prefer is the first setup. Her talents are as follows: Tough 4 Accurate 4 Rough 4 Agile 4 Dodgy 2.
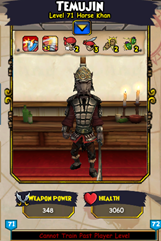
Temujin
Temujin is a great companion to use vs Buccaneers and Swashbucklers. Although he’s a little slow (4 movement), he hits like a truck and can one round any swashbuckler or musketeer companion. He comes with a great selection of epics and 2 guaranteed criticals: A Super Strike (melee) and Buccaneer’s Smash, a 50% reduction to accuracy and agility for 3 turns. He’s just an overall very solid offensive companion for fighting the Melee classes.
His main setup is Vengeance Strike 3, Relentless 2, Blade Storm 2. Talents: Tough 4 Rough 4 Accurate 4 Strong 4 Dodgy 1 to maximize damage output.
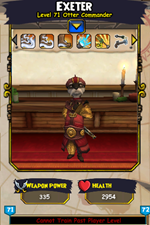
Exeter
Exeter is the counterpart of Commander Emmet, and he is very similar to him, with a few key differences. Exeter does not come with the group heal that Emmet has, but Exeter’s Class is changed from Privateer to Musketeer. This means he is much better suited to run True Grit 3, as he will not die instantly to critical chains from other musketeers. This makes him a great unit to run against Musketeers. You can also pair him with Emmet to run twice the amount of slows, which is mainly seen in Team PvP.
He has 2 main setups. Overwatch 1 Double Tap 2 True Grit 3 and Overwatch 3 True Grit 3. Talents: Tough 4, Rough 4, Accurate 4, Agile 4, Dodgy 1.
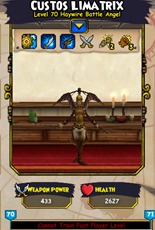
Haywire Battle Angel
The Haywire Battle Angel is not a companion that can be easily recruited. You have to get it from opening the Ashes of The Armada booster pack, and it’s a very small chance you will obtain it. I was lucky enough to get my hands on one, but I would not recommend spending money to get it. The battle angel comes with Haywire Surge, Haywire Shot, and Haywire Strike. The Haywire Surge is a move that removes one buff from any target up at 5 range (the one that is “lowest” when you mouse over their name), which is very useful for combos that remove shields to open up an attack. It can also simply remove buffs like espirit or battle zeal for the same reason. Haywire shot is a devastating ranged attack that does a very high amount of damage. It also pushes back the target, but has a small range of 3. Haywire Strike is a somewhat reliable attack, doing typically around 500 damage. However, it can do upwards of 1000. Overall, the battle angel is a very solid companion with very useful powers for PvP.
Its main setups are First Strike 3 Relentless 2 Flanking 1, First Strike 3 Riposte 2 Flanking 1, and First Strike 3 Relentless 1 Riposte 1 Flanking 1. This is based on preference. Talents: Tough 4, Accurate 4, Rough 4, Dodgy 4, Agile 1.
Gear Setup
In the current meta, Privateers only have a couple different pieces of gear that can be switched out for others. Almost all of it stays the same throughout all 5 matchups. I will be showing the BEST gear setup, but keep in mind that using this setup won’t guarantee a win, just as using a different setup won’t guarantee a loss.
Hat
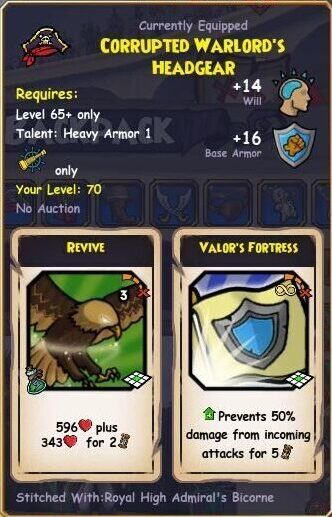
Corrupted Warlord’s Headgear
Robe
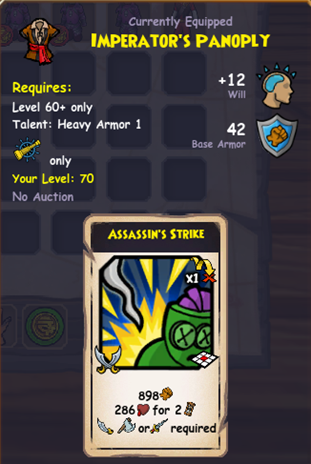
Imperator’s Panoply
Boots
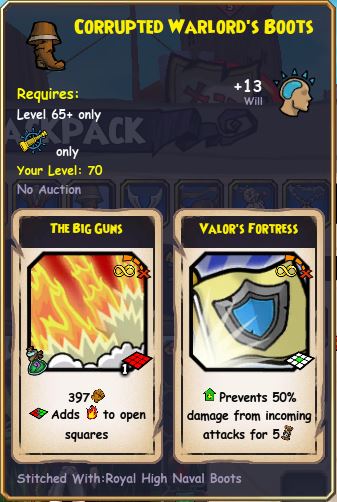
Corrupted Warlord’s Boots
Weapon
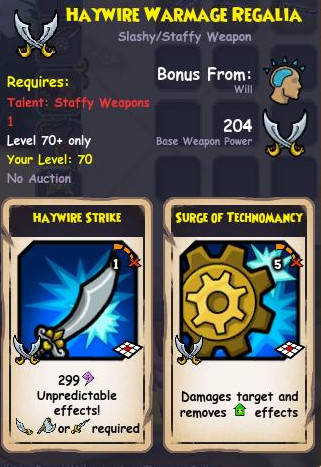
Haywire Warmage Regalia
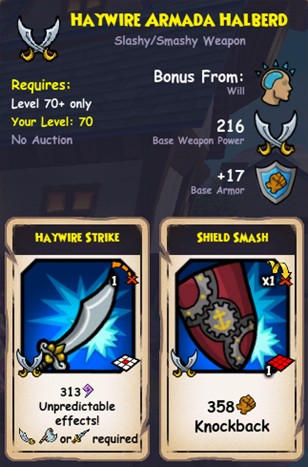
Haywire Armada Halberd
Eyepatch
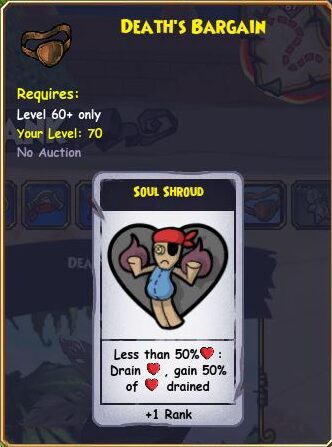
Death’s Bargain
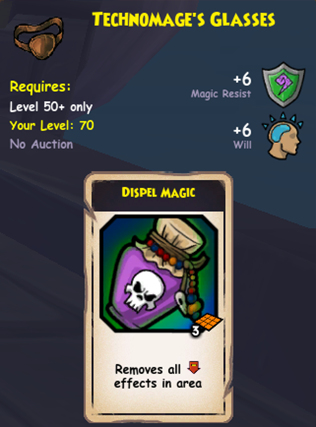
Technomage’s Glasses
Totem
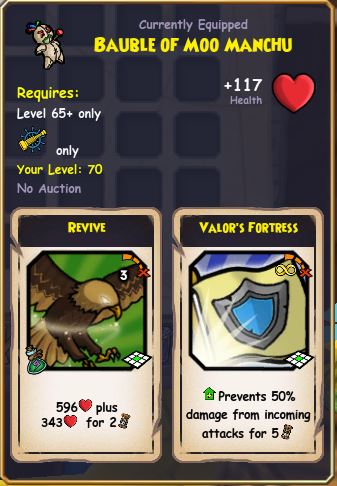
Bauble of Moo Manchu
Charm
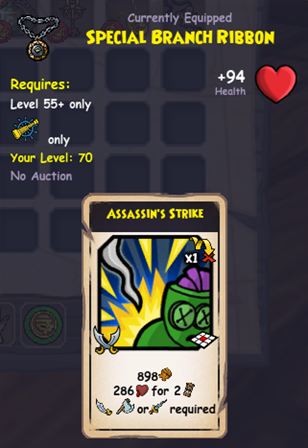
Special Branch Ribbon
Ring
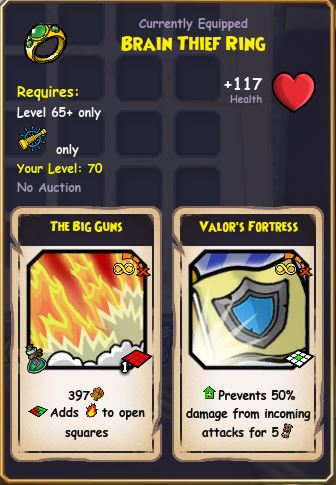
Brain Thief Ring
Pet
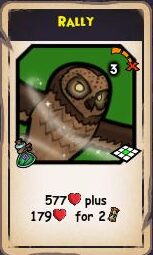
Here is the pet that I used in most of my matches on privateer:

Why This Gear?
Hat, Robe, Boots, Totem, Charm, Ring: The explanation for this gear is fairly simple. The reason this is considered the best gear for Privateer is because it gives the maximum amount of Valor’s Fortresses while also giving you enough attacks to be able to kill an enemy pirate. The Robe and Charm grant Assassin Strikes since the privy Moo gear in those slots doesn’t give Valor’s Fortress.
Weapons: Haywire Warmage Regalia is the one of the best weapons for Privateers and is very easily obtained. It gives Surge of Technomancy, which is a ranged attack that purges off the first (lowest) buff your opponent put on. It can be used tactically for removing shields or buffs like Espirit for combo attacks or to win the Resource War by sniping a powerful protection buff. It also comes with Haywire Strike, which is a nice attack for the Late Game. Weapons such as Summer, Spring, or Fall Champion’s Spyglass would be better than the regalia, but because these are much harder to get (since you have to get to Champion rank), the regalia is still your best bet for PvP (and these champion weapons are often banned form competitive play).
There is one more option for Privateer weapons. You can use the Dark Sea Dagger and Shield from past Winters’ Ranked PvP season. This grants an Assassin’s Gloom, which is SLIGHTLY better for Privateer than the Regalia (which grants Surge and Haywire Strike), but because the Regalia is so much easier to get, I recommend simply using that. The other option besides the Regalia is the Haywire Armada Halberd, which is worse. Although it gives 12 more weapon power, Surge is a much better power to have than the Knockback card given by the Halberd.
Soul Shroud: As for the Eyepatch, Soul Shroud is simply amazing. Every time you drop below half health, you can hit any adjacent unit next to you for up to 800 damage with a super roll (400 or so if they have Witch Hunter), and then you heal back half of the damage dealt. Important note: While a Valor’s Fortress will block the incoming damage by the same amount as Witch Hunter (50%), Witch Hunter halves the heal back as well.
Technomage’s Glasses: Dispel Magic is a card that can actually be quite useful for Privateer’s in certain matchups. There are a variety of uses for it, but there are 2 big ones. The first is to get rid of Assassin’s Shroud, which blocks heals for 5 turns. This is a negative effect that Swashbuckler’s can place on you. The second usage is to dispel Uncanny Shot. This is most commonly used by Hybrid Buccaneers for the deadly Uncanny -> Reckless Frenzy combo attack. Against these types of Buccaneers, I would say that Dispel Magic is slightly better than Soul Shroud. Dispel Magic vs Swashbucklers is SLIGHTLY worse than Soul Shroud (the free damage is just too good), however it is certainly a viable option. Again, Dispel’s main purpose is to counter Uncanny Shot or Assassin’s Shroud. If the opponent is bringing neither, stick with Soul Shroud.
Pet Grants
Pets are a very important part of PvP as their powers granted to you can be very helpful if not necessary to win a match. Privateers need 2 basic things for their pet. 1. Grants Elusive and 2. Grants Brutal Charge. All other grants are considered “bonuses”, but some things you will want on your pet are grants like: Grants Kraken’s Lament, Grants Assassin’s Gloom, Grants Rally, Grants Soul Reaver, Grants Turn the Tide, Grants Relentless, and Grants Repel Boarders.
 Why These Pet Grants?
Elusive: Elusive is borderline essential for Privateers. Without Elusive 4, you run the risk of being killed by Buccaneers who have Turn the Tide 3. You’ll also be able to be hit by Buccaneer companions with Turn the Tide 2, and Swashbuckler’s who have Tide 2 granted to them through their pets or through gear. Now, you CAN run a pet without elusive vs Swashbucklers (so long as they don’t have Turn the Tide 2), but it is still MUCH safer to run a pet with Elusive on it.
Brutal Charge: Brutal Charge is an extremely handy card to have as a Privateer. It is useful for every matchup, but in Particular against Buccaneers. Having an Accuracy reduction means you can walk into Hold the Line 3 without automatically dying. This is still risky, so you’ll have to do it at the right time (don’t run into Hold the Line 3 and reduce them while you aren’t shielded and they have a Whale’s Might on, you will just get clobbered). But having Brutal Charge means that you can go on the offensive and put the match in the direction you want it to go. It is also useful against Swashbucklers to catch up to them or simply reduce their accuracy for a combo attack with Contessa or El Toro. It can be useful against Musketeers and Witchdoctors as well.
 Kraken’s Lament: Pretty Straightforward, just an extra 50% shield.
Rally: Also straightforward, just an extra heal.
Soul Reaver: Extra attack for the Early Game.
Assassin’s Gloom: This is an uncommon grant that you’ll only really see at the top level. Assassin’s Gloom is one of the poisons Swashbuckler’s get (205 damage every turn for 5 turns (with Spooky 2)). Having it as a privateer can be extremely beneficial. With the poison, you can place it on an opponent, make them use a Valor’s Fortress, then use Surge of Technomancy to remove the shield. It is also a great waiting move. Let’s say you use a Valor’s Fortress and the opposing Swashbuckler then hides. You can poison them to deal them damage while they are waiting out your shield. There’s a couple more situations where it’s nice to have, but those are 2 of the big ones.
 Turn the Tide: Turn the tide is a very common trait on pets, and is very useful. Once you’re below half, you get 25% more damage. Just very beneficial for a privateer since they have low damage.
Relentless: You will want Relentless on your pet if you are training Relentless according to the training point guide above, as relentless 2 is a lot stronger than relentless 1. It’s a good way of dealing extra damage to your opponent or their companions.
Repel Boarders: Repel Boarders 3 is not necessary, but it is very useful when fighting Buccaneers, as you can stop them from walking into your Repel Boarders 2 and getting a lot of damage while you’re above 50% HP. With Repel 3, you decrease their accuracy, nerfing their damage considerably. It’s also useful for protecting companions as you can keep them behind your pirate, then anyone who wants to attack will get reduced first, causing them to miss. In these cases, your opponent would have to use a guaranteed hit on your companion, which is always good for you.
Companion Selection and General Playstyle
Privateer’s main advantage is their high amount of heals, shields, and their multitude of buffs. I won’t be able to list moves for the entire fight for any of these matchups, so I will just give a basic rundown of the Early, Middle, and End game (if it’s reached). I will tell you certain strategies to employ and key things to avoid in these matchups as well.
Below is a list of companions I would use in the 5 different matchups. The companions are already listed in battle order.
Privateer vs Swashbuckler
Free to Play: Commander Emmet, El Toro, Contessa Argento
Bought Companions: Commander Emmet, Contessa Argento, Nausica
Swashbuckler In-Match Strategy
Early Game: In the early game, you are basically going to rush them as fast as you can. If they use Black Fog, try to set up a defense as fast as possible. If they don’t and try to spread out to reduce bomb damage, you can continue to bomb and move up your companions, preparing for an attack. Your first target should be their pirate, Fan Flanders, or if they bring them, Bonnie Anne/Nausica. In the case that you are second, and they immediately Black Fog, set up your defense as quickly as possible by using Contessa’s Gallant Defense, and prepare to corner. If you have Commander Emmet, use Emmet’s medium or max slow on either the Pirate or one of their slower units like Bonnie Anne.
Middle Game: If the middle game is reached properly (by both sides), it will be your pirate vs their own in a 1 on 1 clash. Simply do your best to survive their onslaught and counter their tactics. Swashbuckler’s will typically employ their Assassin’s Shroud at this stage of the game, hoping to finish you before it moves to the End Game, where you’ll have the advantage. Make sure to keep a Valor’s Fortress in your hand at all times and to not waste shields. If they try to run away to wait out your shields, employ your Brutal Charge to go on the attack. There isn’t a whole lot that I can add here, but remember to really look at what your opponent is trying to do, and maintain your resources as best you can.
Late Game: If you have survived this long, you should be up on resources, and the rest is just chasing them down correctly to finish them off with your Assassin Strike(s). Make sure to have your 3 turn hide ready, as it will come in handy for blocking theirs.
Things to Avoid: During the Early Game, you will want to make sure that their companions cannot reach your own. Keep it to where yours can attack them but not vice versa. You can employ slows here to make that possible. Do not use shields on companions AT ALL until you have properly learned how to manage your resources. During the Middle Game, you will want to be wary of Assassin’s Shroud. Keep note of how many attacks they have used and figure out what they’re trying to do. Keep trying to threaten them by being aggressive and make them use their powers. Of course, make sure you are properly shielded before attacking, otherwise you will easily die. During the Late Game, make sure that if you’re going to attack, you will either survive the next round or will kill that round. This can be said for Early and Middle game too.
Privateer vs Musketeer
Free to Play: Bonnie Anne, Jane Canary, Wild Bill Peacock
Bought Companions: Exeter, Bonnie Anne, Nausica
Musketeer In-Match Strategy
Early Game: Same as Swashbuckler, start off by attacking with bombs and moving up your companions. They will try to move around and set up, so give them no breathing room. Your main target will be their pirate or Chantal. In this match up, shielding companions is practically necessary, so start by shielding one at a time while also moving them up to attack. By the time you’ve reached them, at least 2 of your companions will be protected and able to easily beat theirs. If you are second or just don’t feel like rushing, you can always take it slow by bombing and buffing slowly, hoping for a weakness in their structure for you to attack. Some Musketeers might bring Exeter, which will greatly hinder your ability to rush. If this is the case, go with the second option of slowly setting up and buffing yourself to engage in an attack.
Middle Game: If you have used shields on your companions and are ready to engage the enemy, start to focus on one unit at a time. Be careful of their bombs and try not to get yourself trapped. Your True Grit companions should be able to beat their own, but never be scared to use your Group Heals or your Valor Armor if they start taking heavy damage. You can also move them back for a Revive. Again, look for what they are planning and avoid their traps as best you can. This will take practice to truly master, as it’s a very hard matchup without bought companions.
Late Game: If you have successfully won the companion war, you can start to use your remaining shields on your pirate and begin attacking theirs. It should be a fairly simple game from here. Just don’t get too low, and wait for a chance to assassin.
Things to Avoid: Don’t be afraid to heal or shield your companions. If you do not win the companion war, this fight will be almost impossible. Keep your companions alive up as best you can. Don’t get trapped in their bombs, and try to maintain pressure on a single target at a time. Make sure not to use too many resources on your companions, as you will need your own for the Late Game.
Privateer vs Buccaneer
Free to Play: Ratbeard, El Toro, Contessa Argento
Bought Companions: Ratbeard, Temujin, Contessa Argento
Buccaneer In-Match Strategy
Early Game: During the Early Game, a Buccaneer will be trying to rush you as quickly and effectively as possible, so rush them right back. Get your space in the center of the field, and start an attack on their open companions. If they bring a Bonnie Anne, target her first. Otherwise, go for Peter Quint. Your best bet will be to start an attack using Battle Zeal, to overwhelm them. Again, try to eliminate the Bonnie Anne as best you can, by finishing her in one shot. If you aren’t able to successfully attack, you will need to focus on defense and try to wait for your chance. Consider putting Focus Fire on the first page for the express purpose of killing Bonnie Anne.
Middle Game: If you have managed to win the companion war, this should be a somewhat straightforward game. Most of your damage will come from using Assassin Strikes for the bleeding, and the damage from Soul Shroud. Make sure not to leave your pirate open, and try to open up a Brutal Charge attack. At this point of the game, it’s just about managing resources and keeping them under pressure the best you can.
Late Game: During the late game, you will both be almost out of powers. At this point however, you should be slightly up on resources and have the advantage. Wait for your chance to strike, and don’t get careless. Buccaneers are your hardest matchup aside from Musketeers, but if you can play to your own advantages, you should be fine.
Things to Avoid: Make sure not to heal or shield companions whatsoever in this matchup. You will need all these resources for your pirate. Don’t let Bonnie Anne live to the Late Game. You will almost automatically lose. Don’t be afraid to use your El Toro’s Espirit to keep up with their buffs, and make sure that your pirate isn’t open to being attacked at any point.
Privateer vs Witchdoctor
Free to Play: Commander Emmet, Bonnie Anne, Contessa Argento
Bought Companions: Temujin, Contessa Argento, Nausica
Witchdoctor In-Match Strategy
Early Game: This will be your easiest match by far, as Witchdoctor is the worst class in the current meta. However, you shouldn’t get careless. During the Early Game, you will want to apply pressure with bombs and slows, and move up as fast as you can. You shouldn’t have trouble winning this companion war provided that you don’t get careless. In the case that they are first and have Exeter, you will want to just slowly buff up. Never force a charge unless you can pull it off. Simply use your overwhelming amount of shields and heals to bleed out their attacks and survive the assault.
Middle Game: During the middle game, you should be up on or tied in resources, if not outright winning. At this point, it’s just about keeping up the pressure and finding an attack.
Late Game: If it gets to this point, the Witchdoctor is putting up a very good fight. You should still be winning, but just keep after them and don’t makes careless mistakes.
Things to Avoid: Make ABSOLUTELY SURE that you will not get spell power reduced from a distance. This is the worst thing that can happen to you. It most importantly nerfs your heals, making you a lot easier to overrun with the long range spells.
Privateer vs Privateer
Free to Play: Commander Emmet, Bonnie Anne, Contessa Argento
Bought Companions: Exeter, Contessa Argento, Nausica
Privateer In-Match Strategy
Early Game: This will be either the shortest, or the longest fight you will have. During the early game, start out with bombs or small buffs, and try to start an attack on their companions. They will likely defend well by slowing you and maintaining proper spacing, so you’ll have to look for openings in the position. Depending on the team you choose to bring, you’ll have to use different methods of attacking. This will be a very positional game, looking for openings where you can attack them and making sure you’re guarded well. Feel completely free to shield and heal companions in this match, but make sure to save some for your pirate and to spread your resources evenly (don’t just shield spam 1 companion).
Middle Game: The early game is the most important part of a Privateer mirror, but even if you win the Companion War, you shouldn’t think it’s game over. Keep playing as you were and make sure to keep your companion alive. If it’s a Musketeer companion, you’re in great shape. If you’ve lost the Companion War, don’t give up. Look for ways to attack their companion(s) and try to survive as best you can. You will probably lose if your opponent has more than 1 Musketeer unit left alive, but it’s important not to give up in case your opponent makes a mistake.
Late Game: If the match gets to the late game, one of you will most likely be higher on resources than the other. At that point, it’s just about slowly trading buffs for buffs and eventually getting the finishing blow.
Things to Avoid: Don’t go too crazy with using shields on your companions. Always prepare for a Middle and Late game, even if it doesn’t look like they’ll happen. Keep your opponent’s range and your own in mind. It’s a necessary skill of getting an open attack on their companions. Try to save your hits for their pirate, as they will have a lot of heals for you to go through if all the companions die.
Power Setup
Here’s the power setup that I currently use and the pet along with it. You are of course, welcome to change it, but I would recommend keeping most of the powers on the first page the same, as they are the most important.
Conclusion
This is all I can write in a guide for Privateer, as it’s supposed to be a quick read to get you started into more competitive play. However, there are obviously more advanced techniques and strategies you can employ in a match that I can cover here. So, if you have any questions about the game or PvP in general, feel free to find me in game or through my discord: MikeyLikesIt#2201. I’m always open to giving advice. I hope you enjoyed the guide!