May 1, 2019
Don’t Get Bucc’ed
How to Beat Buccaneers as a Swashbuckler
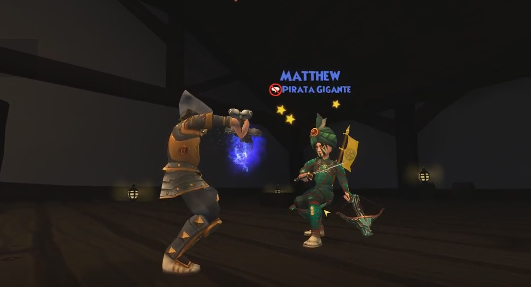
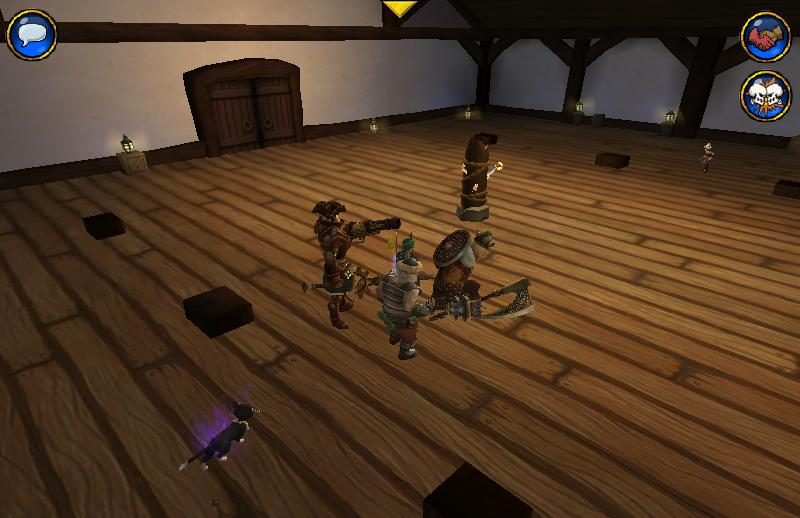
Hi, I’m Matthew. I suppose you’re wondering how exactly I got myself into the above situation. I’m facing a buccaneer pirate that has no shields and is outside of tide. I’m stunned and about to perish horribly at the hands of a Reckless Frenzy. This is what the kids call “Getting Bucc’ed.” What could I have done better if I wanted to beat this buccaneer?
There’s no doubt that the buccaneer class stands as one of the most powerful classes in PvP. They can be an absolutely miserable matchup for swashbuckler, given their great defensive potential and unparalleled inevability from HTL3. However, I’ve found team compilations and gear setups that help to make this particular matchup significantly easier. I believe that this matchup is much closer to 50/50, if not in the buckler’s favor to beat the buccaneer with these innovations.
In this article, I’ll discuss these innovations and changes in gear from the perspective of the swashbuckler. Although I’m focusing on swashbuckler, much of this information is relevant for other classes as well. If you make these changes, you should find that you beat buccaneers much more often.
Gear Changes
In my Swashbuckler PvP guide, I discuss the ‘general’ swashbuckler gear set. This set is optimal for any time when you’re facing an unknown opponent. However, when we know that we’re about to fight, say a buccaneer, we can optimize our gear set to fight them. Below is the gear set that I’ve found ideal.
Hat
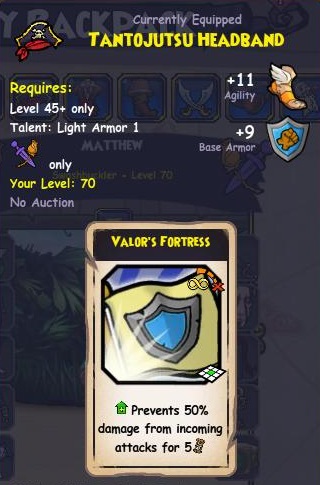
Tantojutsu Headband (Friar Sand)– This slot remains unchanged. Regardless of the opponent, swashbucklers always want 3 “major” protection buffs from gear. This includes the Valor’s Armor hoods, although I’m not a huge fan of them in this matchup, unless they run 0-1 Assassin’s Strikes.
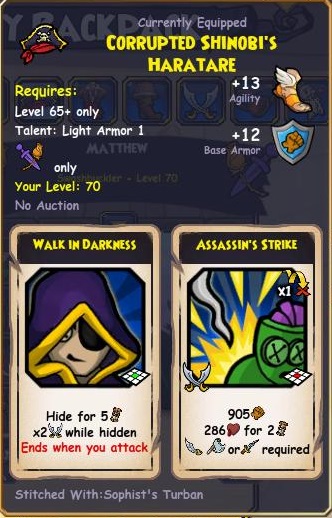
Corrupted Shinobi’s Hatatare (Moo Tower)– When coupled with the Stormzilla Egg, this allows us to optimize our stats.
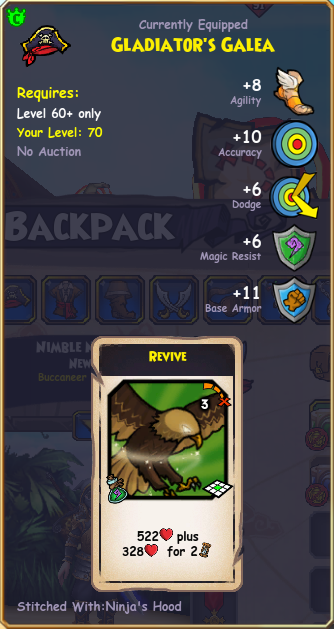
Gladiator’s Galea (Empire Bundle)- This is another option I’ve been experimenting with. When coupled with the tower charm and ring, this essentially allows us to replace our third assassin with an extra poison. Since we’re running extra attacks on our weapon and robe, we can afford to run 2 Assassin’s quite often.
Robe
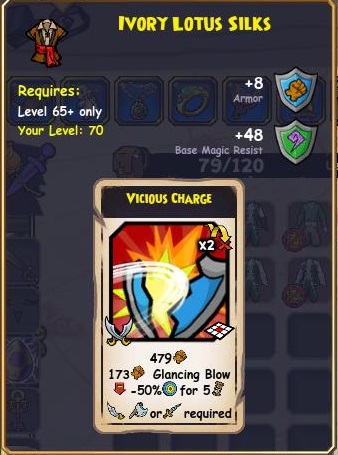
Ivory Lotus Silks (Bazaar)- This is the first major change. Normally, we would run a heal in this slot. However, the addition of a vicious charge allows us to walk into a buck’s htl3 without instantly dying. This helps us to maintain pressure in the mid to late game. Furthermore, buccaneers tend to favor a more passive and grindy strategy, meaning our heals can often be stranded in our hand. Having too many could result in a clogged hand.
Why the bazaar robe over the no auction, level 40 variant that provides agility? Easy: buccaneers tend to favor magical weapons in the swash matchup (Haywire weapons, Ashes Pack weapons, and the Dark Sea Champion Weapons are all magic-based). Having an extra 48 magic resist, meaning -48 incoming damage to every attack, is very strong and will help you beat buccaneers in the late game.
Boots

Shoes of Faunus (various Aquila Bosses)- You need fort boots. Period. The boots from Friar Sand are also fine.
Weapon
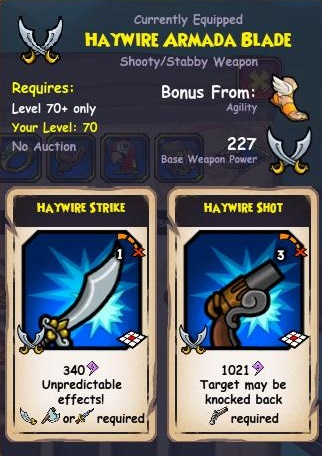
Haywire Armada Blade (Dreadnaught)- This is another easy choice. The weapon does magical damage, meaning we circumvent buccaneer pirate and companion’s high base armor. Haywire Shot provides a way to apply pressure from a distance and is not blocked by Kraken’s Lament and Triton’s Song.
Patch
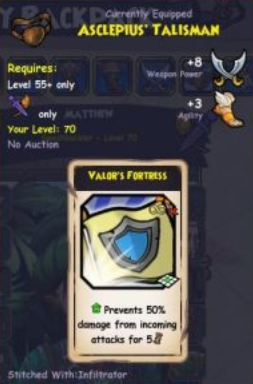
Asclepius Talisman (Sssiva)– We can’t do without this patch.
Totem
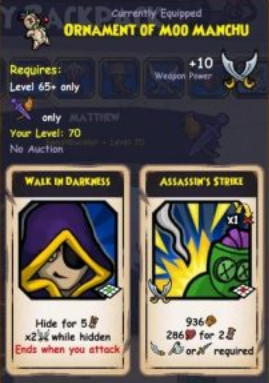
Ornament of Moo Manchu (Tower of Moo Manchu)- As explained in my initial guide, run this if you’re running the fort or absorb hat.
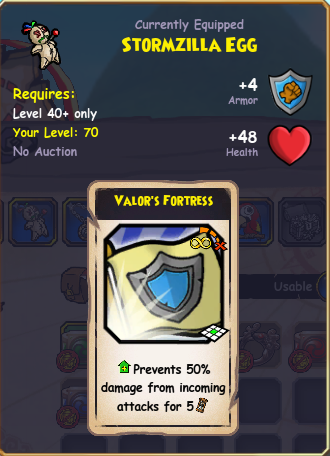
Stormzilla Egg (Stormzilla)– Run this if you’re running the tower hood.
Charm

Right Hand Locket (Tower of Moo Manchu)- This is another change that I’ve been testing out. I’ve found that an extra hide, and consequently another opportunity to approach the buccaneer pirate, is very valuable.
Ring
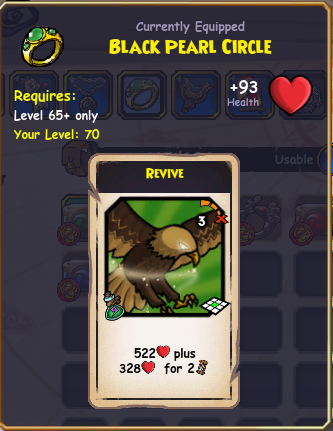
Black Pearl Circle (Revive)- If you don’t have a revive yet, it has to go here.
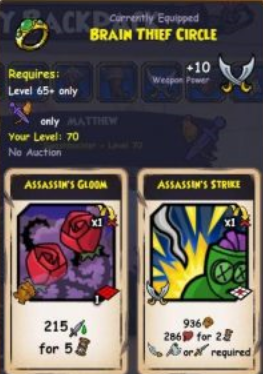
Brain Thief Circle (Tower of Moo Manchu)– If you’re running the Revive hood, run this ring. As noted before, it gives you an extra poison, which is both unaffected by buccaneer’s trained protection and doesn’t trigger their vengeance chains.
Pet
Since it’s not really “gear,” I’m going to devote a separate section to the pet. This is the pet that I’ve found to be very effective against buccaneers. I’ll discuss why it’s so effective, as well as some upgrades.
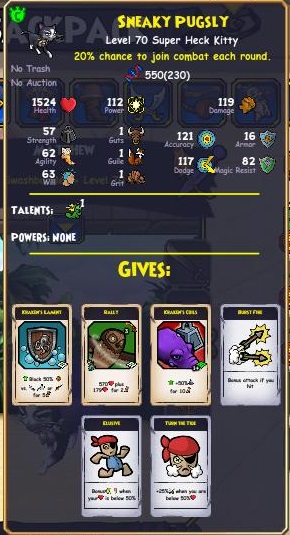
Kraken’s Lament – This is essentially another fort in the bucc matchup. It’s too good to not have
Rally – Another staple power grant, having an extra heal here frees up a gear slot.
Kraken’s Coils – This is the “weak link” in this pet’s powers. Although having the strength buff is great for my vengeance 3- focused team compilation (see below), there are better options.
Burst Fire – Surprisingly, Burst Fire is exceptionally good in this matchup, as it gets around Kraken’s Lament and Triton’s Song. Furthermore, it doesn’t trigger vengeance strikes
Elusive – Staple.
Turn the Tide – This lets us kill from a higher health range in the late game. I love Turn the Tide on my buckler pets and can’t really see myself using a tide-less pet. It’s just so valuable in the late game
Webs – Although this isn’t optimal, buccaneers’ lower base dodge and lack of first strike allow us to take advantage of webs. They are forced to deal with the pet before pursuing us, or risk being immobilized for a few rounds.
Changes
Kraken’s Coils -> Brutal Charge – As I noted before, charges are excellent against buccaneers. They allow us to maximize our riposte chains, weaken their chaining potential, and allow us to walk into HTL3 without being beat by the buccaneer immediately.
Webs -> Turn the Tide or Relentless – Either of these would be better than webs, since they help us to maximize our damage output.
Burst Fire -> Turn the Tide or Relentless– Burst Fire is great, sure. In my opinion, the second rank of tide or relentless are just more valuable.
Companions
I’ll discuss 2 companion setups: one that features Crown shop and pack companions and one that does not. The Crown shop and pack companions are favorable over their ftp counterparts.
Free to Play Setup
- Ratbeard – Hold the Line 2, Repel Boarders 3, First Strike 3; Rough 4, Tough 4, Dodgy 4, Accurate 4, Strong 1
- El Toro – First strike 3, Relent 2, Riposte 1; Rough 4, Tough 4, Dodgy 4, Accurate 4, Agile 1
- Subodai – Vengeance Strike 3, Relent 2, Bladestorm 2; Rough 4, Tough 4, Strong 4, Accurate 4, Dodgy 1
- Fan Flanders (Subodai Replacement)- Flanking 1, First strike 3, Relent 2, Bladestorm 1; Rough 4, Tough 4, Dodgy 4, Accurate 4, Agile 1
This is a fairly ‘stock’ companion setup (in the order that you should select them in). You might notice that Ratbeard has Repel Boarders 3, which is obviously a huge non-bo with Black Fog. However, Ratbeard with First Strike 3 and no repel 3 is really, really bad against buccaneers. By reducing their dodge, you just trigger their vengeance strikes more. Without Vengeance 3 of his own, or Repel Boarders 3, Ratbeard just dies to Vengeance chains way too quickly to be a good choice. Thus, we have to run Repel Boarders 3 if we want to beat a buccaneer. It’s also (quite obviously) very effective against them.
The logic behind the other 2 companions should be self-explanatory: Toro allows us to buff accuracy and dodge, both increasing our damage output and decreasing our opponent’s. Subodai has 2 guaranteed attacks (one is a reduce) and vengeance 3. We can also replace Subodai with Fan Flanders. This will increase our damage coming out of fog (since Fan has significantly better weapon power than Subodai), thereby allowing us to more efficiently kill an opponent’s Peter Quint (and increasing the overall movement range of our team).
Fan does have one major weakness: she is easily killed by the buccaneer pirate or Peter Quint, assuming neither target is reduced. This makes her markedly less strong should we fail to pull Black Fog. Furthermore, Fan only has a single guaranteed hit, meaning if she is reduced after using her super, she will largely be useless. Subodai will, on average, survive longer than Fan, although he is likely to do less damage per turn than Fan can, as he is a strength unit facing other strength units. His second guaranteed attack helps to give him some utility should he be reduced.
Weaknesses?
However, the ftp setup has one glaring weakness: it can’t pressure the opponent at a distance. In other words, to do damage to the opponent, we’ll have to walk our companions into htl3 (unless we already have fog up and active), giving the opponent a better chance of killing them. Furthermore, these companions can only do damage with melee attacks. They are much less effective when reduced. The non-FTP setup fixes these issues, greatly increasing our chances to beat a buccaneer.
Crowns Setup
- Ratbeard – Hold the Line 2, Repel Boarders 3, First Strike 3; Rough 4, Tough 4, Dodgy 4, Accurate 4, Strong 1
- Gerard (optional Ratbeard replacement) – Vengeance Strike 3, Hold 3, Blade 1; Rough 4, Tough 4, Armored 4, Accurate 4, Strong 1 (can be replaced by Haywire Marine with the same epics and talents, but with htl4 and dodgy 4 instead of Blade 1 and armored 4, respectively)
- Baar – Vengeance Strike 3, Relent 2, Bladestorm 2; Rough 4, Tough 4, Strong 4, Accurate 4, Dodgy 1
- Haywire Dragoon – Vengeance Strike 3, Relent 2, Hold 1; Rough 4, Tough 4, Strong 4, Accurate 4, Dodgy 1
This is a team compilation that I was instrumental in thinking up. You may be thinking: where are the 50% reduces? We went from 2 companions with them to 1! That has to be bad, right? However, this team makes up for this lack of reduces in a few qualities. I believe these qualities are key to beating a buccaneer. I’ve alluded to them before, but here they are again:
- Ability to apply pressure from a distance
- Vengeance Strike 3
- Can manipulate movement with multiple HTL units
- Functions fairly effectively while reduced
- Has attacks that ignore trained buccaneer shields (Levy’s Call, Kraken’s Lament, Triton’s Song)
How exactly does this team fulfill the above qualities? I’ll explain!
Ability to apply pressure from a distance
This one should be fairly self-explanatory. Baar has 2 summons and 3 long-range reduces that do not require direct engagement to be effective. This means that we can start applying pressure from turn one. In addition, these reduces do not force us to walk into HTL3 to use them. This means that we can do damage to them, but to do damage to us, they must be the ones engaging. They can’t rely on counterchains to do all of the work for them.
The Armada Dragoon operates in a similar way. He has 2 attacks that are medium to long range and thus neither trigger htl3 nor vengeance strike 3. Furthermore, Surge of Technomancy is one of the most powerful utility abilities in the game and can be devastating if timed properly. It alone can enable you to beat a buccaneer in the early game, should it snipe a Valor’s Fortress.
Vengeance Strike 3
Buccaneer pirates and companions often rely on chains and direct melee engagement to do much of their damage. Vengeance strike 3 can stun opponents randomly, thereby shutting off the opponent’s chains. I have 2 vengeance strike 3 units and a strength buff, which can help to maximize stun chance. As a side note, Gerard has over 100 armor and a Triton’s Song. This allows him to exchange incredibly favorably against units like Peter Quint and Temujin, since they do physical damage. However, Ratbeard fulfills his role as a tanky unit equally well, if not better. His repel boarders 3 fills a similar niche as vengeance 3: both shut down the buck’s ability to chain.
Can manipulate movement with multiple HTL units
One of this team’s weaknesses is a lack of high movement range companions. Therefore, an opponent can run away from us and have a consistently stronger board control than we do. This is by far the strongest argument for not running this team. Despite this argument, I believe the other strengths I’ve noted more than compensate for this (rather marked) weakness. However, we do have 2 HTL units. Thus, we can form a wall of sorts, thereby forcing the opponent to run in a certain direction (we can also immobilize them almost entirely, should they be on the edge of the board).
Functions effectively while reduced
As noted before, both Baar and the Dragoon have attacks that don’t require melee engagement. Furthermore, Baar and Gerard have Turn the Tide 2-3, which provides an accuracy buff when below 50% health. These two things combine to make this team very effective at chaining, even if they’re reduced. Ratbeard somewhat breaks this requirement, as he is quite unlikely to land his repel 3 (arguably the strongest single ability he has) when reduced. This is unfortunate, and can be mitigated by using hold 3, repel 3, and blade 2, but this makes him markedly worse against a hidden Contessa. Thus, if you don’t expect to run into Contessa (which isn’t a terribly realistic expectation), run hold 3, repel 3, blade 2.
Has attacks that ignore trained buccaneer shields (Levy’s Call, Kraken’s Lament, Triton’s Song)
All of the attacks that do damage from a distance have the added benefit of ignoring some or all trained buccaneer shields. I’d like to further spotlight Ruhr (one of Baar’s summons) here. His bleeding strikes ignore all 3 of bucc’s trained shields. They also do 5% of the targets’ base health for 3 rounds. This is a devastatingly powerful ability, should he use one of his trained AOE attacks. It’s not uncommon for him to use an AOE on two units. This attack alone will do a total of ~1200 damage across both units. In addition, all of Baar’s reduces, Surge of Technomancy, and Ratbeard’s knockback ignore all 3 of bucc’s trained shields. Finally, Haywire shot ignores Triton’s Song and Kraken’s Lament. This gives us a huge advantage, increasing our chance to beat the buccaneer.
Coming out of fog, the buccaneer has two choices in regards to shields. They can use a Levy’s Call, allowing Baar’s reduce, Rat’s knockback, Surge of Technomancy, and our poisons to hit them for nearly full damage. I’ve found this is generally a losing strategy for the buck if they can’t very quickly kill our team. With a combination of these attacks, Vicious Charges, and Assassin’s, the pressure we exert is often too much for them to stabilize against. The second option is to use a fort. This prevents the early pressure from the aforementioned attacks, but gives us the opportunity to get full-damage poisons and Assassin bleeds in the late game, which is quite significant.
In-Match Strategy
Early Game
You should have 2 focuses in the early game: beginning to apply pressure by setting up buffs/using summons and advancing your team towards the opponent.
I recommend summoning Shrawk round 1, should you have Baar. His magical AOE attack can essentially function like a free gunnery, should your opponent not spread out. Since he can be spawned anywhere, he will often be too far away to do anything but use this AOE. I generally hold on to Ruhr, since he can only be summoned in a 3 square radius. I want him to always be in range to immediately use an AOE attacks, due to how potent they are.
Why should we advance in the early game? Simple, should our opponent use a Highland’s Charge and Whale’s Might, we are essentially forced to fog. The further we are along the battleboard, the fewer rounds we will have to spend in Fog advancing our team.
Fog
After you fog, you should have a few goals in mind: land a poison on the pirate, restrict movement through HTL units, and get in range of a high priority unit to kill it. We want to use all our poisons on the pirate, as it forces them to shield or heal prematurely. When coming out of Fog, we should eliminate one or more units (probably Pete/Temujin) and be in a position that forces the remaining units to walk into Gerard/Ratbeard’s HTL3.
Once the 5 rounds of Fog are up, we’ll begin to trade companions. In theory, you can come out on top or even fairly often. At this point, you generally want to focus your remaining guaranteed attacks (especially the ones that ignore Levy’s Call) on the opposing pirate. Oftentimes, I’ve beat a buccaneer after an opponent gets stunned by one of my units by combining an Assassin, Baar’s reduce, and Surge of Technomancy/Haywire Shot, all while using Gerard to restrict their ability to run away. The next round, I can continue pressuring them with companions, while I use an Assassin’s shroud to stop their recovery.
Mid-Game
How you play this portion of the match depends on which units you have alive. If you have a HTL unit alive, it’s often best to kite backwards with your pirate being shielded by the HTL unit. This lets you conserve hides and forts, all while forcing the opponent to waste time or resources killing your remaining companions. Eventually, you’ll have to hide again. You’ll want to set up a poison (possibly a shroud depending on how many forts and hides they have available), fort, and then if possible, either reduce or assassin the opponent. You’ll repeat this process a few times, using heals, movement reduces, and other powers when necessary. Maintaining control of the Resource war is key to beat a buccaneer.
Late-Game
Your goal here is to close out the match with your remaining resources. Attacks that get through Levies and Laments are valuable here, such as Ghostwail, Hurl Blades, Hurl Knife, Haywire Shot, and Poisons. Eventually, you’ll want to combine your Assassin’s Shroud with a hidden assassin or your vicious charge to eliminate their pirate. Remember, you cannot risk walking into htl without reducing the opponent’s accuracy unless the opponent is at low health, on the last round of their shield, and out of Assassin’s Strikes (or you’re at sufficiently high health with multiple turns of protections left). Congrats you’ve just beaten a buccaneer.
Conclusion
The swashbuckler vs buccaneer matchup is one that’s traditionally very difficult for the buckler to win. Most of their offensive tools require approaching the enemy, playing into buck’s greatest strength: Hold the Line 3. Buck can effectively defend against a buckler’s plethora of hides, thus giving them inevitability in the late game. This means that an ideal buckler gearset and team is one that can maximize the amount of times it can approach the buccaneer pirate effectively. It also must be able to effectively pressure the opponent from a distance, utilizing attacks that aren’t blocked by the buccaneer’s trained shields.
I hope this article gave you a bit more insight into the buckler vs buccaneer matchup and how to effectively beat an opposing buccaneer. If you have any feedback or comments, feel free to leave a comment! I’m happy to help.