September 20, 2018 June 3, 2020
Swashbuckler Ranked PvP Guide
 I’m going to cut to the chase. I’m Matthew, I’ve been doing Swashbuckler Ranked PvP successfully for about 2 years, and this is a guide to buckler pvp. Buckler is a super fun class to pvp on. Even though I have multiple max pirates, I’ve found buckler to be my favorite. Using this guide does not require previous pvp experience. I hope this guide inspires some of you to try out buckler pvp! 🙂
Why Swashbuckler?
- Crown and pack companions/gear are not necessary to be successful in pvp (I will recommend and show some setups that feature them in this guide, however)
- Buckler is arguably the most balanced class in pvp currently, and is thus unlikely to be a candidate for major changes (more specifically a nerf) in future updates. I’m looking at you, buccaneers and privateers.
- Remember when you complained non-stop about how broken Black Fog was? (Don’t lie, you did) Now you get to abuse… I mean use… it!
- The learning curve isn’t particularly steep. Unlike, say, witchdoctor, learning how to pvp on buckler isn’t insanely time consuming and frustrating
Table of Contents
- Character creation
- Practice points
- Gear
- Pet
- Companions
- Power Setup
- General PvP tips
- Class Specific PvP tips
Setting up your character
Character Creation
Skip this part if you already made a swashbuckler. If not, read on.
- Parent death- This doesn’t really matter all too much. You probably won’t be using your presidio companion all too much in PvP. Lost and Thunderstorm get you Lucky Jack and Milo respectively. They’re essentially privateer and swashbuckler versions of Subodai/Temujin, minus the tide 2 and reduce accuracy attack. Cool and fun companions for sure, but they’ll have niche use at best. They’re the best two options. Armada gets you Gaspard de Vole, who I’ve been told is quite adept at countering summons. Just don’t pick Giant Squid or Mutiny, Birgus and Mike are incredibly lackluster.
- Place of Origin- Krokotopia is the only option for PvP. If you’re level 10 or under and picked the wrong place of origin, I’d recommend restarting. Krokotopia is that much better than everywhere else. It can easily net you +250-300 damage in a match, plus a good bit of extra health on your heals.
- Inhuman Resources Companion- If at all possible, DO NOT redeem Fan until you reach max level. Questing a buckler isn’t that hard, you can do without her. This will give you a level 71 Fan, and those (marginally) increased stats are great to have.
If your already existing, max level buckler doesn’t have any number of these attributes, don’t worry! While the above decisions certainly optimize your character’s ability, they’re not going to stop you from being successful in PvP should you lack them.
PvP Practice Points
At max level you have access to 21 practice points. I highly recommend the following for PvP:
- Privateer Powers: Gunnery, Rouse, Valor’s Shield (3 pts)- Quintessential pvp powers. Don’t leave home without them
- Privateer Talents: All through Elusive 2 (6 pts)- Simply put, you won’t win without elusive’s extra dodge. A lot our viable weapon options are slashy, so slashy 2 provides a nice damage increase as well
- Buccaneer Talents: All through Smashy 2 (4 pts)- Enables us to train relentless and gives a damage buff to some of our weapon options
- Witchdoctor Talents: All through Spooky 2 (5 pts)- Arguably the most useful pvp talents for any class, the spooky line increase our poison and bleed damage and buffs our heals. Staffy 2 enables us to train witch hunter
- Secret Trainers: Relentless and Witch Hunter (2 pts)- Relentless is free damage and Witch Hunter makes all but the best witchdoctors helpless once we get next to them. Get these.
- The last point can go towards one of these three: Forbiddance, Ghostwail, or Mighty Charge– Currently, I prefer Ghostwail, since it is generally the most useful, but Mighty Charge will be the best option for when the next level expansion comes out, assuming that expansion has 10 levels and/or a Zeke quest.
- A side note- If you are dead set on using a “hybrid” setup w/ maximum chains you can replace Witch Hunter, the second rank of Spooky, and your “last point” choice with Shooty 1-2 and Burst Fire and obtain a witch hunter grant on your pet. I don’t recommend starting out with this, since it will prevent you from having an ideal pure melee setup should you decide to switch back to melee swashbuckler. In addition, witch hunter grants are tough to get on your pet, and buckler really doesn’t need to rely on relent 2 burst 2 in order to win.
Preparing to Enter Ranked PvP
So you now have a max level buckler with all your training points properly spent. What next?
Gear
 Buckler isn’t particularly flexible with its gear options in PvP. You need a certain amount of protection buffs and heals (3 forts or absorbs and 1-2 revives), and they only appear in specific slots. Still, there is some choice, especially with weapons. Recommendations are listed in order, starting from the most ideal piece of gear
Hat:
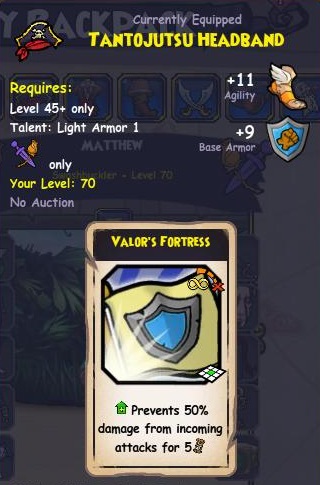
Tantojutsu Headband-Drops from Friar Sand. This is the most popular hat choice for swash PvP. It provides one of the 3 forts you need.
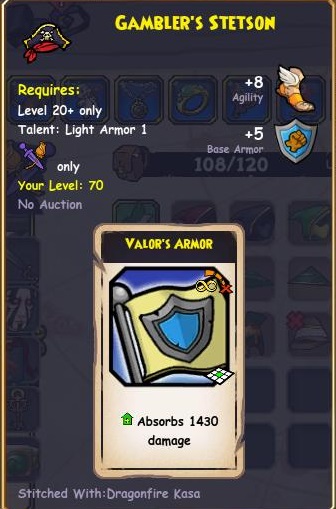
Gambler’s Stetson– Drops from Thunderhead in Cool Ranch. Some players prefer to replace one (and only one) of their forts with an absorb. This can be a good idea if timed correctly, since you can use it to stay in elusive/tide, forcing your opponent to waste powers breaking it. As a general rule, it shouldn’t be used when above half health. It’s also a valuable combo piece with Old Scratch’s mojo buffs, but make sure it doesn’t fall victim to Purge Magic
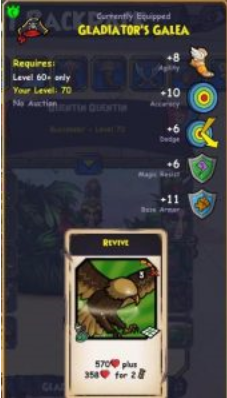
Gladiator’s Galea– From the Empire Bundle. This option gives the best stats of the 3 options listed, but it’s not a particularly popular choice to sacrifice a fort. You can get away with it though. Furthermore, should you have a Stormzilla Egg to use as your third fort (in addition to boots and patch) you can use this hat in certain builds to optimize your accuracy and dodge. DO NOT USE A BAZAAR OR OTHER NO AUCTION REVIVE HOOD
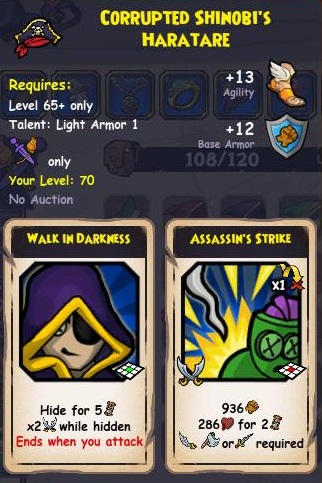
Corrupted Samurai’s Haratare–This is a better choice than Tantojutsu, only if you have the Stormzilla’s Egg. I include this at the bottom since the Egg is a pain to farm. Drops from Moo Tower
Robe:
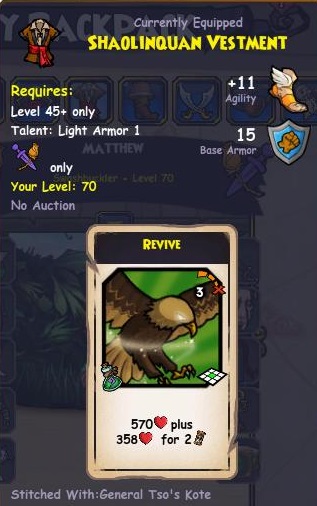
Shaolinquan Vestment– Most popular choice for PvP. Drops from Friar Sand, but if you’re lazy, a bazaar version exists with health and armor or magic resist. The auctionable magic resist version is often very strong against classes that use magical weapons (muskets, bucklers, and a good amount of privies and bucks).
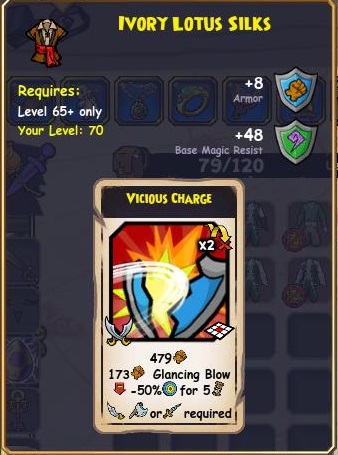
Ivory Lotus Silks– This robe is found in the Bazaar. It’s excellent in the buccaneer matchup, should you not have a charge on your pet. Furthermore, it’s solid in the swash mirror, as it gives you a huge advantage in getting chains. This isn’t something I’d equip in a ranked pvp environment, but it’s very valuable when you know you’ll be able to get good use from it (in a buck or buckler matchup).
Boots:

Shoes of Faunus–Dropped from Sssiva. Fort slot #2. Pretty self-explanatory

Boots of Sanctuary–Dropped from Friar Sand. Same as above, but you gain some agility, and sacrifice a bit of dodge and weapon power. If you like your crits, this may be a better option.
Weapon:
I assume here that you don’t have a spring or fall champion PvP weapon. I’d definitely use spring and probably a fall weapon over all these choices, if you have one from another character.
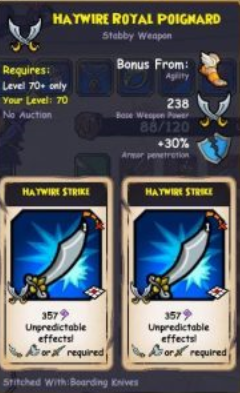
Haywire Royal Poignard–Dropped from Dreadnaught. This and the Haywire Fencer set are the two best non-crown, pure melee weapons for swash PvP.
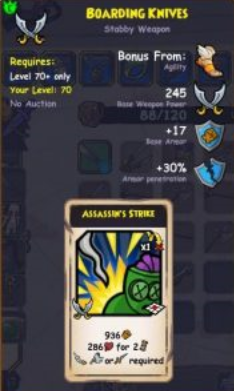
Boarding Knives– Crowns alternative to the haywire melee weapons in PvP. The assassin is more consistent damage than the strikes and the bleed is helpful to push through that last bit of damage.
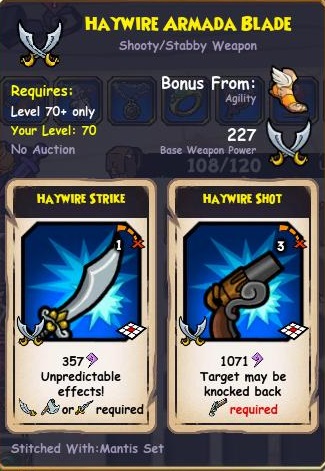
Haywire Armada Blade– Dropped by Dreadnaught. Only real option for hybrid buckler PvP imo. It’s also what I used when ranking up (I didn’t use any ranged talents with it, haywire shot alone is pretty op). If I had to recommend one non-champion weapon, this would be it.
One thing to note is that due to its doing magical damage, our attacks will do significantly less damage against high magical resist units, like witchdoctors. If you see a lot of witches in queue, adjust your weapon accordingly.
Other semi-viable, although not ideal, choices for weapons in PvP include:
- Sea Sheller (Super Charge weapon)– With a rushing team, in ranked PvP, you can easily fog and rush your entire team to their pirate’s face and one hit them. Very preventable strategy on your opponent’s part, but awesome when executed successfully.
- Haywire Cultist Set– Although it’s a bit on the low end in terms of damage (a net decrease of 30 damage compared to most alternatives), this weapon is still quite powerful. Haywire strike can hit as hard as an assassin and surge of technomancy’s ability to remove a fort or absorb in the late game is a match changer. It’s great in the mirror, where opponents lack a critical mass of buffs that can be used to “protect” their forts from a late game surge.
Eyepatch:
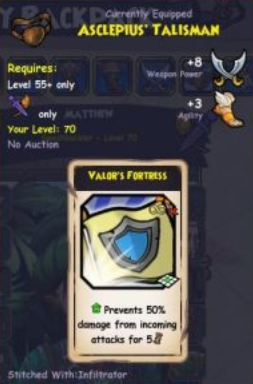
Asclepius’ Talisman- Dropped by Sssiva. This is the only truly good option for eyepatch in PvP. You already have a revive from your robe/charm, and St Fido’s patches aren’t worth it for us.
Totem:
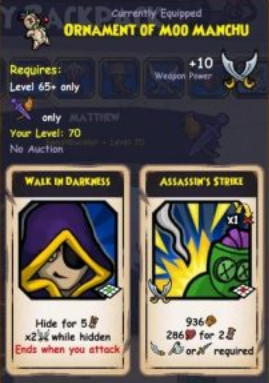
Ornament of Moo Manchu– This is the option the VAST majority of players go for in PvP. As with the ring, if you only have the level 55 or 60 version, that’s completely fine.
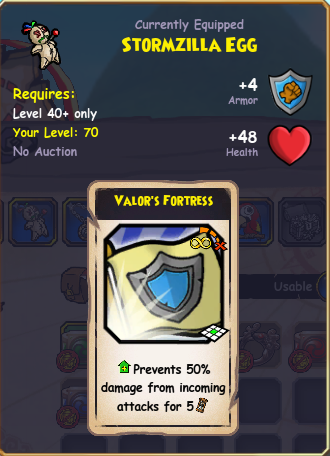
Stormzilla’s Egg–If you have the tower hat and this, use both of these rather than the fort hat and moo totem. Otherwise, don’t stress about getting this. Stormzilla is a pretty slow farm. However, having the Stormzilla Egg opens up some very powerful setups that were not accessible before, such as 3 fort + 1 absorb sets for the mirror. Many of these sets require sacrificing an assassin, so they’re really only viable in the mirror (where you can afford to do so).
Charm:
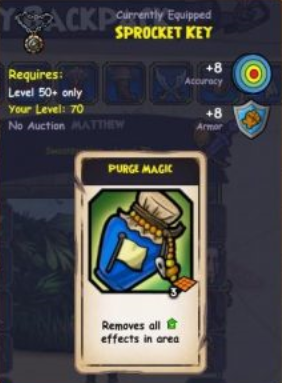
Sprocket Key- This is the best choice for PvP players just starting out, dropped from Kane or Bishop. Most of your early opponents won’t be able to counteract purge strats effectively, and fog+purge combos are game winners in ranked PvP. Once you get more experienced opponents, however, this really only becomes a necessity in the privateer matchup
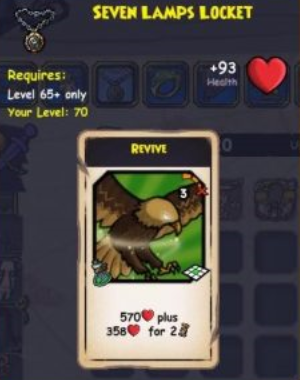
Seven Lamps Locket– If you’re struggling to get purge, prefer a more defensive set, or just feel that you can win without purge, this is your best bet to PvP with. It’s kinda rare in the bazaar nowadays (buyouts OP), so good luck.
Ring:

Brain Thief Circle- Best choice by far. Once again, level doesn’t matter, it’s a difference of 1-2 weapon power
Pet:
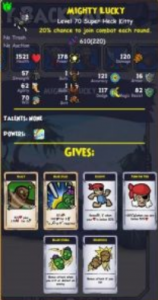
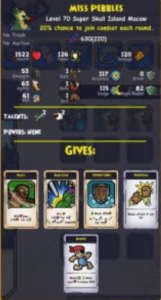

I’ll elaborate more below, but here are some of the pets I’ve used. The first kitty (Mighty Lucky) is a recent acquisition and represents a near-ideal pet, while the Macaw is much closer to a bare minimum and is what I used for almost all of my time ranking. Finally, Pugsly is my favorite option for melee matchups (buck and buckler) in the spar chamber. In these matchups, relentless is a lot less vital, and the addition of the extra shield is extremely valuable. Furthermore, burst fire is a high accuracy epic, and when paired with the hybrid weapon I generally use in melee matchups, it can be very useful.
Pet
PvP pets are a pain in this game. Getting a good one takes a lot of time and a lot of luck. Here are the ‘tiers’ of some pet grants and abilities for buckler 
Companions
I’ll list each companion and their ideal setups, then analyze some team combinations. As you’ve noticed, I didn’t list every possible companion choice. The ones below are the companions I find myself most willing to use. If there’s a unit (particularly a crowns companion) that I haven’t listed that you’re interested in using, take a glance at this tier list first.
Free to Play companions
- El Toro- First strike 3, Relent 2, Riposte 1; Rough 4, Tough 4, Dodgy 4, Accurate 4, Agile 1
- Fan Flanders– First strike 3, Relent 2, Bladestorm 1, Flanking 1; Rough 4, Tough 4, Dodgy 4, Accurate 4, Agile 1
- Contessa– First strike 3, Relent 1, Riposte 1; Rough 4, Tough 4, Dodgy 4, Accurate 4, Agile 1
- Sarah Steele (check out Wolfy’s guide on her)- First strike 3, Bladestorm 2, Riposte 1, Repel Boarders 1; Rough 4, Tough 4, Dodgy 4, Accurate 4, Agile 1
- Ratbeard- Hold the Line 2, Repel Boarders 3, First Strike 3; Rough 4, Tough 4, Dodgy 4, Accurate 4, Strong 1
- Subodai- Vengeance Strike 3, Relent 2, Bladestorm 2; Rough 4, Tough 4, Strong 4, Accurate 4, Dodgy 1
- Bonnie Anne- Quick Draw 3, Double Tap 3, Burst 2; Rough 4, Tough 4, Agile 4, Accurate 4, Dodgy 1
- Buffalo Bill- True Grit 3, Double Tap 2, Overwatch 1; Rough 4, Tough 4, Agile 4, Accurate 4, Dodgy 1
- Old Scratch- Witch Hunter 3, Mojo Echo 2, Mojo Blast 3; Rough 4 Tough 4, Spooky 4, Accurate 4, Spirited
Crowns, Pack, and Bundle Companions:
- Goronado- Vengeance Strike 3, Relent 2, Bladestorm 1; Rough 4, Tough 4, Strong 4, Accurate 4, Dodgy 1
- Haywire Battle Angel- First strike 3, Relent 2, Flanking 1; Rough 4, Tough 4, Dodgy 4, Accurate 4, Agile 1
- Nausica- True Grit 2/3, Burst 2, Double Tap 0/1; Rough 4, Tough 4, Agile 4, Accurate 4, Dodgy 2
- Wagyu- First strike 3, Bladestorm 2, Relent 2; Rough 4, Tough 4, Dodgy 4, Accurate 4, Agile 1
- Baar- Vengeance Strike 3, Relent 2, Bladestorm 2; Rough 4, Tough 4, Strong 4, Accurate 4, Dodgy 1
- Temujin- Vengeance Strike 3, Relent 2, Bladestorm 2; Rough 4, Tough 4, Strong 4, Accurate 4, Dodgy 1
- Haywire Dragoon- Vengeance Strike 3, Relent 2, Hold 1; Rough 4, Tough 4, Strong 4, Accurate 4, Dodgy 1
- Gerard- Vengeance Strike 3, Hold 3, Blade 1; Rough 4, Tough 4, Armored 4, Accurate 4, Strong 1
- Haywire Marine- Vengeance Strike 3, Hold 3/4, Blade 1/0; Rough 4, Tough 4, Dodgy 4, Accurate 4, Strong 1
Companion setups
The companions are given in the order you should select them when queueing
- Toro, Fan, (someone)- This is the most common setup you’ll encounter. Pretty much any unit I listed above can go in this third slot, with the exception of Bill. If the third unit is a buck unit with vengeance 3 or Ratbeard, put that unit in the second slot. I ran Toro, Fan, Battle Angel in ranked when first ranking up. Try to avoid fighting muskets with this setup, as Toro is a dead weight and Ratbeard is mediocre in this matchup.
- Goro, Fan, Nausica- This is the second most common setup (it might be the most common one now, due to how degenerate it is with time warp) and is obviously one that requires crowns units. It’s great to bring in ranked when you see an influx of inexperienced bucklers or muskets in general. There are better anti-musket teams, but this is the best one that remains strong versus other classes. It’s generally played very aggressively, requiring an early Black Fog rush. It’s fairly weak against buck, even more so when you don’t pull fog (Pete and their pirate annihilate Nausica and Fan). However, it’s still one that I’m happy to run in a queue that I know nothing about.
- Fan, Bonnie, Contessa/Sarah- This is one example of a free to play anti-musket team. You’ll only want to run this when you’re sure you’ll fight a musket. You can replace Contessa/Sarah with Bill, but I’m not a huge fan of him, given musket’s ability to use other methods to damage him without triggering true grit.
- Fan, Bonnie, Nausica- This is my favorite anti-musket team. It’s obviously not ftp, but it can pressure them early. Bonnie shuts down attempts to corner with Contessa, and her heal is very useful too.
- Gerard, Dragoon, Baar- While this team requires extensive amounts of crowns, it is by far the best anti-buck team I have found to this date. Gerard is a godly tank unit, possessing a shield and 100 armor, as well as htl and vengeance strike 3. This combination makes him incredibly difficult to kill. The Dragoon has 3 very strong guaranteed hits (one of which can only be blocked by the Valor’s line of powers), vengeance 3, and htl 1. This 1 rank of htl can be used to make your opponent’s movement options very limited when combo’ed with Gerard’s htl3. His surge of technomancy can remove a key accuracy of strength buff, deal good damage through a leviathan’s call, or, if your opponent really messes up, a fort. Finally, Baar’s epics feature vengeance 3 (if you haven’t realized vengeance 3 = good vs buck) and tide 3. Tide 3 makes him a matchup nightmare for buck pirates, especially if they go without elusive on their pets. He also has 3 attacks that aren’t blocked by buck’s naturally trained shields (levy, kraken, triton). He also has 2 of the most annoying summons in the game. If Ruhr uses an aoe that hits 2+ units, they’ll take a combined 1000+ damage, due to bleeding strikes (which does 150 damage a round for 3 rounds). Shrawk has amazing dodge and represents a legitimate damage threat as well. I’ve had matches where these two units do a combined 2000 points of damage across my opponent’s team before my opponent charges. This team, while not super aggressive, absolutely shuts down buccaneers at all stages of the game and forces them to make moves that advantage us in a resource war. (If you can’t tell I love this team so much)
- Old Scratch, Dragoon, Battle Angel- With Scratch’s newest promotion, this is my personal favorite setup to run in ranked. It’s a nightmare for melee classes, solid against musket (Scratch stops Contessa corner strats and barricade abuse), but not ideal against witches. The goal with this setup is to fog, move everyone forward, use Scratch’s 100% buff, cast a poison (430+ damage per tick), and then begin to use Old Scratch’s purge, the Battle Angel and the Dragoon’s Surge of Technomancy, and our pirate’s purge to strip shields off the opponent. This setup is even more effective (read: broken) with Time Warp in the picture. A quick explanation as to why this works so effectively:
- If our opponent isn’t forted already, they’ll be forced to fort or shield once we cast the poison on them. They can’t face-tank 430 damage a round for 5 rounds, especially with our ability to pressure them with hurl knives, Scratch’s AOE, and Surge of Technomancy (all 3 can hit hidden targets, making hiding a bad counterplay option). We then run our pirate away and purge with Old Scratch. This forces them to fort (again). We then use the surge of technomancy to knock off that fort. This is pretty much game over. Our opponent has lost too many resources to win.
- If our opponent is forted, great! They’ve used a fort earlier than they’d normally want to. This puts us ahead in the resource war. We can either poison 1-2 key companions (Nausica, Pete, etc) or just poison their pirate anyway. It’ll still be good for at least 214 damage a round.
- Our opponent can use Contessa’s gallant defense to protect themselves from poisons altogether. We have a great counterplay to this, however. Old Scratch has an AOE drain, as well as an AOE basic attack. Each and every unit that Contessa guards will not take damage from this drain or basic attack. Instead, Contessa will. This means a 100% mojo buffed drain will do 2.4k damage (650*4) to Contessa. Non-hidden basic attacks do 1200 damage. This will nearly one-round Contessa, allowing us to get in with a poison the following round.
Power setup

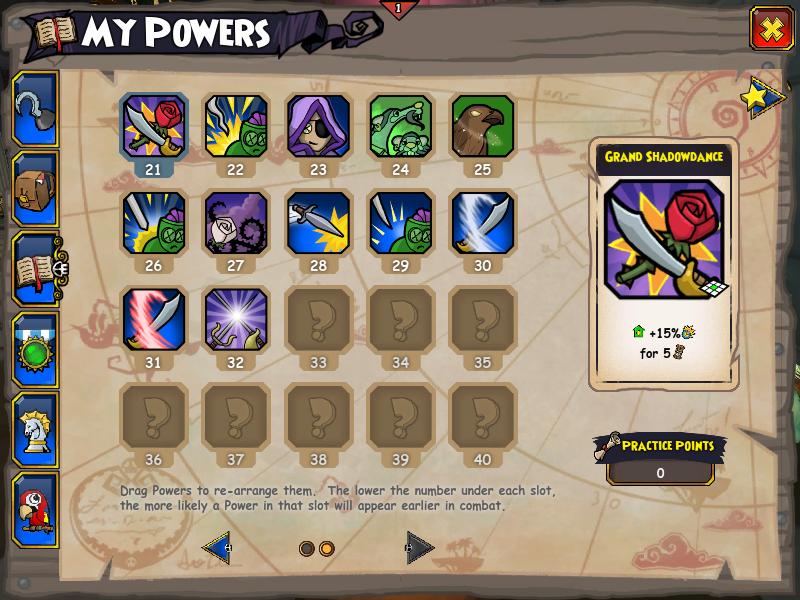
Notes on Power Setup (replicate it as closely as possible):
- Ghostwail is high up for early burst damage, discard fodder, or a nice way to test which of our opponent’s units have sight on us
- If you trained Mighty Charge or Forbiddance, put them closer to the end of your setup
- Purge is high to guarantee we have it when we need it, whether it be mid-late game or for an early game fog combo
- Always keep a few slots between your forts if you decide to deviate from this setup. The same goes for heals and assassins
- Fog should always be in slot 1. Period.
- Hurl Knives coming out of fog is a nice aoe that doesn’t generally trigger epics or require a non-hidden unit on our opponent’s team. Ideally, it’s used late game coming out of a hide when our opponent attempts to time out our hide with their own.
Feel free to alter this setup as you see fit. Make sure to test every iteration for 3-5 matches before deciding whether to alter it some more or to keep it as is (Oh, and there’s no “magic spot” for fog. You’re no more likely to pull it in slot 3 or 4 or something than you are in to pull it in slot 1)
In the Match
You’ve set your buckler up, gotten its gear, and have a working companion and power setup. Now you’re ready to queue up and get a match. Here are some general and matchup-specific tips
General
- When you enter the match, your first priority is checking your opponent’s class, their companion selection, and their epics. Also, make note of whether or not their companions can rush you immediately.
- Speaking of rushing, here is a guide to movement range. All the info is accurate as of 2018. Learn ALL the information in this guide. It’s a lifesaver. It will inform you as to whether or not a given unit can reach you in any given round. http://www.pirate101central.com/forums/showthread.php?56849-Movement-Range-Guide-for-PvP IF YOU LEARN NOTHING ELSE, LEARN THE INFORMATION HERE. YOU WILL NOT SUCCEED UNTIL YOU DO.
- When rushing, assume your opponent has a pet with scent until you know they don’t. Don’t let a random pet spawn ruin the match. That’s not to say never rush (in fact, pressuring is often better than not pressuring), but just be wary.
- When rushing with fog, there are two ways you can use it. You can either attack with 2-3 of your units immediately (probably using a Toro buff and letting the other 2 attack and guarantee a kill on a high-priority enemy unit) or you can wait around, advance and buff, then on the last round, hit!
- Confirm the kill. This means that it’s always better to put an extra unit on an enemy unit to guarantee that your hit will kill, rather than assuming that it will “probably” kill.
- Count your opponent’s powers. As you get more experienced, you will recognize that, for instance, a buckler normally has 3 forts, 3 assassins, and 1-2 revives. A privy has 5 forts, 1-2 assassins, and 3 revives. Note when one is used, and keep track of how many are likely left.
- Assassin’s Shroud is great. Use it when a protection buff has 1 turn left and your opponent is low on shields or health. This is why purge is great to have. When they inevitably try to shield themselves (since under shroud they have no way of otherwise recovering), you can purge their protection right off.
- Don’t use your team buffs (or any buff that is 5 or fewer rounds) on round one. This isn’t pve. Casting Toro and Fan’s buff, then meandering over to your opponent is a mistake. They will time out those buffs. The same is often true if an opponent tries the same. If a musket, for instance, drops a 100% Scratch buff and Cloud Spirit turn one, you’re best off sitting back, timing out that buff, and possibly timing out the bombs they drop too.
Ideal Team (unknown queue compilation, ftp)– Toro, Fan, Scratch (If you want to “play fair”, replace Scratch with Contessa or Subodai. They have utility in multiple matchups, and will never be a “dead” unit, as Ratbeard can be vs muskets, for example)
Ideal Team (unknown queue compilation, non-ftp)– Scratch, Dragoon, Angel (If you don’t have the pack units, or want to be more aggressive and less combo-centric, use Fan and Nausica in the last 2 slots)
Second Ideal Team (unknown queue compilation, non-ftp)– Goro, Fan, Nausica (This is a fair non-ftp team, unlike the above team which uses the most broken unit in game, Old Scratch. This is also a super strong team if you have time warp)
Matchup Specific
Buccaneer
- Never. Ever. Walk. Into. Hold. The. Line. Three. Got it? Good. Frenzy will kill you. Doesn’t matter how high your dodge is with elusive. Doesn’t matter that you have espirit. You. Will. Die.
- On that same note, you can “walk through” barrels and your own units in order to approach a htl3 unit without triggering the dodge reduce.
- Vicious/Brutal Charges are great in this matchup. They make our riposte chains very potent and can allow us to walk into their htl in the late game, should they have no strength buffs up.
- When coming out of fog, never hit the opponent’s Pete with your pirate. Pete will likely have espirit/call to arms and Whale’s might up. Pete will land on and stun you with vengeance 3 and then chain on you some more. Since your opponent is possibly hidden and you are definitely stunned, they can take advantage of the fact your first strike won’t trigger and get the double damage from their hide.
- Assume the pirate always has a charge up
- If they are hybrid, beware uncanny shot. It has 5 range and reduces your dodge by 75%. If they frenzy you with that debuff up, you lose almost certainly.
Ideal Team (ftp): Toro, Ratbeard, Subodai/Fan
Ideal Team (non-ftp): Ratbeard, Baar, Armada Dragoon
Privy:
- Spread your companions out immediately. If that means you can’t fog, so be it. Blast of Discord is lethal, not to mention the fact that we don’t want to give them the ability to get more value on their bombs
- Kill Emmett if they bring him. I hate that stupid otter so much. Kill him asap, he’s a pain if he’s left alive. In spar, they’ll often get all their slows off and one or more attacks off before you can kill Emmett, so eliminating units like Ratbeard that hinder our movement becomes a greater priority in comparison.
- With Scratch’s newest promotion, he becomes priority #1. His purge can put us at a fatal disadvantage in a resource war.
- More generally, focusing on removing all their companions before killing their pirate is your best move unless you can definitively one-round their pirate. If all 3 units are down, and your pirate hasn’t used too many shields, you win by default.
- In the Spar Chamber, Bonnie is your best friend vs privy. She counters attempts at guarding with Contessa (she takes 2400 damage from scatterblast if she guards the entire team), gives us a much needed extra heal, and represents an win-con if left alive.
- Generally speaking, you don’t want to waste attacks on them when they’re above half health. You can land relents on them with ease. Let those do most of your work for you, saving your attack powers for when they’re below half.
- If they summon trees or scorpions early on, killing their summons before focusing on their team is a smart idea.
- There are some privies who are heavily dependent on their Nausica (they are otherwise mediocre to bad players that abuse boon+nausica and focus all their resources in keeping her alive). If you encounter one of these, removing their Nausica early removes their biggest damage threat and pretty much seals the game in your favor.
Ideal Team (ftp): Toro, Fan, Bonnie
Ideal Team (non-ftp): Fan, Bonnie, Nausica (the angel is often a fine choice to replace Bonnie)
Musket:
- If you’re running Goro, Fan, Nausica against a musket in ranked, congrats! Unless you got one of the top muskets, you just won! (and even then, the good ones need some rng to win). If you’re using a slower team, well, this matchup is no fun. Generally speaking, being aggressive is better, unless they create a “bomb fortress” in the corner.
- Don’t let them get value from a full Exeter slow on your team if you can help it. “Giving up” your fog is often a reasonable move in exchange for minimizing the value they get from him.
- Early on, move forward (this is very important, as we can’t afford to give them a positional advantage with their massive range!) while keeping out of their range (and sight, if at all possible). Your units should have enough movement range to force some sort of positional or power-related concession from them before you hide (either single or fog) and go on the offensive.
- Never rush Nausica in completely on her own. They will kill her quite quickly, and it’ll be a 4v3.
- Place hidden units on the edge of their overwatch range and walk your un-hidden units through it.
- Bonnie is great here. She represents a win-con, effectively chains their team, counters a Contessa corner strat, and makes it impossible for the musket to hide.
- Don’t over-commit to attacking the pirate early on. They have absorbs. Remember, confirm your kills.
- They will run 1-2 absorbs and some will use them in the early game, especially if they have Scratch. These are primary targets for our purge or our/our companion’s surge of technomancy. If you don’t purge them, know that your hides will not break upon attacking them unless the absorb also breaks
- As I said before, Toro and Ratbeard are pretty bad in this matchup. Try not to run them whenever possible. If they run Ratbeard, know that Ratbeard can knock your pirate back into bombs and traps, or just hinder your movement (so kill him early).
- Know what knockback bombs sound like and don’t get blown out by them.
- Whenever possible, don’t run through bombs. If they spam bombs and create a mini fortress early on, just time the bombs out. No reason to take unnecessary damage when you don’t have to. Also, if you have a unit that has barely any health and can’t deal much/any damage, it’s a valid move to kamikaze them into bombs to remove some of them.
- In the late game, their uncanny represents a legitimate win-con if they have units alive.
- Pretty much all of their hits can hit us while hidden. This forces us to almost always have a shield active, unless they are out of sight or pressured enough to ensure they can’t afford to attack.
Ideal Team (ftp): Contessa, Bonnie, Fan
Ideal Team (non-ftp): Fan, Bonnie, Nausica
Witch:
- Witchdoctor is bad in this meta, largely due to witch hunter. Get adjacent to them, and you generally win by default.
- If you’re running Goro, Fan, Nausica against a witch in ranked, congrats! Unless you got one of the top witches, you just won! (and even then, the good ones need a lot of rng to win). If you’re using a slower team, well, this matchup is no fun, assuming they’re summon based.
- If you’re running an aggressive team, charge them early and focus their pirate or scratch. Without one of these 2 units, the witch just loses. They need the offensive and defensive value from Scratch, and they obviously lose if their pirate dies.
- They can force your witch hunter to trigger, breaking your hide, if you are next to them when you cast a hide. It’s not always a bad thing, especially if they have an absorb up.
- The Ocuborous line of spells (there are 3) essentially functions as an assassin’s shroud, in that it prevents us from healing for 3-5 rounds. They go in a straight line or diagonal and have 6, 7, and 8 range. Try to avoid positioning yourself such that you can get hit with one whenever possible.
- When they summon (trees, their pet, scorps, skeletons, terra cottas, Shrawk, Ruhr, etc.), kill the summons before focusing on their units
- If they use a banner, you can break a banner without breaking your hide.
- SCRATCH HAS PURGE NOW. REMEMBER THAT. IT’S EASY TO FORGET IN THIS MATCHUP.
- If they have units still alive, know that they can purge and do a lot of damage to your pirate.
Ideal Team (ftp)– Toro, Fan, Bonnie/Sarah (assuming a summon build from them)
Ideal Team (non-ftp)– Goro, Fan, Nausica (in spar, it’s often better to run the Ideal ftp team, as you can’t be aggressive as easily)
Buckler (the mirror):
- This matchup often comes down to rng-based first strike and riposte chains. If you lose because your elusive decides not to work, or if their grand shadowdance goes ham, you just gotta deal with it and then complain about it to all your other swashbuckling friends ;).
- In the early game, positioning is key. That movement range guide is your best friend when it comes to knowing when you can and can’t fog or be reached with fog. Once again, if you don’t have that guide committed to memory, have fun losing most of your buckler mirrors.
- When their pirate does hide, spread out your units. Don’t give them the ability to poison multiple units.
- If they have 2925 health, they have normally have purge.
- Know that when you decide to attack their pirate with an assassin or charge, you will start a first strike/riposte war. You will be hit if you are out of elusive. Take that probable damage into account.
- Having a brutal or vicious charge is great here. You can force your opponent to use another hide or fort before they want to, or risk taking tremendous by your ripostes.
- If they hide or fort, you don’t necessarily have to in response. Try and time out their hides by running away. Resource control in this matchup is essential.
- Hurl knives are tremendously useful. They can hit a hidden unit without fs3 triggering, and they make it near impossible for your opponent to run away.
- If you can kill their Toro before he uses his buff, do it. Having that buff over your opponent for 5 rounds makes your team very difficult to hit, while ensuring you will almost always land your hits.
- Try and use shroud when an opponent has 1 round left on their own shield.
- Sometimes, an opposing buckler will try and stack a triton + valor’s shield. Know that this isn’t enough protection. (I used to do this, it’s ineffective). 2 stacked 25% shields block ~43% damage (and only 25% of poison or bleed) since the damage decrease is multiplicative, rather than additive.
Ideal Team (ftp)– Toro, Fan, Contessa/Ratbeard/Subodai (a lot of stuff works in the mirror)
Ideal Team (non-ftp)– I’m of the opinion that pretty much any units with 1 or more relevant powers (a super strike by itself doesn’t count) that either fs3 or vengeance 3, or are named Nausica are viable in the buckler ditto. I’m constantly switching my team around for this matchup. I’ve found Baar to be particularly excellent and 1+ Surge of Technomancy units are very strong too.

Best of luck and happy dueling! Hope to see you in the Brawlin’ Hall.