April 5, 2019 October 15, 2022
Buccaneer Ranked PvP Guide
![]()
![]()
![]()
![]()
![]()
![]()
![]()
![]()
![]()
![]()
![]()
![]()
![]()
![]()
![]()
![]()
![]()
![]()
![]()
![]()
Introduction
I’m NinjaPikmin or Nimble Nicholas Newton. Buccaneer has been my class of choice since the very beginning of Pirate101 and even though I’ve dabbled in other classes, I’ve always come back to Buccaneer in the end. I’ve experienced the lows of release-state Buccaneer, and I’ve been riding the highs of the Moo Manchu Tower Update for over 4 years.

Buccaneer has been in a meta-defining position since the release of Ranked PvP. A Buccaneer’s capability to reach the opponent at practically any place on the board forces all classes to play in a reactive position. In the past, Buccaneers capitalized on that ability and planned their gear and companion choices with the idea of rushing down the enemy in a few turns. Despite the trend of faster matches discussed here, Buccaneer is fully capable of playing a slower and more methodical style. This guide discusses this slower play style in which the Buccaneer hopes to outlast the enemy in both shields and heals.
Place of Origin
Buccaneer is viable with any of the character creation stat increases; however, Grizzleheim (+5% Health) and Krokotopia (+5% Spell Power) are the most useful. Should Pirate101 ever receive another update, these 2 talents will become stronger as well, due to their percentage-based nature.
- Buccaneer enjoys staying in a state of Elusive and Tide which occurs at or below 50% health. More hp directly contributes to your ability to safely remain inside the 50% health threshold.
- Spell Power is less effective for Buccaneers than on other classes that rely heavily on spell power for their damage, but the spell power can add a couple hundred hp onto your heals throughout the match.
Practice Points
This guide promotes a pure melee Buccaneer (Smashy Slashy) instead of a hybrid (Slashy Shooty) Buccaneer. The practice point choices will support that playstyle. The final point varies depending on preference. The Variable Category shows the options for the last point.
- Privateer:
- Powers: Gunnery, Rouse Valor’s Shield
- Talents: Slashy Weapons 1, Elusive 1, Slashy Weapons 2, Elusive 2
- Witchdoctor:
- Talents: Staffy Weapons 1, Spooky 1, Resistant 1, Staffy Weapons 2
- Swashbuckler:
- Powers: Sneak Attack, Walk in Shadows,
- Talents: Stabby Weapons 1, Fast 1, Rough 1, Stabby Weapons 2, Fast 2
- Secret Trainer:
- Epics: Witch Hunter 1, Relentless 1
- Variable:
- Ghostwail (Witchdoctor), Spooky 2 (Witchdoctor), Forbiddance (Secret Trainer)
My personal choice is Ghostwail; however, the other choices are both viable for Buccaneers in general. Ghostwail provides poke damage towards a unit to make them easier to take down later in the match. Spooky 2 raises the effectiveness of heals marginally. Forbiddance eliminates one of a pirate’s important cards like a heal or a shield but only if it is used in the later stages of the match.
Gear
The play style promoted by this guide is slower than the strategies promoted in guides such as this one in the past. The gear choices reflect that idea.
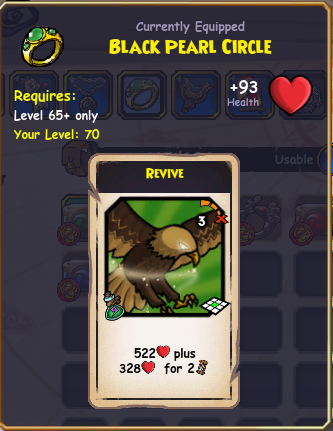
All gear choices here can be substituted as long as the total cards provided is the same. The stats, like Accuracy, are important; however, this strategy can still be executed without them. The cards provided from the gear are 2 Revives, 1 Vicious Charge, 1 Leviathan’s Call, 1 Walk in Darkness, 2 Haywire Strikes, 1 Assassin Strike and 2 Valor’s Fortress. The Pet tab discusses possible replacements because duplicating a pet is very difficult in this game.
For example, if you don’t want to farm for Stormzilla’s Egg, you can farm Jinzaburo who drops 3 Valor’s Fortress Accessories that supplement a missing Valor’s Fortress item.
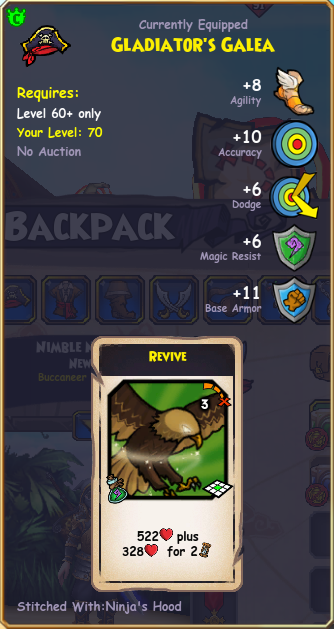
The Empire Bundle provides this hat. The Revive and the accuracy are the focus.
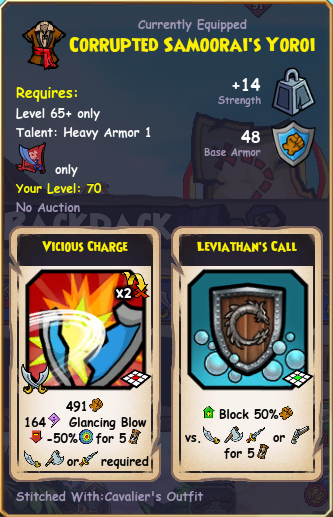
Moo Manchu’s Tower drops this robe. The level 55 or 60 options of this robe are also acceptable.

The Empire Bundle gives these boots. A possible substitute are the Dragoon’s Heavy Boots. Buying a piece from the Bazaar is acceptable, but not ideal as it provides mediocre stats.
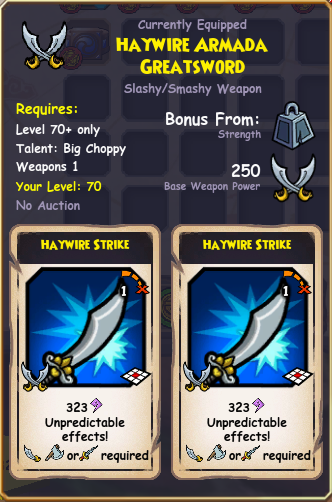
This is the defining gear piece of this guide that makes it stand out from previous guides. Other Haywire Weapons can fill some of the advantages of this weapon, but this one is the best to use in general. The weapon deals magic damage and this bypasses the armor on Buccaneers, Swashbucklers, and Privateers. Over the course of a match, these small damage gains add up.
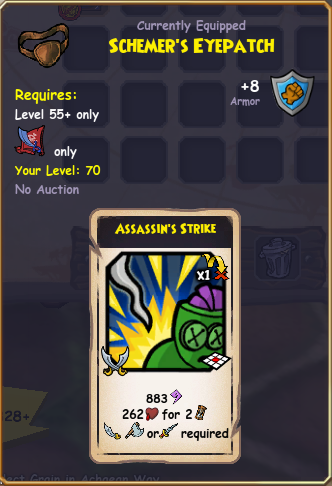
Schemer’s Eyepatch is the most useful piece of Buccaneer gear in the game. You will use it in a majority of your fights, so farming for this is a good move regardless of your intentions of PvP’ing.
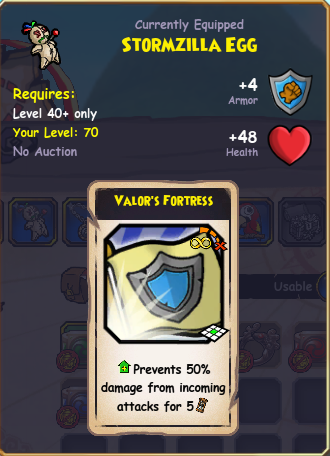
As discussed earlier, Jinzaburo drops replacements for this piece of gear. In addition, a fortress on the Robe or Hat is fine as long as the other gear provides the missing cards.
![]()
The Bazaar sells these or Moo Manchu’s Tower drops these in the lower floors. It can be placed into any of the 3 accessory slots depending on which pieces of Valor’s Fortress gear has been acquired.

This is the pet I use in the majority of my matches. I consider it very close to perfect for a general pvp pet against an unknown opponent and unknown companions.
Bare minimum Abilities
You must have Rally (or Rouse) and Relentless. Your pet needs to have these in order to even begin considering this strategy.
Powerful Abilities
Elusive, Turn the Tide, Turn the Tide 1, Kraken’s Lament, or Brutal Charge are always welcome on a Buccaneer pet. They can make the strategy in this guide much easier to use.
Rainbow Blessing, and Time Warp are also very strong pet specific abilities that are good to have. Time Warp in particular can end matches immediately if it activates before an opponent can properly defend themselves.
Good Abilities
Scent 2, Riposte, Backstab, Jobu’s Kiss, Triton’s Song, Assassin’s Gloom, Shark’s Fury or Kraken’s Coil are very effective in certain matchups, but you are not going to be at a large disadvantage if your pet does not have these skills.
Niche Abilities
First Strike, Vengeance Strike, Hold the Line, Bladestorm, Accurate 1/2, Tough 1/2, or any pet ability that reduces enemy stats. These are average abilities that don’t really impact the many matchups to a significant degree or don’t boost your performance enough by themselves. These don’t destroy a pet, but you’d much rather have the other abilities in the categories above.
Abilities to Avoid
Repel Boarders, Cheap Shot, and Flanking. These talents can be good in very specific builds; however, most of the time they will activate unintentionally causing you to lose your hide or enter combat you don’t want to take. For a general pvp pet, you won’t have the resources to cater to very niche strategies. If your pet receives one of these, I would not use it at all.
Companions
I will describe below the possible companions builds followed by when you should use them.
Peter Quint
- Talents: Tough 4, Accurate 4, Rough 4, Strong 4, Dodgy 1.
- All of the talents given 4 levels directly contribute to his ability to survive and win trades.
- Epics: Relentless 2, Bladestorm 2, Vengeance Strike 3
- This build makes Peter Quint into a dual phase unit that terrorizes any other companion in a 1v1. A lucky stun from Vengeance Strike 3 can easily swing the duel in your favor. The other epic selections are more straight forward: destroy.
- Use Peter Quint. Buccaneer’s ranked strategy is a two-headed monster. Your pirate is one head and Peter is the other. If Old Scratch did not exist, Peter Quint would be the undisputed most powerful companion in the game. He will generally go in your second/third slot for companions, as you want him to be able to enter combat after a companion or player pirate has secured a safe path for him.
- His Brutal Charge can help find vulnerabilities in the enemy’s companion placement. If an Old Scratch or Musketeer is left open, Peter Quint can likely take them down in 1 exchange as long as he is appropriately buffed.
- Brutal Charge can also be used to initiate onto Buccaneers, Swashbucklers and Privateers. While they normally would be able to trade with him, albeit at a deficit of damage, the accuracy reduce from the skill shuts down the enemy’s ability to trade. Even if he doesn’t defeat them, they become practically useless for 5 turns unless they still have guaranteed attacks left.
- Whale’s Might telegraphs your movements and makes you predictable. If you use it with the intention of attacking the next turn, your opponent will be sure to prepare to repel your charge. This isn’t to say the skill is bad, it is still very powerful. Since you have plenty of strength buffs yourself, you can get away with using it as a bait of their shields and buffs. The main usage comes at the end of a Black Fog’s 5 turns, or in a downtime mid game when Pete doesn’t have a good chance to land an attack immediately.
- Since Peter Quint is a high priority target, he will not live for many rounds in most match ups once combat starts. I suggest using his skills as soon as possible (without getting over aggressive) instead of conserving his guaranteed attacks.
Contessa
- Talents: Tough 4, Accurate 4, Rough 4, Dodgy 4, Agile 1.
- Epics: First Strike 3, Relentless 1, Riposte 1
- This is my preferred build. It allows Contessa to get the chance for an additional attack which can be the difference in bursting down a companion. Riposte 2 can be taken instead of the Relentless 1 due to the general ability of Buccaneers to reduce accuracy.
- With the rise of timewarp-rushing Swashbucklers, Buccaneers, and Privateers you need extra protection in the case of only having 1 turn to prepare yourself. Contessa provides good mix of offense and defense for a Buccaneer’s team
- Contessa’s Gallant Defense can protect from on average 2 full exchanges with enemy companions and players. This can be enough to survive a Black Fog attack when combined with First Strike 3. In the picture below, Peter Quint is protected from hidden attacks at all angles. Wu Tang is protected except in the square to the top left. The Buccaneer pirate would be exposed; however, that is sometimes acceptable due to them being able to use shields. A Black Fog team would generally avoid targeting the pirate unless they had no protection at all.

-
- Gallant Defense can also protect against a Swashbuckler’s poisons or AOE damage. If Contessa is guarding a character, all AOE abilities that would have hit them will be redirected to her. With the popularity of Old Scratch mojo boosted AOEs, Contessa can protect you from the brunt of the damage. This can be a double-edged sword, as a 100% mojo buffed AOE can instantly kill Contessa if she is guarding your whole team
- If a companion protected by Contessa is attacked by Nausica’s guaranteed attacks, the attack will be cancelled unless Nausica is adjacent to Contessa (at which point Contessa will guard the attacks as normal). This shuts down the early effectiveness of that companion.
- Contessa’s Walk in Darkness can be used offensively; however, its defensive potential is underappreciated. Using Contessa to sit on the edge of Overwatch or Repel Boarders ranges will allow other companions to move through without being targeted by the enemy user. In addition, this is a key strategy to deal with Overwatch 5, the toughest matchup for Buccaneer.
- Backstab powered by a hide provides decent burst damage.
Wu Tang
- Talents: Tough 4, Accurate 4, Rough 4, Spirited 4, Dodgy 1
- Epics: Riposte 2, Relentless 2, Blade storm 2, Flanking 1
- Blade storm 3 is a possible change, although he shouldn’t be targeting companions where he has a chance of missing Blade storms. He should mainly be hitting minions or enemies that have been dodge reduced by a Buccaneer’s Hold the Line 3.
- Most of my rationale for using Wu Tang is discussed in this guide.
- As a brief summary, Buccaneer needs an Accuracy buffing companion to survive the general ranked queue. In a few match ups you can get away with not having one; however, running into a Swashbuckler or Privateer without 1 can be a disaster.
- Wu Tang’s heal contributes heavily to the play style of this guide.
- Even if Wu Tang only gets his heal and accuracy buff off before dying, he will have still done his job well enough.
El Toro
- Talents: Tough 4, Accurate 4, Dodgy 4, Rough 4, Agile 1
- Epics: First Strike 3, Relentless 2, Riposte 1
- This is a non-negotiable general build if you intend to use him in ranked. There are too many Swashbucklers in the queue to risk him getting destroyed by a hidden pirate or companion.
- This is the free to play alternative to Wu Tang, although they aren’t extremely similar in abilities. These differences were discussed as well in the Wu Tang spotlight.
- El Toro promotes a more offensive style which while effective in the past, isn’t the strongest style of Buccaneer at the moment
- 5 turns of accuracy boost forces you to move immediately to avoid wasting your buff. The tradeoff is a potential to avoid more damage and ensure more dodges/ripostes. With Vengeance Strike 3 being on members of the team, it is likely better to be taking hits rather than dodgy so overall his buff finds less use.
- His main advantage would be in his greater ability to trade with melee companions.
Temujin
- Talents: Tough 4, Accurate 4, Rough 4, Strong 4, Dodgy 1.
- Epics: Relentless 2, Bladestorm 2, Vengeance Strike 3
- Temujin is a staple to a Buccaneer’s companion list. He is used when you need a 3rd threat on your team after your Pirate and Peter Quint.
- I would only use him if you know that the queue is free of Swashbucklers and Muskets, which is very rare.
- His main disadvantage compared to Peter Quint is his lack of a charge ability, leaving his mobility low. This keeps him vulnerable when trying to advance on the opponent.
Barnabus
- Talents: Tough 4, Accurate 4, Rough 4, Armored 4, Strong 1 (or Dodgy 1)
- Epics: Vengeance Strike 3, Hold the Line 3, Blade Storm 1
- Barnabus acts as a second long range threat, but he has more defensive options than Peter Quint.
- Triton Song combined with his high armor stat make him a formidable wall against melee units.
- Hold the Line 3 takes the pressure off of your pirate, which can let you get away with free rounds in which the enemy is wasting their buffs while you are not wasting anything. If they run into Barnabus, his Vengeance Strike 3 combined with the dodge reduce can set you up for a significant amount of damage on the reduced or stunned charcter.
- 3 guaranteed attacks makes Barnabus a good character to finish off units with.
There are other units that can be used; however, these are the only ones I used to rank on in the last 2 years. Below are the possible companion lineups and when to use them.
Lineup 1: Contessa, Wu Tang, Peter Quint
This lineup is the one you should use if you have absolutely no idea which players or which classes are in the queue. It will provide you the most chances to win against the varied field of opponents. In particular, it provides the best defense against the large amount of Swashbucklers in the ranked queue.
I completed the majority of my matches with this lineup.
Lineup 2: Barnabus, Wu Tang, Peter Quint
This lineup is the best if you know that queue is only Buccaneers or Privateers. It is still good against the other classes; however, it is susceptible to AOE damage without Contessa’s protection. It can give you a greater pressure threat against classes late game if Barnabus survives due to the presence of the HTL 3. They won’t be able to approach while you can wait for an opening. If they approach, you get a lot of damage on them.
Lineup 3: Wu Tang, Peter Quint, Temujin
This is your high damage lineup used only when you are absolutely sure there are no Musketeers in the queue. If you face a Musket with this lineup, you start out the match with a disadvantage due to Temujin’s low mobility.
Lineup 4: El Toro, Peter Quint, Barnabus
I would not suggest using this lineup, but use this if you do not wish to buy Wu Tang. You are giving up sustainability in the match in favor of trying to end it quickly. You will most likely lose late game if the match does not end early, but you have a chance at the least as long as Barnabus survives.
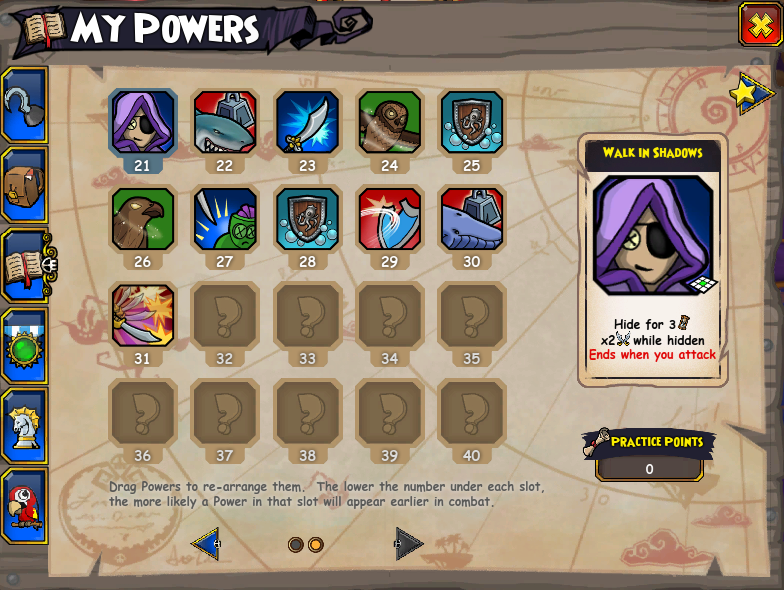
Power Organization
Before I begin, the strategies I discuss will be from the point of view of Lineup 1: Contessa, Wu Tang, Peter Quint. Examples of matches using this strategy can be found in this playlist.
Below is the power lineup I would recommend. Depending on your pet grants, you can freely move around a few pieces as long as the general positions are the same.
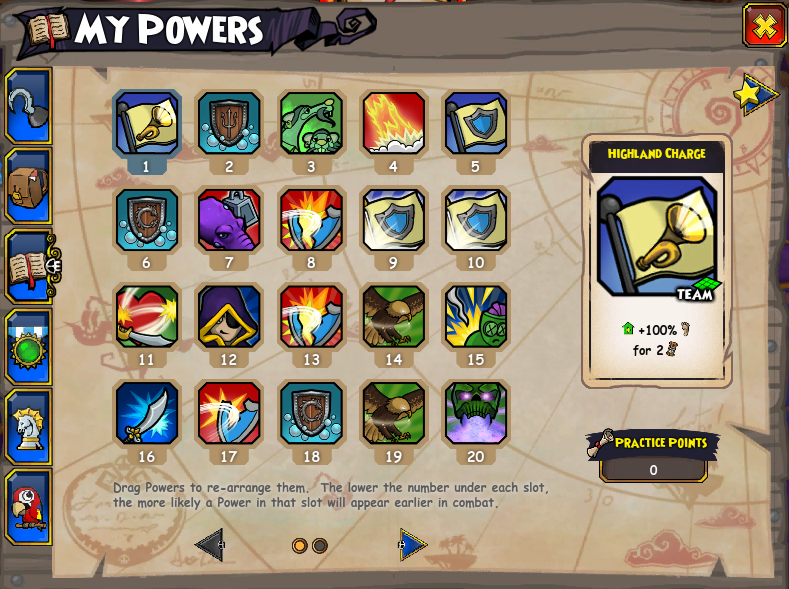
- Highland Charge should always be number 1 as you always want to have the potential to prepare for a charge at any time. You won’t always be shooting to use this card 1st turn, but you always want it on hand to force the opponent into the defensive when needed.
- 25% shields (Triton Song and Valor’s Shield) should be in the top row. The 25% shields are good to use if you are within range of a charge. Combined with a 50% shield (Leviathan’s or Valor’s Fortress) you can survive any 1v1 engagement and can often take multiple opponents at once.
- Gunnery and Ghostwail (if trained) should be in the top row. If you are in a low pressure situation early in which you aren’t in danger of being attacked the next turn, these can be used for free damage on the opponent. Their primary usage, however, is to be discard fodder. As a Buccaneer, every single one of your cards has a use at some point in the match. Having to discard a heal, attack, strength buff, or shield just to get a needed card into your hand is a huge blow to your ability to win the match. These 2 cards are low impact in general so they can be safely discarded to repair a bad turn 1 hand.
- Kraken’s Coils early in your list ensures that you have 1 more card that you can use to help cycle your hand. Wasting a few turns of this in exchange for getting an important card to your hand isn’t bad. Since you don’t have many Buccaneers on your team, the strength buffs aren’t as vital to your success as they would be in a 4 Buccaneer composition.
- Reckless Frenzy in 3rd/4th row. It is extremely unlikely that a competent opponent will allow you an opportunity for a free Frenzy on their team. I put this card farther back into my deck to avoid it clogging my hand early in the game when I need to draw my key shields and attacks like a Vicious Charge.
- Walk in Darkness is in the 3rd row so that it can be used as a Black Fog defense or in the mid game to bypass epics that would impede your attacks. Just like with Reckless Frenzy, I leave it back in my deck as it is likely that you will not need this card until a few turns into the duel rather than turn 1.
- Shark’s Fury/Whale’s Might in the back. This is a contentious position for the buffs. Kraken’s Coil and Peter Quint’s Whale’s Might are enough strength buffs for the early game. You don’t want to discard these cards though as late game they are very useful. In a 1v1 scenario against a melee opponent, a strength buff can sometimes be equivalent to a shield in that it will make the opponent reconsider attacking you directly. You should save these buffs for when you are alone and need to make your final attacks do the most damage that they can do.
- Haywire Strikes have one purpose: Use them as finishing strikes on companions or players. Appropriately, they are in the second half of the list.
- Every other card position is rather straight forward. Shields are up early, heals are in the middle, melee shields and strength buffs are in the back.
Strategy

Against Buccaneers
- Your companion composition promotes waiting for the Buccaneer to attack you. Only take the offensive if they leave a companion in the open and Hold the Line doesn’t block you.
- Putting up a 25% shield is your first priority to avoid getting rushed early. Only use a 50% shield if they use one themselves or if they use Highland Charge. Any other time wastes turns of your shield, since your intention isn’t to be aggressive.
- Do not run into their Hold the Line unless you have reduced the opponent. If they run into your Hold the Line, consider using Reckless Frenzy.
- Eliminate Peter Quint as soon as possible. Unless he is at low hp and can be bursted down with a Contessa Hidden Backstab or an Assassin’s Strike, lead with an accuracy reduce attack as Vengeance Strikes will destroy you otherwise.
- Do not be conservative with your attacks once the enemy initiates on you. Ensuring Peter Quint or El Toro is dead is much more valuable than the chance of them surviving later into the match. If you reach the end of the game with 1 companion against 0 companions, you have a massive advantage in damage potential.
- Count their Brutal and Vicious Charges. If they have none left, you can run away from them to wait out shields rather than continue trying to match their shields. As long as your health is higher than around 2000, you are not at a large risk of dying to a Mighty Charge.
- Most of the late game will be spent matching their shields and keeping your health pool just above 50%. If you play on the defensive most of the match, you should have more shields by the end of the game which will give you an opportunity to attack into them while you are protected and they are not protected.
- Your weapon’s magic damage properties will ignore their armor, leading to a significant amount of damage throughout the match. This is the primary reason you want to use the Haywire weapons.
Against Swashbucklers
- Feel free to use Highland Charge 1st round to force out their Black Fog early. If they don’t have it, you likely win the match or force them to shield. Do not follow up the charge unless they leave a key unit, like Old Scratch or Nausica completely vulnerable. Peter Quint will destroy them.
- If they use Black Fog, prepare your companion positions to protect your Peter Quint. Use Contessa’s Gallant Defense the same turn as they Black Fog. Do not use it in anticipation, always use it in reaction.
- Put a 50% shield on once a companion is in range to reach you. I always try to stack a 25% and 50% shield if possible.
- In the worst case, use your Walk in Darkness to protect yourself if you can’t get out of range of a purge. It likely won’t be wasted, as Swashbucklers generally run at least 1 unit susceptible to hidden attacks.
- Always assume that the Swashbuckler has Purge. Never end your turn in a 3 block radius of them early game or else you will most likely die. It may be useful to examine the swash pirate’s starting health. Should they have 2925 health, they are almost certain to have purge.
- Even if you fall behind in companions, Buccaneer can easily catch up if you run away from them and force the enemy to run into your Hold the Line in order to attack you.
- Attacking into a shielded Swashbuckler will likely end in taking more damage than is dealt to them. Only attack if they have reduced dodge or if they do not have a shield on.
Against Privateers
- Spread out companions as soon as possible.
- If they go hidden in the early game, immediately use Gallant Defense and put a shield on yourself. The risk of a hidden powered Boon outweighs the potentially wasted shields. A Nausica with this boosted attack from the buff will absolutely destroy your team if you are not protected.
- If they use Fall Champion Trees, you will be playing on the defensive for a long time. Keep yourself between the trees and your companions without grouping your companions up. Tank as many hits as possible with your shields rather than letting your companions take hits. Only bring up the companions if you believe a kill on a tree is guaranteed.
- If they don’t have trees, slowly edge your companions up so that everyone could reach the Privateer if you chose to activate Highland Charge the next turn.
- Take down companions, and don’t use any attacks on the Privateer unless they leave themselves open. Most of their damage is from keeping their companions alive as long as possible. Feel free to use a hide if it means a companion will die.
- If Emmett lands his damage reduce on you, spend the turns buffing, running away or landing finishing blows. Don’t expect to do much damage during these turns.
- Once the match is down to a 1v1, never attack the pirate if they are close to 50% health unless they lack a shield. Soul Shroud damage is their ultimate win condition so don’t fall into it.
- Basic attacks should be used when they are above 50% health. Guaranteed attacks should be used only when they are below 50% health and unprotected.
- If you are above around 2000 hp, feel free to run away from them unprotected as an Assassin Strike will not be able to kill you from this threshold.
Against Musketeers
- Timing out bombs leads to a better chance of victory. Don’t rush through them unless you can land a devastating attack on them.
- Your hides are your greatest strength here. Your hide should lead directly to a Reckless Frenzy or to the death of at least 2 companions in combination with Peter Quint.
- Even if they use Contessa, your hide can still translate to a lot of bombs wasted on the ground.
- Since their dodge is low, getting hit by Overwatch’s Accuracy reduce can still lead to successful chains, so don’t be afraid to enter that range.
- Use Reckless Frenzy early to take down companions. You may only have one good chance to attack them, so you have to make it count.
- Your accuracy should be high enough to not have to worry late game about missing too often.
- If they use Overwatch 5, you only have a few chances to win the match without immense luck. Take your time and wait for them to move up to you. This is Buccaneer’s hardest match up by far, so expect frustrating losses.
- Placing a companion just outside of Overwatch range and then moving a second one into the range can prevent them being pushed away. This can let you get Peter Quint into them.
- A hidden Contessa or pirate can also help you run your companions through the Overwatch range safely.
- If you happen to know that an Overwatch 5 Musket is in queue, consider bringing a second piece of gear that has a hide. Josey’s Ring or another piece of Bazaar gear in exchange for a Revive is acceptable.
Against Witchdoctors
- Use boxes to avoid line of sight.
- If they don’t have Trees, Highland Charge as soon as possible. Even if you only can target Ratbeard, taking him down means you are that much closer to being able to reach the pirate.
- Once your pirate or Peter Quint reaches the opponent’s pirate, the game ends in most cases. Witch hunter and strength based attacks will shred the Witch Doctor with little resistance.
- Reckless Frenzy early, even if only to kill companions. Their pirate alone is little threat if they haven’t damaged you a lot already. Chains happen regularly in this match up, so even a basic attack can lead to a 5+ attack string.
- This is the one match up in which you play exactly like a standard aggressive Buccaneer would play.
- If they have Trees, focus them down unless you somehow have an unimpeded line towards their pirate.
 Final Thoughts
Sometimes waiting for an opportunity to present itself is stronger than constantly trying to force one to occur. Playing Buccaneer in this style will lead to a better understanding of the game’s underlying mechanics than pursuing an aggressive style would. Good luck in the Brawling Hall.