July 16, 2017 September 3, 2023
Beginner Grandmaster Myth PvP Guide (1v1)
 Meet Molly Misthead, my level 51 Myth, and learn about my setup in this Grandmaster Myth PvP guide. I got my rank at the very end of the 3rd Age, but this will work just as well in the 4th Age. I’d wait a bit till all the hotshots have ranked up though, just so you can get an easier start :p Do tourneys while you wait!
If you’re a beginner at PvP, this guide is just for you! I’m especially trying to help Grandmaster Myths who have a rank below 500. Being stuck in the sub-private regions is not much fun. I spent quite a while down there myself, so I know what it’s like. In this guide, I will attempt to explain how I worked my way up to rank 1500-ish.
I will be pointing out some of the things that long-time PvPers do automatically. I will try to include everything I can think of that everyone takes for granted. If you’re really only getting to know the basics of PvP, you will have to understand that you will have losses. Losses are not a thing to be ashamed of — they’re just learning opportunities! Reflect on what has happened in the match and then try again.
1. Gear
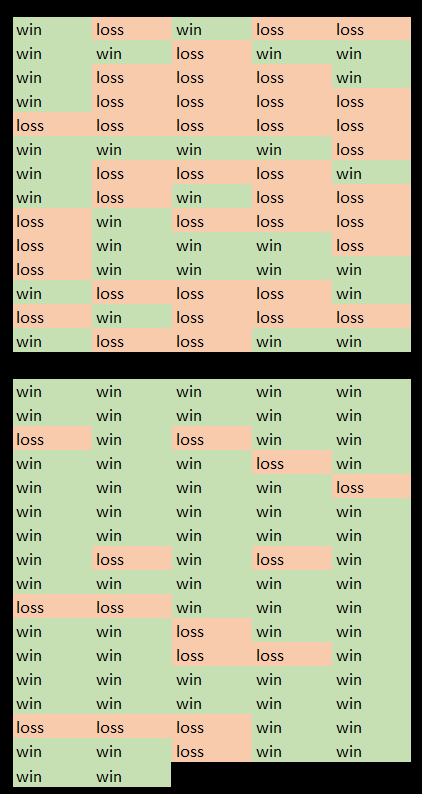
Gear matters. Sometimes I wish it didn’t, but it clearly does. Just look at the following image. The first half of this image is a representation of my wins and losses before I got geared up. As you can see, it’s riddled with losses. The lower half is what happened after I got gear. There’s a clear change, isn’t there? For me, all that was needed in order to start winning more was a gear change.
Make your gear and strategy match
If there’s anything I’ve learned during my recently adventures in Myth PvP, it’s that your gear and your strategy have to match. Right now, for me, they do. My new gear is focused on damage and pierce, which fits with my kill-or-be-killed style of PvPing. In my old gear I was trying to play aggressively without an aggressive set-up, so that didn’t work.
One thing to keep in mind if you follow this guide is this: this is a great gear set-up if you’ve been losing a lot. As a Grandmaster with low rank, you’ll be facing a lot of Magus overlords. An aggressive set-up is perfect for facing Magus overlords, because they don’t have enough health to survive it. However, if you DO rank up with this gear, you will eventually need to switch your gear. You’ll start facing higher level wizards with more health who won’t be as squishy as the Magus wizards you face in the low ranks.
The Duelist gear in this guide is meant for an aggressive playstyle. Glendemming gear, on the other hand, is perfect once you have ranked up somewhat. Glendemming will allow you to play defensively, which gets important when you start facing Legendary wizards. Don’t worry about that for now though, first we need to get you out of the sub-privates!
Arena Tickets
When you look through the gear, you will see most of it costs a lot of Arena tickets. While this guide doesn’t require any Crowns, it DOES require some work. To get enough Arena tickets, you will need to do tourneys. However, don’t stress about the tourneys, please. Think of them as a kind of gear farming. You’re just slowly gathering enough tickets to start your road to warlord. Winning tourneys is not important: even if you end up last, you will get tickets. If you end up last in every single of your tourneys, getting the gear recommended in this guide will take you MANY tourneys. However, it won’t cost you ANY Crowns! Plus, you won’t be last EVERY time, don’t be silly.
A trick to get your tickets faster could be to do tourneys in less popular times. Those tourneys won’t be full, so even if you’re last, you could still be 5th or 6th, which would give you more tickets.
The Hat
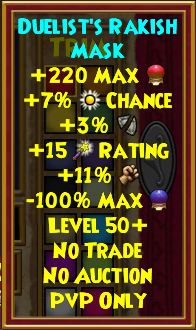
This hat (Duelist’s Rakish Mask) is sold by Brandon Mistborn, the badger right outside of the Arena. It’s quite expensive: the hat will cost you 3000 Arena tickets, aka TWELVE tourneys if you end up being LAST in all of them. Just keep going. It’s worth the trouble.
The robes
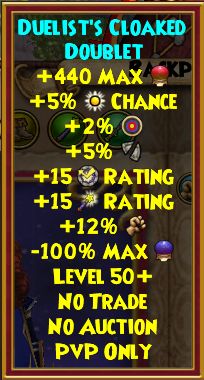
Duelist’s Cloaked Doublet is a very pretty looking robe if you ask me. It will cost you 5000 Arena tickets, aka twenty tourneys if you get last place. You’ve got to work for your rank! Be glad it’s not Crowns.
The boots
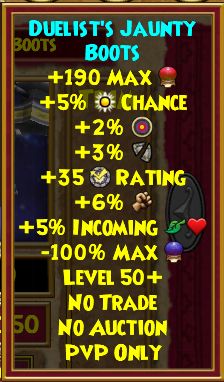
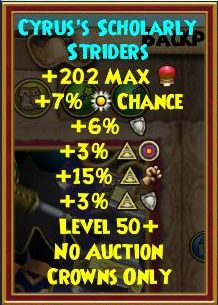
The boots Brandon Mistborn sells are called Duelist’s Jaunty Boots. These will cost you another 3000 tickets. If you DO have some Crowns and want to save your tourney-gold for pet hatches, you can also buy the Professor’s Hoard Pack and get the boots from there (Cyrus’s Scholarly Striders). These Crowns boots will give you extra damage, extra resist and extra power pips, so they’re totally worth losing a little pierce and health over if you ask me. I’ve used both these boots and I can’t really decide which ones I prefer.
The ring
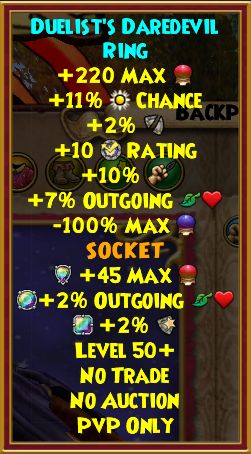
Duelist’s Daredevil ring will cost you another 3000 tickets. Just like everything else, you can get it from Brandon Mistborn in Unicorn Way. Time to go lose some more tourneys!
It has three jewel slots. First, for the square slot, I went with stun resist, but I can’t say I’ve ever resisted any stuns, so maybe flat resist is more useful. Second, the round slot should ideally be filled with a flat damage jewel. You’re not healing so don’t be a misthead and use a healing jewel! Third, put a health opal in the tear-shaped slot.
The Wand
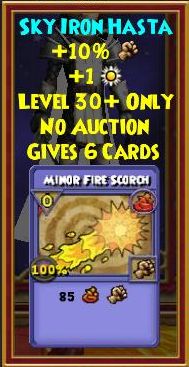
Yay, something you won’t need Arena tickets for! You can get the Sky Iron Hasta wand from Mount Olympus. It’s a guaranteed drop in there. That ten damage is hard to resist.
The Amulet
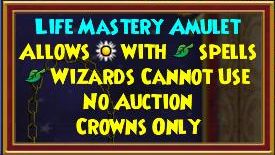
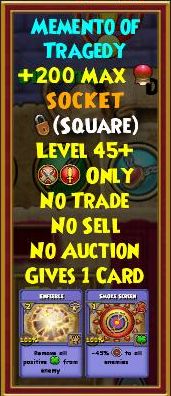

I used a Life Mastery amulet, but you don’t need one. This guide is NOT defensive, so you will not be healing very much. I mostly used my Life Mastery to give my opponents the impression that I was going to heal. Let them waste a round on Infections and Life Dispels! However, there are plenty of other options that are more useful and don’t rely on mind games. Diego sells the Memento of Tragedy, which gives an Enfeeble card. I’m a big fan of Enfeeble! Use it when your opponent is stacking blades (which magus overlords often do). Thirdly, Brandon Mistborn’s amulet (Duelist’s Virtuoso Talisman) comes with a Gargantuan and Infallible card, both of which are very useful. I’m sure there are other options. Just keep in mind that you’re trying to be aggressive and make your choice based on that!
The Athame
Another 3000 Arena tickets to Brandon Mistborn in Unicorn Way! The triangle socket would be important to fill with either an accuracy or a pip chance jewel. The other sockets don’t matter as much. Fill the circles with flat damage or a healing boost. The tear socket is for a health jewel.
The Deck
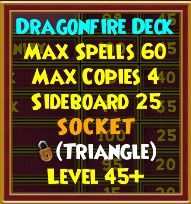

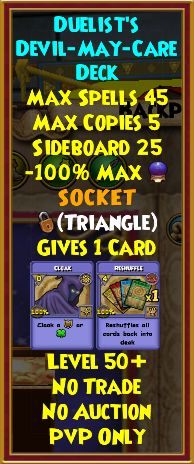
When it comes to decks, I don’t really have any advice other than this: pick one with a triangle jewel slot. Dragonfire and Runewarden can be found in the Bazaar, while Duelist’s Devil-May-Care Deck can be bought for more Arena tickets from Brandon Mistborn. Since I’m a regular at Brandon’s, I went for the third option! Not much thought went into it for me though. He was right there, it was convenient, I had the tickets, so why not?
For the triangle slot, you could use either an accuracy or a pip chance jewel. You can buy both from Jordo Mistborn in Unicorn Way, not far from his brother. You’ll have to decide for yourself which one suits you better. However, if you have an infallible pet, I’d go with power pips.
The Pet
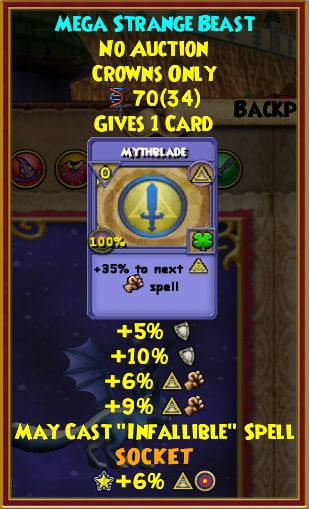
I have the perfect pet, so that has helped a lot. Try to get a pet with damage! Resist is also good if you can. Infallible is also a very important, as it means you don’t need to waste a round to cast it yourself. I know getting the perfect pet is hard, but just keep hatching. If you run into me in the Arena, you can always ask me for a hatch. I usually have enough gold.
You pet jewel will depend on what talents your pet has. If you can get your hands on a damage jewel, use it! Accuracy and pips are also useful. I’m currently using an accuracy jewel but will switch to a Pain-Giver jewel once I get this pet to Ultra.
With these gear choices, your stats will be pretty unbalanced. By that I mean your resist will be pretty bad (20-ish), but your damage will rock (80-ish). That’s okay because that’s what we were going for. This set-up will work for you when you play aggressively. Never forget that you are squishy like a little bug. Instead, focus on squashing everyone else with your damage and pierce!
2. Training Points
At level 50, you will have access to a maximum of 21 training points, I believe. This is only possible if you’ve finished questing from Wizard City to the beginning of Celestia (no side quests) and have done Grizzleheim to get to Wintertusk. I recommend checking out our training point calculator to see which training points you have available to you. I didn’t do Celestia at all and chose to do Wintertusk instead (more XP, it feels more rewarding to quest there). However, I did port all through Celestia to get the Zeke training point from there. Likewise, if I remember correctly, you can get the Wallflowers in Wysteria by porting to someone.
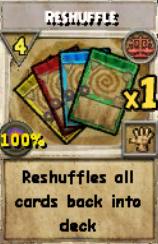
- Reshuffle – 1
- Infection – 1
- Spirit Blades – 1
- Ice to Tower Shield – 5
- Stun Block – 1
- Life to Satyr if you’re going to use a Life Mastery – 7
That’s only 16 training points used! I suggest keeping the rest until you’re one hundred percent sure what else you want to train. High rank grandmasters train all kinds of things I don’t find essential if you’re a beginner. They’d make the deck needlessly complicated. You could consider training these spells once you have ranked up and want to try a more defensive play style:
- Storm shield: in case you get a pet with may cast Enfeeble and want to get rid of Storm dispels
- Balance up to Weakness: for a more defensive build or to trigger your pet’s may cast Enfeeble
- Storm dispel: if you’re going to go defensive and need to block your opponent’s pet’s may cast Enfeeble.
- Life dispel: you might want to keep the opponent from healing
- Balance dispel: good against Balances, but also good for locking people out of Reshuffle
3. Lore Spells
Farm for Ninja Pigs from Koto in Mooshu. I don’t use Ninja Pigs as often on my Grandmaster Myth as I did on my Master Myth, but it’s still a nice spell that will do more damage than Medusa if it’s enchanted with Gargantuan. I recommend Koto over Loremaster because he drops it much faster.
Of course, Loremaster could drop you some other nice spells as well! Notice with these that if you really are a beginner, they would require some changes to your strategy and will make your deck more complex. That’s not a bad thing, but I prefer to keep things simple.
- If you get Luminous Weaver from Loremaster, it could make a Life Mastery more reasonable than the other options mentioned. Goat Monk is less interesting because it doesn’t leave a weakness.
- Keeper of the Flame and Athena Battle Sight are also Myth spells you could get from Loremaster. I’ve never had them, but they could be useful, I suppose. The first leaves a trap and the latter a -35% shield.
- Getting the Loremaster spell could be interesting too! If you have a Balance Mastery, you could try that out as well. Loremaster would make your play slightly more defensive than a full-Myth set-up, but it’s an awesome spell, so if you’re self-assured enough, you can try to tweak my deck to fit it in!
3. Deck set-up
I spent a lot of time thinking about what deck to share. I’m aiming this guide at total beginners, so I’d like my deck to be fool-proof, something anyone can use. Jeremy (who’s pretty much the only person I take advice from lol) says I’m overthinking it. Decks always look like their makers. What works for me might not work for you. However, I’d love to offer you the best deck I can possibly offer.
Consequently, I’ll be sharing two decks. Firstly, my own deck. I don’t recommend using this one because you’re not me. Regardless, I thought you might still like to see what I work with, no? Secondly, the new and improved version that you could give a try! Maybe comparing my deck with the new and improved version will give you some insight.

I don’t recommend you use this deck for the following reasons:
- It has too many heals! Admit it, you’d be tempted to heal and play defensively if you had all those heals in your deck. The new and improved version doesn’t have them, so it will force you to play aggressively. This is very important because your gear is built for aggression. If you have less experience PvPing, you shouldn’t put anything in your deck that doesn’t fit your strategy.
- This deck has several spells I’ve never used: the Cyclops minion, the Weaknesses, the Ninja Pig. These are the spells I always discard with the intention of drawing something from my side deck. Why do I carry these spells specifically? I guess in the very beginning, I thought I might use them. Then, I never did. I could have removed them, but you need something to discard, so these spells were as good as any.
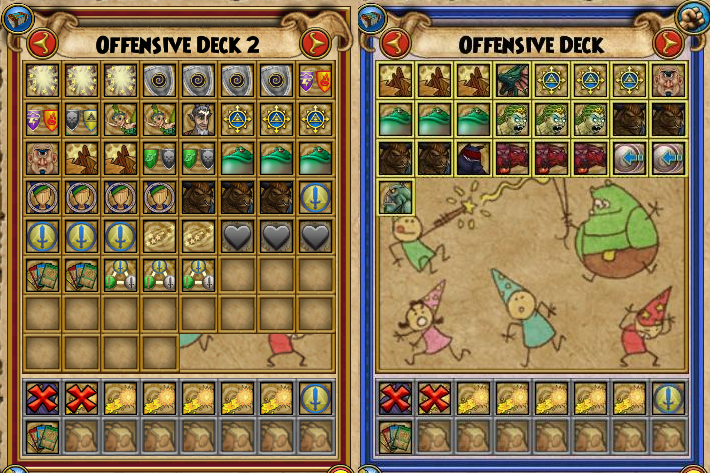
Note: this deck is bigger than the one I started with, so I didn’t fill it up any further. I hope that makes it easier to compare the two. Also note that decks don’t have to be full! Just because you have a deck with 60 spaces in main doesn’t mean you need to use 60 spaces. In fact, if you would fill this deck up, you would lose the balance of the spell amounts I feel works in this deck. I’d say, even if you pick a bigger deck, don’t add anything to it for the first 10 matches. Give it a serious try the way it is and, then, tweak it as needed.
4. Try-Hard vs Regular
Before we go any further, ask yourself: how much trouble is ranking up worth to you? If you follow this guide, you will be spending a considerable amount of gold and time on tourneys to get your gear, and still more on pet hatches. In addition, getting Ninja Pigs will require farming Koto for a while. On top of all of that, are you prepared to also work for your TC?
High five if you answered “yes” to that last question! Welcome to the club of try-hards! xD If your answer is “no”, don’t despair, I will list alternatives for you that will cost you less time and effort. Just keep in mind that some of your choices will make ranking up more difficult.
I’m definitely a try-hard, and I’m not even ashamed of it! Here’s the difference between try-hards and regulars:
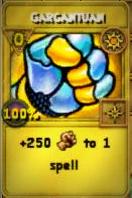
- Gargantuan vs Monstrous: Try-hards should do their crafting quests up to Celestia. As a Grandmaster Artisan, you will be able to craft Gargantuan. Since you can buy Gargantuan from the Treasure Card Vendors only once you’re level 58, that option is not open to you. If you’re not up to the challenge of crafting, you can buy Monstrous treasure cards from the Archivist in Celestia’s District of the Stars. Less damage, but still not bad.
- Shift vs Triage: As a try-hard, I constantly farm the Bazaar for Shift treasure cards. Shift is a neat Myth spell that allows you to throw a DoT spell back at your opponent. This is especially fun if you’re first against a Fire with Burning Rampage, but works for Basilisk and Heckhound and whatever as well. If you don’t have much time to farm the Bazaar, try to farm for Triage TCs instead, as they’re slightly easier to find. I don’t recommend fighting a Fire, Myth or Ice without either of these two cards.
- Aftershock vs Earthquake: Earthquake you have as a trained spell at Grandmaster, so that one requires no work other than enchanting them with either Gargantuan or Monstrous. Earthquake’s baby brother Aftershock will take you a bit more work to get, but will remove your opponent’s blades for only 4 pips! Totally something every try-hard should have! You can get them as a reward for the 112 tourneys you will be doing to get your gear, or from hours of Bazaar farming.
- 45% vs 35% Time of Legend: Yes, there are different versions of the Myth bubble available in the Bazaar! Buy the +45% ones if you can, they’re not really all that rare.
- Ninja Pigs vs Oni No Jade: If you don’t want to farm for Ninja Pigs, you could replace them with Oni No Jade TCs. I’m not exactly sure how rare they are, but the few times I checked during writing this guide there were always a couple available. Oni No Jade will cost you one more pip and give you about the same damage as a Ninja Pigs enchanted with Monstrous.
5. Beginner Tips for PvP
If you’re new to PvP, the following tips and tricks are meant for you. If you know these things already, you’re already one step further and can move on the part 6 of this guide, nice! I just want to cover everything I possibly can to help you on your way. This means pointing out some of the more obvious things. Still, don’t be sad if these things aren’t obvious to you yet!
5.1 Enchanted Hits
 Most of the attacks you will be using will come from the side deck. These Treasure Cards are not bought from the Bazaar, you will need to enchant them yourself. This should be done before you set foot in the Arena. Don’t forget to change decks and add your newly made Treasure Cards to your PvP deck!
Please note that the attacks in your main deck are meant for discarding or emergencies — not as your main attacks! More experienced players are able to win many matches with their non-enchanted main-deck hits and feel like they have to “save” their side deck hits for more demanding battles. As a beginner, however, it is simpler to depend on your side deck. Our battles won’t last all that long, so being able to quickly pull an attack is more important than preserving TCs.
The best enchantment you could use at Grandmaster is Gargantuan. However, you can’t buy it from a vendor, you will have to craft it. This requires you to do all your crafting quests from Wizard City through Celestia. If this is too much work, you can also enchant your hits with Monstrous, which you can buy from example from the Archivist in Celestia.
5.2 Knowing who your Opponent is
When you click “confirm” and get teleported into the Arena, the first thing you will want to do is to find out your opponent’s school. Knowing your opponent’s school will help you decide which cards are redundant and can be discarded right away.
The second thing to check is whether your opponent has a Mastery Amulet. These amulets are visible as a floating light circling around your opponent’s head. Is the light green? Then your opponent has a Life Mastery Amulet. Not all colors are as easy to distinguish from one another. Red indicates either Balance or Fire, with Balance being a lot more Common. Blue-ish could be Ice or Myth, and is most commonly Myth. Purple-ish could be Storm. What color is Death, you think?
5.3 Figuring out your Opponent’s Playing Style
This is important to figure out, because you will be adjusting your play style to counter theirs to some extent. Usually, an opponent’s school will give you a first possibility to guess what kind of a player they are. Ices are often considered tanks: slow players with good resist, leading to long matches. Storm wizards on the other hand more often spam hits.
However, the school doesn’t tell you everything. A Fire wizard COULD be a Rampager (get Triage/Shift ready!), but they might just as well try another route. A Life wizard with a Myth Mastery will not necessarily be using any Life hits at all; instead they could focus on Basilisk’ing or Medusa’ing you to death.
Getting used to the different playing styles and recognizing them in time to take measures against them is a long road. Don’t expect to be good at this right from the start, just reflect on what you learned after every match you play. It’s a learning process!
That said, in our matches with this set up, there will be very little need to adjust your play style to your opponent. After all, we will be attacking as soon as we can pull off a combination of some sort. We’re in charge here, not the opponent. We have a mission — get ready to kill them — as soon as we can!
5.4 Discarding Properly
Many beginners don’t discard aggressively enough. Don’t be afraid to discard a card that you won’t need this round nor the next one, even if you think you might need it in 4 rounds. This deck has multiple copies of pretty much everything, so you can and should be discarding what you don’t need right away. Two towers in hand? Delete one! A Fairy in round 1? Discard! Whenever you delete something, it’s an opportunity to pull something from your side deck. Right from the beginning, you should be pulling something from your side deck every round.
5.5 Counting your Cards
I’m personally pretty bad at this one. You deck doesn’t have an endless supply of everything. You will need to keep track of how many cards of a certain type you have used or discarded already. If you use the new and improved deck, this will definitely be important for reshuffles and heals.
Definitely count your reshuffles! Delete the first one to appear, hold on to the second one and only discard that one when number 3 appears. Early reshuffling is always a good thing (when you have about 15-20 cards left), especially if you’ve been discarding side deck attacks in order to find Aftershock or Shift.
5.6 Pip Management
Especially as you rank up, you will see that people don’t really attack right away (unless they’re Storm). They will be using utility spells like Blades, Weaknesses, Infections etc while building pips. You should be trying to get a blade or two on yourself as soon as possible. Use your Living Puppet minion, as it’s a good shield breaker and costs zero pips.
However, aggressive Myth is slightly different from most schools. While building pips is important, your easiest chance of winning is by Medusa before your opponent finds Stun Blocks. As such, if in the third/fourth round you have enough pips (8-10), ATTACK! Medusa will stun your opponent for two rounds, so you have time to set up your next attack after that. Sadly, if they find Stun Blocks right away, your play style should change right away and you sould be focusing on getting as many pips as possible before you start being offensive. Getting rid of white pips is important for most schools, but slightly less so much with Myth. Minotaur is 5 pips, and Orthrus is 7 pips, so those white pips don’t matter all that much.
Remember to be a threat to your opponent. A scared opponent makes mistakes! As for yourself, remind yourself that a little bit of fear is good for you: it keeps you on your toes. As long as you realize your opponent’s pips or blades are intimidating you, you will be paying extra attention and avoid the mistakes we’re hoping the opponent will make. Myth is luckily a scary school to face, so your opponent should be scared a little as soon as they see you already 😉
6. General Strategy
This guide is meant for an aggressive play style. It’s not generally a very spammy set up; rather depending on pulling off combos. Most of our combos rely on either Medusa (if we’re fast enough to hit before our opponent puts up stun shields) or Orthrus. Follow those up with whatever you have in hand and you’re done. Sounds simple? It kind of is! That’s why this is a beginner’s guide.
Plan A
Generally, round one is for blading, discarding and pulling Medusa. If you have a blade in hand, use it. If you don’t, maybe you pulled a bubble, use that. Round one is best spent being aggressive. Your third good option would be your minion, because they’re excellent shield breakers. The only exception to this is if you face a Myth or Ice, or someone with a Myth mastery: against those opponents, you will need to put stun block before anything else. If you pulled stun block, use it. If you didn’t pull it, discard cards from your hand and don’t draw from your side deck, so you’ll be able to draw as many main deck cards as you can the following round.
The second round, like the first, should be spent being aggressive: blade, bubble, minion. It does’t matter if you use the same blade twice either. Better two blades that don’t stack than only one blade. We’re trying to pull off a Medusa here before our opponent can stun block, so we have to be quick.
If they haven’t stun blocked, Medusa them as soon as possible. Don’t bother trying to first build pips in this stage of the game. You can gain those pips while your opponent is stunned. The first post-Medusa round is a blade round (shield if you can’t find blades, or use a stun to get rid of Medusa’s stun block). The second round is either the round to attack (if you’re second) or another round to blade or shield and build pips (if you’re first). Attack round 3 from first. That’s it! They should be dead now. Grats, you got an easy game xD
Plan B
However, if your opponent has stun blocked, you can relax and slow down the pace just a tiny bit, because your chance of an easy win is temporarily destroyed. Discard your Medusa, if you get one in hand, because you won’t need them until after a reshuffle. Your second plan is to Orthrus your opponent. Try to keep your bubble up, try to get some blades on.
In the beginning, when you’re mostly facing Magus overlords, don’t worry too much about having lots of blades on you. One blade and a bubble should be enough, especially if you manage to get a pet with may cast infallible. Minions should be killed as soon as they show up with either Humongofrog or Aftershock (favor Aftershock if they have 2 or more blades), don’t postpone this. Don’t worry about wasting blades on these AoEs: getting rid of minions is much more important than having blades.
If you’re more self-assured about your PvP skills and want to save your blades, you could replace some of your TC with enchanted Seraphs if you’re using a Life mastery. This will make your deck more complicated (the more spell variation you have, the more difficulty you will have finding exactly what you’re looking for from your deck), but it’s definitely worth considering. Especially when you’ve ranked up a bit, this could be a good idea.
Do not go defensive. Do not stack shields. And do not heal unless there’s absolutely zero chance you can kill your opponent instead. We’re in it for the thrill, live on the wild side a little, will you?
Plan Misthead
Hey, I am a Misthead, so don’t exect too much logic from me. Sometimes I just throw all plans out of the window and do random stuff. A random Minotaur with nothing to follow it up with? Sure, why not! Let’s see how your opponent reacts! Please note that by “random stuff” I don’t mean randomly putting up 6 stun blocks or using a Storm/Fire shield against an Ice. Random attacks! We’re aggressive, let’s do some damage even if it won’t kill! Having no plan and randomly doing stuff can work out great because your opponent will first wonder what you’re up to and then start underestimating you. It can also mean you die, but who’s scared of death when you always respawn. Try it sometimes, but don’t do it every match. We’re here to have fun, remember? Always following a strict plan will make you both stressed and bored.
7. Spell-Specific Advice
Next up: a look at what each of the spells in your deck is used for. If you’re truly new to PvP, it would be extremely important that you read these. When you know what specific uses I have in mind for these spells, you will know when you can discard them and in what situations you should keep them.
8. School-Specific Strategies
This section is hard to write because so much depends on who you are facing. On your way up to warlord you’re bound to meet all kinds of players. There will be overlord Magus wizards, Grandmasters and low-ranked Legendary wizards. I will try to give some kind of an impression of what each school is about, but there are so many factors, and frankly this guide is too long already!
Fire
I haven’t met many fires on my Myth this time, but there always are a few! Fires can be extremely dangerous if they have Rampage and if they go first. Unfortunately it’s almost impossible to counter a Rampage from second unless you have awesome predicting skills and can cast Triage or Shift the exact round they cast Rampage. From first, it’s much easier, since you get to pick your next card before the damage comes through. From first, it’s an awesome idea to Shift the DoT back at your opponent. Make sure you always kill their minion, because if they’re second, they could try to time their Rampage with their minion’s Fire Elf, thus making it impossible for us to remove the DoT.
Fires without Rampage are still hard to face, since they usually are pretty aggressive. Don’t discard your wands in case they Efreet you. Play like your life depends on it. Because it does.
Ice
Ice is a defensive school and most good Ices will blade stack. Aftershock is awesome in these battles, if you have any. Usually these Ices will try to go for at least three blades, so two blades is your mark to Aftershock. Spectators may tell you that’s a waste and that two blades isn’t that much yet, but trust me! In our gear, two blades would be enough to kill us.
If they’re low levels with high rank, prepare to be one-shot killed by Lord of Winter. Make sure you stun block in case they have Winter Moon or use Woolly Mammoth. Ices have good resist, so a pet with Infallible will make these battles so much easier. Win the bubble war! Kill their minions immediately!
Storm
Most Storms you face will be very bad and most probably higher level than you. They will be aggressive, obviously. You can go two routes: either shield a lot, or go all out on attacks. Storms usually won’t Stun Block (because you will find very very few GOOD Storms), so I would recommend just blading once, shielding once and then Medusa’ing them. That will give you time to blade some more and kill them. Storm is all about luck, so let’s hope they don’t get lucky with their Wild Bolts. Stun block might save your life, if you can find a moment to cast them.
Balance
Balances are scary, ugh! There’s just so many things a Balance could do! If they have a Life mastery and are higher rank, you can expect Weaver, Spiny and Gnomes. Don’t let them blade up: Aftershock is your best bet here, after even two blades (we’re squishy). Bubbles are also important: defensive balances love the Life healing bubble. Once you rank up, many will also have the Guardian Spirit wand. If they do, you’re best off killing them when they’ve already used it and need to reshuffle. That’s hard to plan for though. Just keep up your aggression and try to pull off combos. Balance has Spirit Shield so get your minion out to help keep those away.
If they have Loremaster and like to spam it, you’re most likely going to lose. It only takes like three Lores in a row to kill you. Pray your pet does Infallible to keep your accuracy up.
Life
Lifes with a Myth mastery are crazy difficult to face. If they’re any good, they will be blading with both Life blades and Spirit blades and try to pull off a combo of a Myth and a Life spell. Stun Blocks are vital, because Medusa + Seraph/Centaur is gg. Don’t use the Myth bubble if they have a Myth mastery! And remember: the only good life minion is a dead life minion.
Prepare for the Guardian Spirit wand. Don’t kill them when their bubble is up, because they will be revived with more health that way. Use infections. Usually Lifes play slow enough that you can distract them from their own attack plans by making them heal. Don’t give them time to get into the groove! Kill them before they manage to establish the tempo. There’s nothing worse than a Life controlling the battle. Except maybe a Life with Lore controlling the battle.
Death
I don’t know where all the Death wizards are hiding. I can’t remember facing any. It’s hard to write about something you’ve never encountered. I’m such a noob, right?! xD The most likely strategy would be a bladed Skeletal Dragon.
Myth
I love mirror matches (aka matches where you face your own school)! Just pretend you’re fighting a slightly better version of yourself. Don’t bother shielding too much, but do remember Stun Block, please. Don’t use the Myth bubble, as it will give them an advantage as well. Keep Triage/Shift within reach. Give them a hatch if your pet is better than theirs, because we Myths should stick together!
9. Conclusion
All in all, getting to warlord with this gear and setup should not be incredibly hard. Don’t expect to win every fight, because our resist is so low that you will lose some battles if anyone decides to be offensive right back at you. Still, have fun being aggressive and feeling powerful! Stay positive however and don’t abuse your power. The Arena is a great place to make new friends, but this requires showing your opponents that you have a sense of humor and aren’t stuck up. Accept that some of them will be frustrated when they face you and lose.
Once you get to warlord, you will notice that it gets harder to win due to the fact that your opponents will start being higher level, and will have more health, more resist AND more damage than you. It’s hard to win against that. When you reach that point, it’s time to go visit Diego and purchase Glendemming gear. You will also need a new deck — one that’s not quite as aggressive. I can’t currently provide you with this deck, but maybe we can have a follow-up guide once you make it to warlord!