September 8, 2020
Ice Deckathalon
How I Accidentally Won
Before I start, the purpose of this article is to give some insight into my thought process during the recent Ice Deckathalon. There will certainly be some parts meant to educate readers on Deckathalon mechanics, deck building, and card conservation. Do note, though, that not everybody will have access to the same pet, deck, or jewels that I did here. My goal is to illustrate concepts that will help people trying to complete this sort of “endurance” form of Deckathalons. If you’re trying to learn how to finish each individual floor of a Deckathalon tower, that’s not the focus here. When trying to finish the tower, you have a lot more flexibility and deck space to use stronger utilities (dispels, stuns, and plagues come to mind).
On the Competitive Deckathalon
Let me say first that I don’t think competing in the Deckathalon is necessarily inaccessible for anyone. It requires a consistent deck setup, the ability to follow a flow chart of options when complications arise, and time. This, in essence, leads to it being relatively simple if you have sufficient resources (high tier decks, gold for treasure cards, a specialized pet, and time). For this reason, I didn’t try to win the Deckathalon before now; I didn’t, and still don’t, personally find it interesting as a competition, because it seems like winning is as simple as having a high tier deck and specialized pet.

My suspicion is that if anything, it will get much more difficult to win as time goes on and more people get the higher tier decks and get more resources to compete. At that point, I would be much more interested in it. If the event ever gets to a point where you have to aim to be perfectly optimal with your play to win rather than simply having the best deck and pet, I would probably be more interested in it.
In other words, I think it’s very easy to win right now by just out-gearing people rather than being perfectly optimal with deck building and in-battle techniques. I don’t personally like that in a competition meant to test deck building and card conservation, which is why I hope things will change when more people get the 9th and 10th Deckathlete decks.
Like I mentioned, my priority has been to craft certain Deckathalon decks for use outside of the Deckathalon. For this, it’s easier and maybe more efficient to farm on multiple characters. That being said, I decided to try to win this one. This was mostly because I decided to change my rune farming strategy from using all of my wizards to just a few. Because of this, I could tell early on that I would win comfortably if I could use all of my credits even without playing optimally; it’s much easier to see where you are relative to other players when you only play on one character (leaderboards). I finished this event with 3211 points, and won by the equivalent of about 2 and a half credits worth of points.
If I had played all of my runs optimally (i.e., went into the event knowing I would compete), I would’ve gotten 3616 points at best (probably around 3500 accounting for some of my mistakes and my starting with deck 9). That would’ve put me a full 5 credits above the next closest player. The purpose of my saying this is to show that everyone (including me) competing for this Deckathalon was notably sub-optimal in terms of accumulating points. Although I didn’t pay too much attention to the leaderboards of previous events, I suspect they were similar in this regard (maybe even less optimal because casual players had less time to craft high tier decks).
I hope with this article to encourage more people to optimize their play to make for what I would consider more interesting competition. Of course, how optimized you can be in terms of point accumulation is relative to resources; as time goes on, play will naturally get more optimized because players will craft better Deckathlete decks. This article is meant to be a supplement to that natural optimization.
Before I get into strategy, I’ll give a quick description of how my week went.
My Deckathalon Timeline
So there I was on the first day of the Ice Deckathlon event. My goal for this event was to farm up enough Fire runes to craft the Ice Deckathlete’s Deck 10, which meant I needed about 600 more runes (I already had deck 9 and about 200 Fire runes). My usual strategy for farming for runes is to farm the first 4-5 stages on several different wizards so I was less restricted by the 3 credit per day limit. This time, however, I decided to choose one wizard and finish as many floors as possible with each credit. And that’s how it all started.
Naturally, for the first 3 days, I got the 20 treasure card points and collected credits on every wizard even if I didn’t go into the tower. The purpose of collecting points is to get the first 3 rewards on all wizards: the first reward is a Deckathlete’s Deck 1, and the third reward is 10 runes, both of which are incredibly useful for crafting decks and can be traded between wizards. For the treasure card points, I just bought 20 Keen Eyes treasure cards and enchanted 20 cards. After 4 days of this, you get 80 points, which is just enough for the 10x rune reward (you need 75).
The purpose of collecting credits is not as concrete. For me, I did it in case I wanted to farm on every wizard like I usually do. It worked out well for me because the wizard I won the event on was not the wizard I was initially farming on, and I still had all of my credits when I made the switch.
Into the Tower!
When I first went into the tower, I wanted to do it on a wizard with a lot of gold. The wizard I had the most gold on was my level 80 Death wizard, so I figured I’d start with him. I didn’t bother socketing jewels on the Ice Deckathlete’s Deck 9 that I had from the first event. If I was going to trade the deck between characters, I shouldn’t bother. I grabbed my Deckathalon pet, threw together a deck setup, and started farming the tower. Before I go on, note that I reference always starting a run through the tower at stage 1. This is the optimal strategy for farming basic runes, and as I’ve learned, for gaining points as well.
During my first run, I managed to go from stage 1 to the first battle of stage 6. By the end of day two (sixth run), I managed to go to the second battle of stage 7 consistently. That’s when I noticed that I was in first place on the leaderboards after day 2. This was on my level 80 Death wizard with no jewels on my Deckathalon deck. I didn’t think much of it, and just kept on farming on other wizards. This is sort of why I say I won “accidentally.” I wasn’t trying to win, and my winning strategy was initially created to help me farm for runes.
By day 4 (Friday), I checked up on the leaderboards again. My level 80 Death wizard was still in the top 10, which shocked me. I found that the top player was getting about 102 points per credit. This meant they were finishing around the first battle of stage 8 each credit. I knew I could do better than that, and my initial projection was that I could probably get 120 points (finishing stage 8) per credit. If I was able to finish stage 7 battle 2 without jewels on my deck, I should be able to beat stage 8 with level 130 jewels, right?
Getting the Points
So, I essentially knew by day 4 that I could win if I used all my credits. The question was if I would have time to use them all. Thankfully, I already had 80 points and 12 credits on my level 130 Storm wizard because I kept up with redeeming points and credits. At this point, I was more competing with my willingness to use my credits than anyone else. Each of these “endurance” runs took a while, so I ended up doing them while keeping busy with other things.

My first run on my level 130 Storm was very successful in finishing stage 8, and I figured I could push myself to win the first battle of stage 9 as well. It surprised me that I not only finished the first, but also the second battle of stage 9 without preparation. This ended up being my baseline. I consistently was able to go from stage 1 to the second battle of stage 9 each credit. This meant 138 points per credit, more than enough to compete with the 100-105 on the leaderboards. I soon realized that I could craft Ice Deckathlete’s Deck 10 and probably finish stage 9 entirely for 144 points per credit. I eventually was able to do this successfully and consistently; however, I waited to craft the deck until I could do it without transmuting Fire runes.
And so that was that. There were very few runs that ended prematurely. When they did, it was usually only one battle before I was expecting. In the end, I was able to convert all of my credits to points. I finished around where I expected at 3211 points.
Terminology
First, I’ll go over a few terms I use. See below:
Deckathalon Stats
Before I get into what stats I think are optimal, I’ll do a quick review of the mechanics of flat stats.
Mechanics
In contrast to the rest of the game, the Deckathalon (as well as Beastmoon) relies on flat stats rather than percent based stats. Therefore, it’s essential to understand exactly how they work. The interaction between flat damage, shields, and flat resist is incredibly important to having good defensive instincts in the Deckathalon.
First, let’s talk about standard one hit damage spells. The order that boosts get applied is flat damage, percent based outgoing alterations, percent based incoming alterations, and finally flat resist (in the rest of the game, percent based damage boost is applied before flat damage and percent based resist is applied after flat resist).
For example, if I get hit with a Frost Giant on stage 9 when the opponent has a 35% Balanceblade and I have a 65% Snow Shield (a very common interaction given monster pierce, to be discussed later). Frost Giant does 460 based damage. First, the monster’s flat damage is added (this is 135 on stage 9). Next, the percent based alterations (blade and shield; order actually matters because the game truncates values to the nearest whole number after every added buff) are taken into account. This puts the damage at (460+135)*(1.35)*(0.35), which comes out to 281 damage. Finally, flat resist is factored in. I had 204 flat resist with my final setup, so that Frost Giant would do 77 damage to me.
DoTs
DoTs work similarly, with one key difference: flat damage is applied in full to the initial hit of a DoT, and then applied again to the entire DoT portion, which is then divided by 3 and truncated to get the per tick damage. Flat resist, on the other hand, is applied in full to both the initial hit and each individual DoT tick. This means that flat damage is twice as effective on DoTs (with initial hits), but flat resist is four times as effective.
With high enough flat resist, this makes monsters using DoTs in the tower do very little damage to you. Other than that, the same order of operations applies. Note that this likely isn’t a glitch, but instead illustrates the idea that individual DoT ticks are treated as individual damage hits to the recipient, but as a single entity to the attacker. This idea is also what causes each individual DoT tick to have a chance to proc a pet may cast (more on this later).
For multi hit attacks (Minotaur, Hydra), flat damage and flat resist are both applied in full to each hit. In essence, the game treats a DoT as a 2 hit multi hit attack to the caster (initial hit is one, secondary DoT is the second), and as a 4 hit multi hit attack to the recipient (initial hit is one, each of the three ticks is another one).
Buffs
As for what this means in terms of defending: damage buffs are much more valuable for monsters in the tower than they tend to be in the rest of the game. Since damage buffs are applied after flat damage, both the base damage and monster flat damage is boosted by a percentage based buff like a blade. When compounded with flat resist, this typically causes buffs to seemingly boost damage by much more than their percentage might lead you to believe.
For example: consider getting hit with a Frost Giant (460 base damage) on stage 9 (135 flat damage), and you have 200 flat resist. Without any buffs, it will do 395 damage. However, if the monster has a 35% blade, the Frost Giant will do 603 damage. This means that adding a 35% blade actually will give a 53% boost to the Frost Giant’s damage. This effect gets stronger as you get higher flat resist, which means that especially on higher floors when you have more optimized stats, you should be careful when monsters buff up for attacks.
Debuffs
Luckily, the same effect holds for debuffs. Percentage based debuffs can also be much more effective than you might expect when flat stats are involved. In the tower, the optimal debuff is usually school specific shields, but in some cases weaknesses are optimal (any Deckathalon using Plague or Virulent Plague for double battles, or using Weakness in the Myth Deckathalon specifically for Minotaur or in the Balance Deckathalon against Hydra).
If you look back to my earlier example, a Frost Giant on stage 9 with a 35% blade and 85% Snow Shield (pierced down to 65%) deals 281 damage before flat resist is factored in. If you have 200 flat resist, then, it will do 81 damage. However, in the previous paragraph I noted that without any buffs, a bladed Frost Giant on stage 9 does 603 damage against 200 flat resist. This means that adding a 65% shield (pierced down from 85%) is actually an 87% reduction in damage. Without the blade, the reduction becomes 98% (from 395 to 8 damage). Although this effect of shields becoming more efficient when you have more flat resist exists in the rest of the game, it is amplified in the Deckathalon just because flat stats are all that’s available, and you get a lot of flat resist.
As for how you get stats in the Deckathalon – there isn’t a whole lot. You get your deck, deck jewels, and pet may casts. Next, I’ll talk about what I think is optimal for these gear pieces. Please note that you don’t need to have the best deckathalon setup to just finish the tower. This section is aimed at showing what I think the optimal stats are for marathon runs.
Deckathalon Jewels
Obviously, you should be prioritizing getting the best deck possible to increase your health and flat resist. Higher decks also give you access to jewels, which are equally important. I’ll quickly go over what I see as the optimal jewels.

Tear: This unlocks once you get to deck 3. Obviously, you should be equipping health here.
Square: This unlocks at deck 6. I would say you want to aim for deck 6 as fast as possible to get this slot. For most Deckathalons, a single school defense jewel is optimal. If you don’t have one laying around, you should try to craft one at your appropriate level. If you’re level 115+, you can buy a 45 defense opal for gold for any school in Caravan in Mirage. The one exception here is the Balance Deckathalon – having done that one plenty (my first Deckathlete Deck 10 was the Balance one), I think a defense opal is optimal. You can buy those for arena tickets.
Triangle: This unlocks at deck 9. I think accuracy is optimal here. What accuracy jewel you choose depends on what spells you’re using. Of course, the first priority should be to not fizzle your attacking school. Deckathalons give enough base accuracy to put attacking school standard spells at 95% accuracy. This means that if your level’s best school specific accuracy jewel is at or below 5%, you should use that. However, if you’re at a high enough level that universal accuracy jewels are 5% or above, you have that option too. If you’re using spells with below base school accuracy (e.g., Firezilla, Arcticzilla, Leafstorm), you should use a school specific accuracy jewel to make sure those don’t fizzle. If not, then using a universal accuracy jewel at 5%+ will help with not fizzling Sprite, Steal Charm, etc., while still making sure you have perfect attacking school accuracy.
I didn’t end up using spells below standard accuracy, and I was using Sprite for many of my runs. Therefore, I used a universal accuracy jewel. The accuracy jewel is incredibly important if you’re trying to repeatedly finish marathon runs. This is because the value of having 100% accuracy goes beyond just not fizzling. It allows you to be confident making plays that would otherwise be risky. These sorts of situations might not come up often enough when playing normally, but during 24 marathon runs, they add up faster than you might expect.
Deckathalon Pets
An optimal pet has 4 may cast talents and a will cast talent, along with a may cast jewel. I didn’t have a suitable may cast jewel, so I only used four may casts. I’ll talk about may casts and will casts separately.
May Casts
Obviously, your first thought should be may cast heals. I like Spritely and Sprite Queen the most. The reason for this is that whenever they proc, they have a very good chance to have high value because the will heal future damage as well as current damage. This means that if, for example, a Sprite procs off of a shielded attack that does 0 damage to you, it still has potential to be useful if you get damaged in the next 3 rounds. Other good heals are may cast Fairy and may cast Healing Current, both because they carry the potential for an incredibly high value heal. I personally used those four may cast heals on my pet. I don’t think any other heals are optimal, though Unicorn isn’t awful if you have it.
The next type of may cast to consider is auras. The main options are Fortify and Amplify, with Fortify being my personal choice if you’re using an aura. Fortify will slightly reduce the damage you take on lower floors and increase the effectiveness of shields on higher floors. Another option is Empowerment, which is an interesting choice that is only really useful on higher floors (4-5 and up). Of course, if you have a may cast Brace jewel, it’s worth using.
In general, I don’t like offensive utility may casts. I would advise against using may cast Locust Swarm, Snow Serpent, Sunbird, Balanceblade, Dragonblade, Amplify, etc. This is because I find it optimal to calculate exactly how much damage you need when building your deck, and may cast offensive utilities will throw that off significantly. Put simply, these may casts are not easily reactable; you can’t easily react to one of these may casts mid battle to gain significant value in terms of card conservation like you could with a may cast heal or Fortify. I think that defensive utility may casts (shields) have the same issue. Of course, they aren’t bad; if you have these talents you can definitely use them. Keep in mind that I’m talking about optimal strategy for 24 marathon runs.
Will Casts

For me, will casts are pretty simple. I value versatility very highly in general, and so I swear by will cast Vampire. Will cast Vampire gives you a consistent method to heal, deal chip damage, break shields, and can even defeat lower stage monsters without using any treasure cards. In general, I think you should have a will cast attack, if only because you save deck space by not needing any cards to finish the early stages. I would say take will cast Vampire for any Deckathalon except Death, and take will cast Leafstorm for the Death Deckathalon. Will cast Frozen Kraken is also a very good option for non-Ice Deckathalons, and may be optimal for the Fire Deckathalon.
If you aren’t familiar with how will casts work, they cost pet happiness to cast and have a cooldown that depends on the pip cost of the will cast and/or happiness cost. For Vampire, that cooldown is 3 rounds. In the Deckathalon towers, you can feed your pet snacks for happiness, so there isn’t much of a limit to how many times you can use a will cast in the tower. The only limits are the round cooldown and the hard limit on how many times you can use your will cast per battle (for Vampire, that hard limit is 3 casts per battle).
Plenty of pets with these talents are in the kiosk if you need to get one. A will cast talent is probably the most important Deckathalon pet stat. You absolutely need a lot of pet snacks to feed for happiness. Shanta Puddings work for this, as does buying snacks for arena tickets if you have a lot.
Deckathalon Monster Stats
The monsters in the tower also have stats. Apart from them gaining starting pips as you move through the tower, they also gain flat damage and armor piercing (along with critical block and resist to their own school, though these aren’t as relevant).
The gain in flat damage is relatively straightforward, and seems to be at 15 per stage (i.e., 15 at stage 1, 30 at stage 2, etc). A useful shortcut is to look at a stage’s corresponding deck to see how much flat damage monsters will have: monsters on stage 6, for example, will have the same amount of flat damage as flat resist is given by Deckathlete Deck 6 (that being 90).
The gain in armor piercing is slightly more complicated, but still not difficult to understand. On stage 1, no monsters have armor piercing. Beginning on stage 1-3, monsters gain armor piercing. From this point, at every X-3 floor (i.e., at the third floor of each stage), monsters get an armor piercing boost. At these floors, monsters alternate between gaining 2% and 3% pierce (in other words, they gain 2.5% pierce which is truncated to the nearest whole number). For example, from 1-3 to 2-2 the monsters have 2% pierce, from 2-3 to 3-2 they have 5% pierce, from 3-3 to 4-2 they have 7% pierce, and so on. The short of this pierce gain is that your shields will be less effective as you go up in stages. This is compounded by most Deckathalon monsters beginning to use spear spells to boost pierce at the highest stages (9 and 10).
Deckathalon Deck Setup
Moving on to specifically this Ice Deckathalon: take a look at the decks I used at the beginning (up to stage 9-2) and end (up to stage 9-3) of the event:

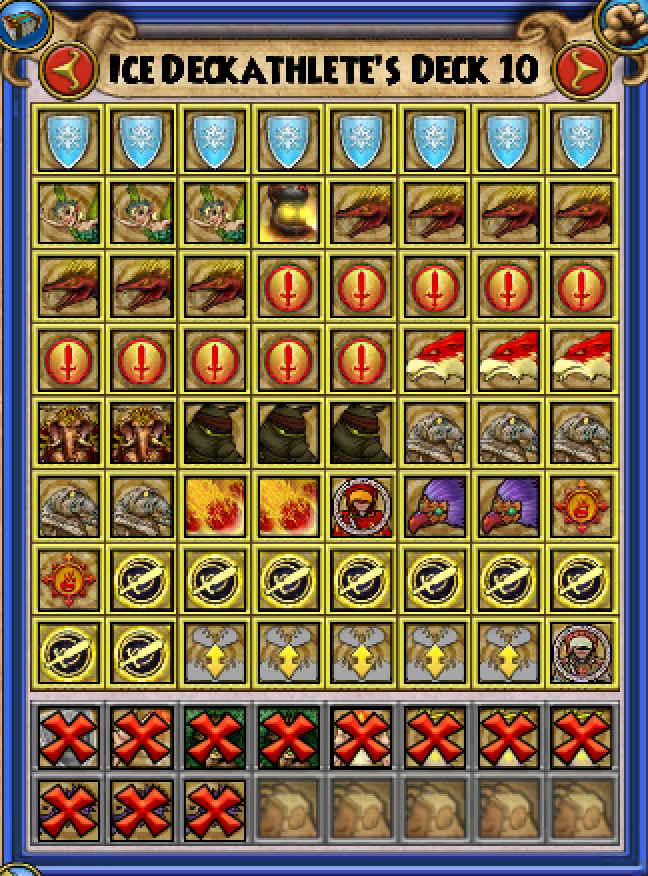
Notice that the second deck is exactly the same as the first, with the addition of 4 cards. Those 4 added cards are a Snow Shield, a Fireblade, a Heck Hound, and a Brandon minion. Those four cards are enough to win stage 9-3. I also traded a Sprite for a Fairy, and a Phoenix for a Koto (based on availability). I’ll talk each card below, as each has a specific purpose. It may be worth circling back to these explanations after reading the rest of the article. See the tabs below:
Note that Brandon minion cards can be farmed with a 100% drop rate from Neberyx in Dragonspyre. It’s a fairly simple boss with 44000 health. Which school you get is random, so it’s probably worth farming a bit.
General Deckathalon Strategy
The general strategy of marathon runs should be to conserve as many cards as possible. You want to finish each battle with as many cards remaining as possible. The strategy for doing this will differ based on which Deckathalon you’re running; I’m here to focus on what I did to win the Ice Deckathalon, so I’ll talk about that. I thought of each run through the tower as split into 3 phases: early, middle, and late floors. Roughly speaking, early floors spanned 1-1 to 3-1, middle from 3-2 to 5-3, and late from 6-1 to 9-3. I’ll break down my general strategy for each section below.
For early floors, I pretty much needed to wait on my will cast Vampire to either defeat the monster on its own. I used will cast Vampire exclusively to win floors 1-1 through 2-1. For 2-2, 2-3, and 3-1, I had to dig for specific cards to defeat the monsters. A note on discarding: you should be discarding a lot. On earlier floors, discarding and drawing 7 cards per round is not uncommon at all and should be done. You need to know how many copies of cards you have and how many you need to use. This will tell you exactly what you can discard. Discard aggressively and cycle in new cards.
For middle floors, this is where the endurance happened. These were the most dangerous floors in terms of taking chip damage. Specifically for the Ice Deckathalon, this is because these floors have good enough attacks to do significant damage (Evil Snowman, Ice Wyvern), but don’t use Frostbite with regularity yet (more on this later). These floors were about waiting to set up my attack while defending when necessary when the monsters buffed up. The monsters can’t use Steal Ward until stage 5, so stage 4 was a hotspot for using Snow Shields to defend. The monsters also start using Tower Shield here, but my planned attacks didn’t suffer much from being shielded since the monsters still have low health.
For late floors, I shifted from timely defense to timely offense. Here, will cast Vampire was integral to breaking Tower Shields, which would now negatively affect my attacks. Choosing when to cast Vampire was key, as is reacting to monster pip level to gage when they have the most potential to shield. Defense was not as much of an issue here because the monsters main attack is Frostbite. Generally, I preferred a monster using Frostbite to them passing. Frostbite being the monsters preferred attack was a huge help.
My reason for wanting monsters to use Frostbite was simple: with high enough flat resist, Frostbite does very little damage per tick (under 20 per tick at stage 9 with my final setup). Additionally, Frostbite damages you 4 times. This means that it gave my pet 4 opportunities to proc a heal. More often than not, I would gain health from an enemy using Frostbite on me. Since Frostbite was the most preferred attack at these floors, you can see why I didn’t need to shield much. The one exception was on stage 9, where the enemies use Frost Giant. I saved at least 2 shields for blocking round 1 Frost Giants on stage 9.
Apart from Frostbite, the next most common attack at late floors was Angry Snowpigs, which only deals 2.5 ranks of damage. This doesn’t translate to much damage against 204 flat resist, even when considering enemy flat damage (+15 per stage, 135 on stage 9). They also could use Ice Wyvern, which was important to keep in mind if they got buffs up. Colossus is also a possibility, but it’s incredibly rare. In around 100 battles where I could’ve been hit with Colossus, I only got hit with it 3 times, none of which were fatal. Regardless, it was important to keep in mind.
Passing
I’ve referenced “preventing a free Balefrost” previously. I’d like to explain that now before moving on. As a method to prevent pure minion strategies, the devs implemented a “cheat” for all monsters in the tower. If you don’t successfully cast a spell for 3 rounds in a row (even if you fizzle or are stunned), a global damage bubble for the monsters’ school will be casted. The first cast is a 35% global. Next, if you go 3 more rounds without successfully casting a spell, a 50% global is casted. I’m sure more globals are casted after, but I didn’t stick around any battle long enough to find out what the percentage boost is. This can be advantageous for the Balance Deckathalon (where the monsters boost to Balance damage), but for anything else, it’s very bad.
The obvious way to counter this, of course, is to cast spells. This can become a problem, however, when you’re trying to conserve cards. For example, will cast Vampire has a cooldown of 3 rounds. If I needed to pass for 4 rounds to cast 2 Vampires and win a battle in the Ice Deckathalon, a Balefrost would go up if I don’t cast anything myself. This would turn ugly if the opponent put up some other buffs in addition to the Balefrost.
As a more specific example, my plan for 3-2 was to pass until I could Fire Dragon (which killed the monsters through Tower Shields). I needed to wait 5 rounds to get pips to cast it. This meant that I was forced to cast a spell, or face what would likely be 3 rounds under a Balefrost against 2 monsters whose main attacks included Evil Snowman. Since putting up the Balefrost could have meant taking 400-500 damage that I would have otherwise avoided, I decided to sacrifice a shield. On round 2 or 3 (depending on context), I would use a Snow Shield in a battle where I wasn’t taking much damage regardless specifically to avoid the Balefrost going up.
For this reason, the concept of spacing out your passes becomes very important in marathon runs. I often would pass on round 1 on any stage even if I had a blade I knew I would need in my hand. I did this specifically to make sure I had room to pass later on if I needed to, say, wait for my will cast Vampire cooldown to break a Tower Shield or finish off an opponent. It’s definitely worth understanding this idea.
Specific Deckathalon Strategy
Now I’ll go over my specific game plan for each of the 27 floors I would take on per run at the end of the event. Note that I didn’t bother with stage 10, only the first 9 stages. Hopefully, this is interesting or insightful in some way. For calculation purposes, note that all enemies in the tower have a 15% boost Fire. This 15% boost to the opposite school is normal with all Deckathalons (Balance has a 5% boost to Spirit schools and Balance). Additionally, the monsters gain 15 flat damage boost per stage and roughly 5% pierce per two stages (pierce gain is staggered). See below:
Closing Thoughts
So that’s how I accidentally won the Ice Deckathalon. It’s definitely a time investment to play optimally – it can take an hour or more to do a marathon run. I typically had to do runs sort of in the background while doing other things. Although it was fun to do once, I don’t think I would want to compete for every Deckathalon. Depending on if I have time, I might compete for some future Deckathalons. However, I would have to genuinely enjoy playing in the tower and/or want a deck for use outside of the Deckathalon.
Although I think the Deckathalon in general is alright where it is, I personally would prefer a few changes. First, I think the decks should be easier to craft in terms of basic runes. Keeping the exact same recipes and reducing the amount of basic runes needed by, say, 30% would go a long way in terms of allowing more players to compete at the highest level. Currently, it takes over 2100 basic runes to craft a Deckathlete’s Deck 10 when starting with deck 1; the decks are a huge barrier to entry.
Additionally, I think that players should automatically get all of their credits at the start of the event. This is definitely more of a quality of life change, as you currently are forced to log in every day to collect credits. This sort of credit change would mostly benefit people farming for runes to craft decks, which again would lower the barrier to entry for competing.
Finally, I think that credits should be less limited (i.e., more than 3 per day, but likely not totally unlimited), but that only the first 3 (maybe even 2 or 1) credits you use per day should count towards your event points. This would have two main benefits. The first of these would be allowing players to practice and optimize their strategies on their competing wizard without having to risk a sub-optimal run through the tower. The second would be to allow competitors and more casual players to farm up runes without being restricted by a credit limit that is necessary to make the competition less grindy.
If any of these changes are made to the Deckathalon, I feel that they would be huge quality of life changes that would allow more players to more quickly reach optimal levels of play. As it is now, the Deckathalon will always have a very high barrier to entry. I think that the Hands of Fate recipes can remain as is to provide a long term goal for consistent Deckathalon players, but the deck recipes and credit distribution could be changed.