February 21, 2019 March 3, 2019
Pirate101 Spar Chamber Sight Guide
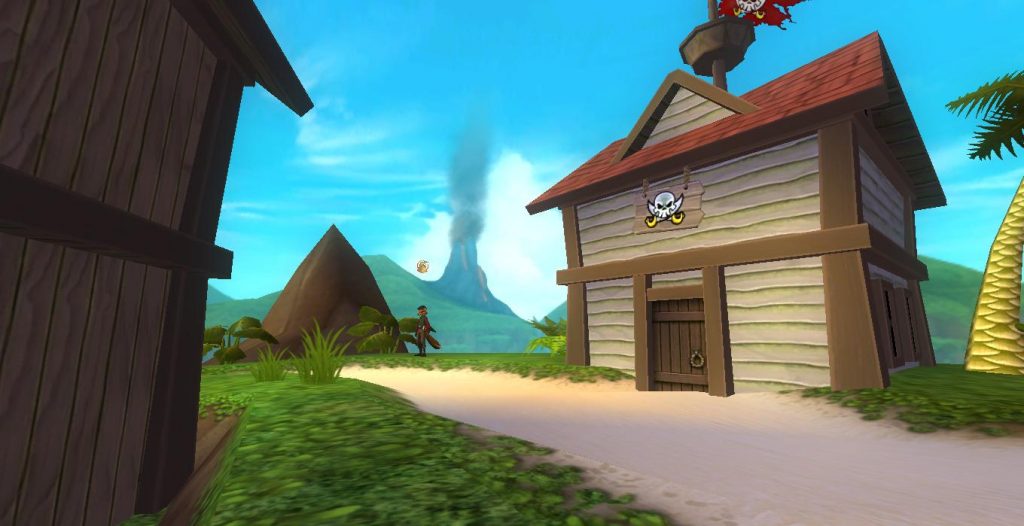
I’m sure that anyone that has done Pirate101 PvP in the Spar Chamber has suffered at the hands of fickle lines of sight. It’s no secret that line of sight is the most illogical and difficult to understand mechanic in the game. Sometimes you can see a unit when it seems that you shouldn’t be able to see them. Other times you can’t see a unit when you think you should be able to.
Recently, I had a conversation with some friends in a Discord server about how there was a dearth of guides pertaining to sight. There are a variety of PvP guides out there, covering topics like movement range, companions, and class-specific playstyles. However, there was no comprehensive guide on line of sight. Even though it’s an integral game mechanic, the common wisdom is that it’s just something you have to get a ‘feel’ for. Unlike movement range, you couldn’t get it down to an exact science.
I’d like to think that has changed now (at least for the Spar Chamber). This guide will allow you to instantly know if an opponent can see you at any given time. I hope you find it helpful!
Pirate 101 Spar Chamber Sight Guide
How The Guide Works
Above, I’ve linked a google spreadsheet with 197 imgur links. Each of these links corresponds to 1 tile on the battleboard. Each link shows the tiles that an opponent can see (light blue tiles) and the tiles they can’t see (tiles with a crossed-out eye) should they be standing on the denoted square.
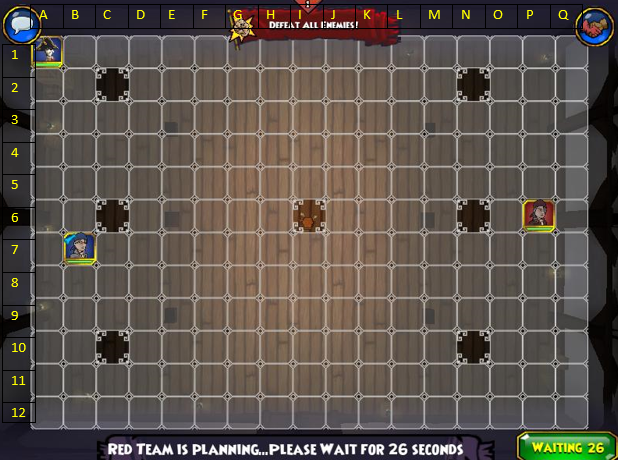
You may be thinking: “But Matthew, the point of view changes depending on what color you’re on. The top left tile for the blue player isn’t the same is the top left tile for the red player! In fact, everything is flipped 180 degrees when you switch colors.” I’ve taken this into account. As you see in these images found below, I’ve assigned each tile a number and a letter, similar to how tiles in Chess are denoted. This creates a universal way of denoting each tile, regardless of whether you’re the blue or red player. It’s important to take your color into account. For instance, the bottom right for the red player is A1, while the top left for the blue player is A1.
What Exactly Does the Guide Show Me?
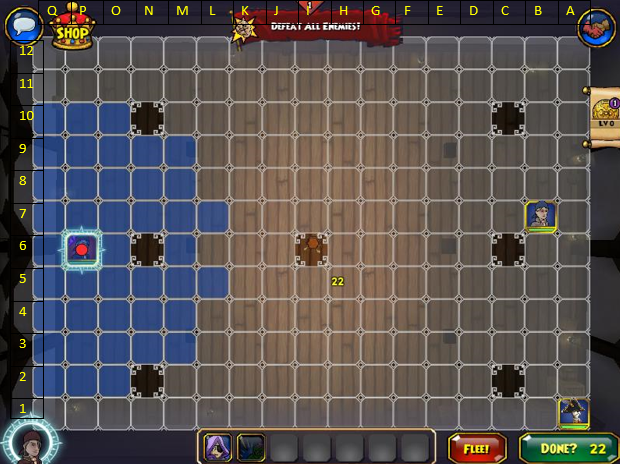
Let’s use an example. I’m the red player. As shown above, my opponent’s Emmett is in tile A1. I click on the link for cell A1 in the spreadsheet and see this:
What exactly does all of this mean? Any unit, regardless of color, on tile A1 could do the following on one of the light blue tiles:
- Target an opposing unit with a single target, sight based spell or attack, presuming they are in range of their target (Think of things like Mournsong, Super Strike, and Hurl Knife)
- Center a targeted, sight based AOE, again, provided that they are in range of their target. (Think of things like Mojo Storm, Musketeer Bombs, and Musketeer Trick Shots). Note that I said ‘center.’ This means that a unit that is not in sight of one of these aoes can still be hit by it, should they be adjacent to the tile it’s centered on. In this situation, if an opponent was on tile D2, they could not be seen by Emmett. They therefore could not be hit by any of his guaranteed critical attacks or a basic attack. However, they could still be slowed by Emmett, as they are adjacent to tiles that he has sight on (C1, D1, E1, and C3)
They cannot do any of the above on a tile that isn’t light blue. This includes pillars.
What About Barricades (and other sight-blocking obstacles)?
You may have noticed that this guide doesn’t take barricades or other sight-blocking obstacles into consideration. Simply put, there are too many different positions for the barricade to take them all into account. However, you should be able to make an educated guess as to what tiles a barricade blocks sight from.
In the A1 example, it would be safe to assume that a barricade on tiles A2 and B2 would block sight from all the tiles in the downward sloping staircase (the one that ends on L12), as well as all the tiles directly below them.
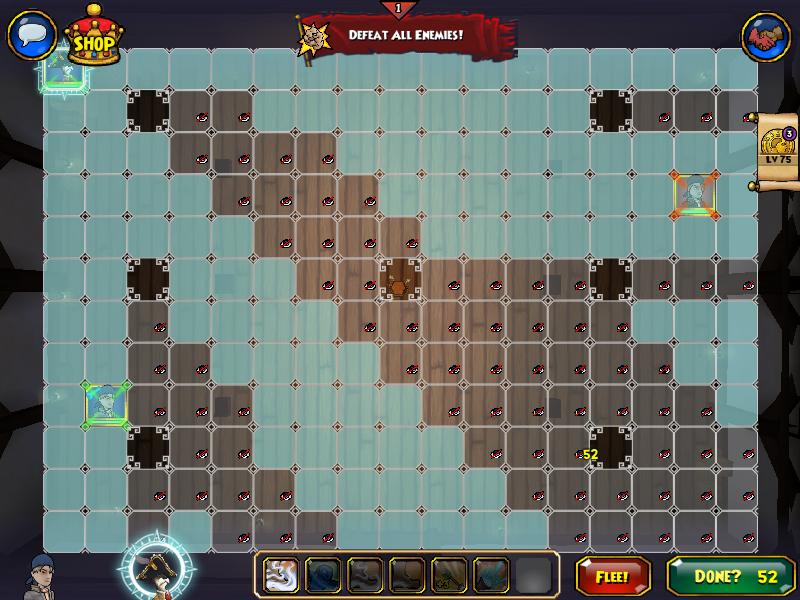
Direct Map
We now have a more direct map of the spar chamber. This map is from the perspective of the blue player, so if you’re the red player, you’ll have to mentally flip the image 180 degrees. It also will not work for mobile browsers and low-resolution users (720p or higher ONLY).
![]()
![]()
![]()
![]()
![]()
![]()
![]()
![]()
![]()
![]()
![]()
![]()
![]()
![]()
![]()
![]()
![]()
![]()
![]()

![]()
![]()
![]()
![]()
![]()
![]()
![]()
![]()
![]()
![]()
![]()
![]()
![]()
![]()
![]()
![]()
![]()
![]()
![]()
![]()
![]()
![]()
![]()
![]()
![]()
![]()
![]()
![]()
![]()
![]()
![]()
![]()
![]()
![]()
![]()
![]()
![]()
![]()
![]()
![]()
![]()
![]()
![]()
![]()
![]()
![]()
![]()
![]()
![]()
![]()
![]()
![]()
![]()
![]()
![]()
![]()
![]()
![]()
![]()
![]()
![]()
![]()
![]()
![]()
![]()
![]()
![]()
![]()
![]()
![]()
![]()
![]()
![]()
![]()
![]()
![]()
![]()
![]()
![]()
![]()
![]()
![]()
![]()
![]()
![]()
![]()
![]()
![]()
![]()
![]()
![]()
![]()
![]()
![]()
![]()
![]()
![]()
![]()
![]()
![]()
![]()
![]()
![]()
![]()
![]()
![]()
![]()
![]()
![]()
![]()
![]()
![]()
![]()
![]()
![]()
![]()
![]()
![]()
![]()
![]()
![]()
![]()
![]()
![]()
![]()
![]()
![]()
![]()
![]()
![]()
![]()
![]()
![]()
![]()
![]()
![]()
![]()
![]()
![]()
![]()
![]()
![]()
![]()
![]()
![]()
![]()
![]()
![]()
![]()
![]()
![]()
![]()
![]()
![]()
![]()
![]()
![]()
![]()
![]()
![]()
![]()
![]()
![]()
![]()
![]()
![]()
![]()
![]()
![]()
![]()
![]()
![]()
![]()
![]()
![]()
![]()
![]()
![]()
![]()
Thanks for reading! If you have any issues with the guide, or if you find any broken or misplaced links, be sure to let me know. I’m always glad to get feedback!