June 22, 2018 January 13, 2019

P101: Haywire Battle Angel
Formerly fearsome foe turned friend… Learn how to best use this powerful battle angel randomly dropped from the Ashes of the Armada pack below!
Type: Offensive/Utility

Base Stats
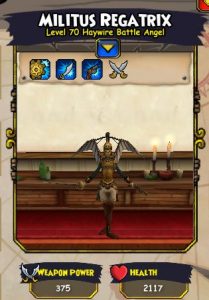
Health: 2117
Accuracy: 120
Dodge: 140
Weapon Power: 375
Agility: 84
Movement Range: 4
Overview
The battle angel is a primarily offensive companion. She has two hits that can each do more than a hidden assassin (both Haywire hits). The third power is a fantastic utility power.
Her available epics are somewhat lackluster, but with an agility or critical buff, she can chain damage together quite nicely.
Her somewhat low health and very dangerous powers make her a prime target for your opponent, but she is almost ensured to take a unit down with her.
Base Talents, Powers, and Epics
Haywire Shot: This is the Battle Angel’s most potent damage dealing power. It has two different “rolls” it will randomly select from, a 2x weapon power and a 3x weapon power roll.

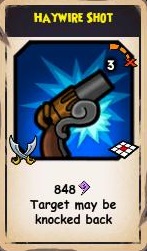
If you’re a buckler and use her Haywire Shot coming out of Fog, a “low” roll will do just over 2000 damage. The high roll easily does over 3000 damage and a critical can do nearly 6000 damage! Anything but the lower roll will one-shot an unprotected unit. Getting this attack off whenever possible should be a high priority.
Haywire Strike: Although this isn’t as hefty of a damage dealer as her Haywire Shot, Haywire Strike is quite the beast itself. It will (generally) sacrifice damage in exchange for the ability to chain while using it and slightly higher range-of-use. (However, I have seen Strike do a casual 11,000 damage, which is fairly strong)
Surge of Technomancy: Surge is essentially a long-range, single target, mini-Purge Magic. It removes the lowest buff on the target. It also does 400-600 damage before criticals are factored in and can target hidden units. This is a fantastic utility power that will make any opponent’s life miserable!
Flanking- Not a particularly great epic if you’re a swashbuckler, but if you can avoid it if she’s hidden and take advantage of it when she’s not, it can be quite beneficial.
Alert- Half damage from traps. Every swashbuckler companion has it
Recommended Setup

Talents:
- Rough 4– Maximizing an offensive companion’s damage is always good
- Tough 4– This brings her health up to a slightly more survivable level
- Accurate 4– Missed hits = Missed damage
- Dodgy 4– Since she doesn’t have multiple ranks of Bladestorm, we don’t have worry about maximizing critical chance. Thus, we should make her more survivable with dodgy 4 rather than increasing her damage and critical rate slightly with agile 4
- Agile 1– Only real option for the extra talent
Epics:
The battle angel gets 5 epics + Flanking, which should be spent as follows:
- First strike 3– Mandatory talent for swashbuckler companions that can get it
- Relentless 2– Another mandatory talent for offensive companions
These epics may seem boring, but they keep an otherwise overpowered companion balanced.
Who can best use the Battle Angel?
The battle angel suffers from a low movement range (a measly 4 tiles). Her Haywire Shot has an even lower usage range, merely 3 tiles.
This means that you must get very close to your opponent in order to use her offensive powers. Because of this, they will have an opportunity to attack the battle angel upon her approach. Since she is a very fragile unit, they can lower her health greatly, or even kill her rapidly, before she has a chance to wreak her havoc. Therefore, the angel is weak against teams that can attack her before she approaches
What does all of this mean for her usage? Well, it means that the battle angel is an all-star on a team that can allow her to approach without being targeted (Swashbuckler with fog) or when used on a character that can invest resources into protecting her (Privateer with accuracy/dodge buffs, forts, heals, etc.). A buckler can fog, approach, and use a haywire shot or strike to instantly kill or cripple a high threat unit. Privateer can’t give her hidden, but they can use forts and revives to extend her longevity and ensure that she remains a thorn in an opponent’s side for a long while. Other classes can use her, especially since she has first strike 3, but there are better options.
Usage
If she can get off all 3 of her attacks, you’re generally on your way to winning the match. I struggle to think of a time when I used all 3 of her attacks, got good value from them, and then went on to be defeated. If you’re a privateer, don’t be afraid to use a fort or revive on her in order to guarantee her survival. Swashbucklers should not waste their much more limited heal and fort supply on her. The angel should be used to spike down a high threat unit, ideally when coming out of fog.
Some more tips:
- Keep in mind that any offensive strength unit, while buffed, can one-round the battle angel if she is unprotected… hate you too Pete </3
- Units with quick draw and true grit can and will respond to the angel’s haywire shot, possibly resulting in a chain.
- Count her movement and shot range. Unlike other high tier swashbuckler companions, she has a limited move range that is very easy to escape from. If you lose count, you’ll find yourself 1 tile away from a unit that you need to hit this round
- Haywire strike has a chance to stun her or the targeted unit. This effect is random, so there’s no controlling it.
- If an opponent or their companion’s bottom-most buff is a fort or an absorb, prioritize using Surge of Technomancy to remove it. However, if she’s hidden, don’t waste the hide damage. If she’s hidden, only use it to remove protection when the targeted unit has an absorb on since your hide won’t break.
- Surge of Technomancy is a magic attack, and will thus be Witch Hunter’ed if she is in Witch Hunter range.
- Assume that, if she is hitting while in hidden with a haywire shot, your attack will not kill (unless the opposing unit is below 1.8k health). Leaving an opposing Pete or Temujin alive with 600-700 health is very dangerous, especially since you are unlikely to kill him before he has a chance to attack in Turn the Tide.
- Haywire shot knocks the affected target back 1-3 tiles whenever possible. This can be taken advantage of in order to knock your opponent into traps. It can also be detrimental, if the unit you knocked back has htl (if the knocked back unit doesn’t move, its hold the line radius will be in the same place it was before it was knocked back).

Conclusion
The battle angel, although fragile and hard to obtain, is a great unit for PvP. She shines in the hands of swashes and privies. Her powers have a good balance of heavy offense and utility and she can chain rather well on her own. Definitely give her a whirl if you get an opportunity