September 20, 2014 December 8, 2018
How To Train Your Dragon/Dillo/Octopus/Ostrich/Crocogator/Whatever
To those who encounter it for the first time, Pirate 101 pet training can offer a bewildering number of choices: exercise options, snacks, gear, time/energy tradeoffs – yikes! Fear not! This article will help any budding pirate understand the Pirate 101 Pet Levelling subsystem, aid in getting your pets to their maximum level in the minimum amount of time, and guide you in crafting an exercise regimen that meets the needs of both you and your pets.
Executive Summary
Choose exercises based solely on the amount of experience they give – but do not automatically select whichever exercise provides the most experience.
Feed your pets Banana Burgers and Banana Sandwiches. (Not the most balanced diet, but they don’t seem to mind.)
A Slightly Longer Synopsis
Experience is everything. More precisely, the amount of Experience Earned per Minute Exercising (EEpME). When figuring out how to maximize this, it is important to include the experience from the snack at the end of the exercise – shorter exercises may give less experience, but mean more opportunities to feed your pet.
Assuming you are feeding your pet at least a rank 4 snack (+32 experience) after every exercise and restarting the exercise promptly, the maximum EEpME is achieved by doing the lowest level exercises: Sculling, Deadlift, and Planking. You should be exclusively practicing only these three exercises. Over and over and over and over… In fact, the only reasons to do any other exercise are because a) you know you will not be able to restart an exercise as soon as it finishes (everyone has to sleep sometime), or b) you’re lazy.
O.K., I’m exaggerating. But not by much.
The Exhaustive, Long-Winded Details
This article is based on the following assumptions:
- You are NOT spending crowns on Pet Training – If using crowns, then the only real limit (aside from your patience) is how much you’re willing to spend, and very little of this analysis applies.
- You have sufficient Gold for Pet Snacks and Gear – For any max level pirate, or even those who have just gotten to the end of Mooshu, gold shouldn’t be much of a problem. Collect chests, farm Friar Sand, set companions to Plunderin’, or run at least the first few levels of Moo Manchu’s Tower – there are lots of ways to quickly accumulate enough gold to buy a stockpile of pet training necessities.
Pet training requires the following inputs: pet gear, pet snacks, pirate energy, and time. Of these, the limiting factor is almost always time. There are several ways to procure gear and snacks, and unless you are simultaneously training a large number of pets, your pirates should replenish their training energy faster than they use it.
Tip: Unless you already have the maximum number of pirates on your account, create a few more just to help train pets. The minimum level required to access the Circus Maximus is 5, which takes very little effort to reach. Level 5 pirates get 41 energy points, and since pets (as well as gear and snacks) can be passed freely between pirates without losing energy (unlike Wizard101), a few extra low level ones can considerably increase your training capacity.
Before discussing exercise programs, it is important to have a basic understanding of the pet exercise structure, and the use of pet gear.
Overview of Pet Exercises and Gear
Pet gear comes in 3 levels:
Level 1 Pet Gear
Level 2 Pet Gear
Level 3 Pet Gear


It seems that the intent of the pet training subsystem design is to work your way up the exercise “ladder”, generating higher levels of gear that you can use for exercises at higher pet levels. But since when do pirates follow the rules? 😈 As you will see, some of the best exercise programs can be designed using nothing more than level 1 pet gear, or even no gear at all.
Proudly Purveying Premium Pet Paraphernalia
Note: there is a clear error in exercise gear requirements. Calf Press (Cool Ranch/Level 25) takes a Squirt Bottle as gear input – it should take a Dead Weight and a Bronze Medal. I expect KI will correct this at some point.
What to Feed Your Pet
Breakfast (and Lunch and Dinner) of Champions
Power, and Snacks that Pets Like/Love
The Power stat affects pet power damage and ability to cheer, and is the only pet stat that can be raised solely through snacks (see our Pet Snack Guide for details on different snack classes). This means that if your pet doesn’t like Banana Burgers/Banana Sandwiches, you could get all the way to max level and still have 0 power. I use only Rank 4 snacks until my pet reaches at least level 50 (when the final talent manifests) or even level 60 (when the final power manifests), and then start to feed it higher level snacks that it likes/loves. This approach takes longer to reach max Power, but conserves higher level snacks. Another alternative if you have a pet that likes Side Dish or Dessert snacks is to feed it a Rank 3 purchasable snack, and gain +1 Power per exercise at the expense of +4 experience.
Pet Exercise Choices
The first thing to realize is that, even though there are 43 exercises to choose from (not counting the special ones), quite a few of them are not worth doing. This is because the only things you should care about are the time it takes to do the exercise and the experience it provides. Specifically, stat boosts are NOT important. If you are only training the pet far enough so you can morph it, you don’t care about stats; if you are taking it all the way, you will reach the max values in all stats before you reach max level (I’ll provide proof in a bit). Many exercises trade less experience for a larger stat boost – these are the ones to avoid.
Exercises You Should Never Even Consider Doing
Anchor Lifts/Davy Jones’ Row/Yo-Ho-Hopscotch (Skull Island Level 15)
Jump Rope/Balance Beam (Monquista Level 25)
Aces High Jump/Sidewinder Side Bend/Hay Bailing (Cool Ranch Level 30)
Sumo Match/Crane Meditation/Tiger Meditation (Mooshu Level 35)
Football (Marleybone Level 45)
Tennis/Badminton/Cricket (Marleybone Level 45)
Chariot Race/Pankration/Javelin Throw (Aquila Level 55)
A few other exercises are worth considering only if you absolutely must have the Level 3 pet gear they generate. Personally I find keeping track of pet gear and ensuring I have enough of the right level/kind to be a huge hassle, and so rarely choose exercises that need Level 3 gear (I also have a number of companions constantly Pet Wranglin’). But if you really must possess that Gold medal…
Exercises You Should Do Only For The Level 3 Pet Gear
Monkey Bars/Pull Ups/Leg Lifts (Monquista Level 15)
Fire Walking (Mooshu Level 40)
After excluding these exercises, we have 21 left to choose from, forming 8 groups. Let’s look at the all important EEpME values for these groups. The following two graphs show the values for every pet level starting at level 10 (the lowest level that offers a choice of exercise groups), and assumes the pet is being fed a +32 experience snack (a Rank 4 snack it doesn’t like/love) at the end of each exercise.
First, for levels 10 through 34: 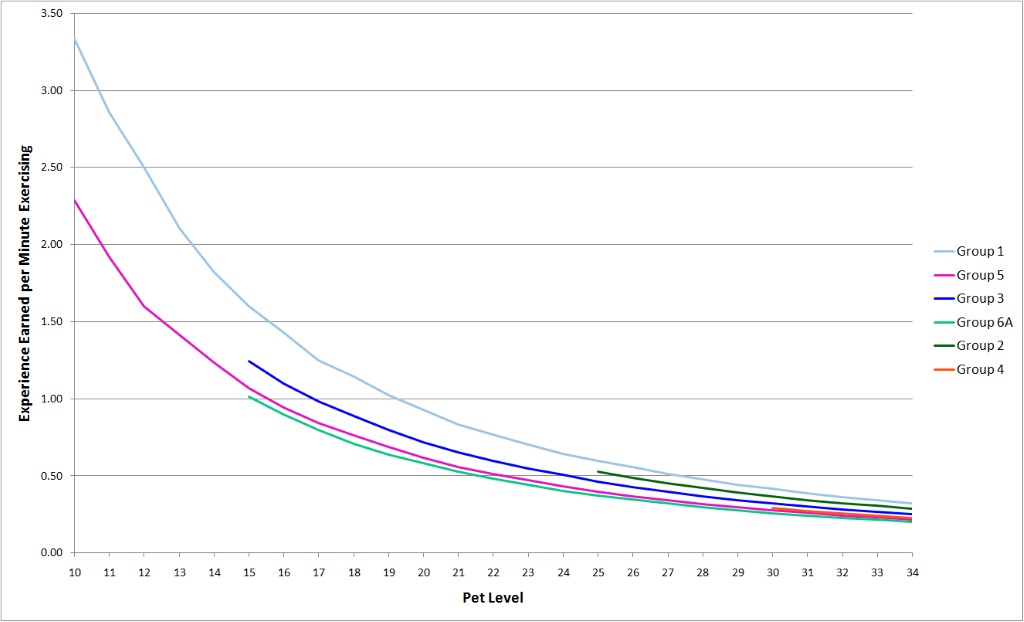
And then for levels 35 to 65: 
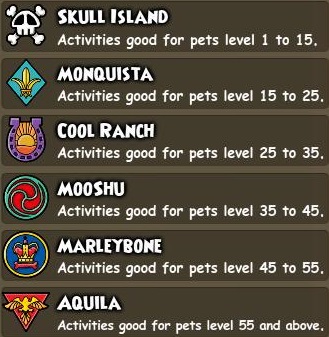
The groups, in order from highest to lowest EEpME, including their exercise world and the minimum pet level needed to access them:
- Group 1: Sculling, Deadlift, Planking, Cap’n Gunn’s Gauntlet (Skull Island Level 1)
- Group 2: Calf Press/Saw Bend/Ghost Dance (Cool Ranch Level 25)
- Group 3: Salsa (Monquista Level 15)
- Group 4: Downward Horse/Hands Up (Cool Ranch Level 30)
- Group 5: Dead Man’s Chest Flys/Long John Long Jump/The Hornpipe (Skull Island Level 10)
- Group 6A: Parallel Bars/Kong Vault (Monquista Level 15)
- Group 6B: Military Press/Calisthenics/Wind Sprints (Marleybone Level 45)
- Group 7: Shot Put/Aquilian Power Lift/Chariot Race (Aquila Level 55)
Clearly there is significant variation in EEpME values (except for Groups 6A and 6B which are essentially the same), and the better performers are from the first few worlds. To gain experience the fastest, choose exercises from the lowest numbered groups. If you are feeding your pet snacks that provide more than +32 experience, the EEpME spread increases further (i.e., you are even better off sticking with exercises from the first groups listed). The basic idea is that, since your pet gets much more experience from the snack than from the exercise, you want to finish the exercise as quickly as possible to get to the chow line.
Of course, this all assumes you are starting a new exercise immediately as soon as the old one completes – any time your pet isn’t exercising, it isn’t gaining experience. For most people, this assumption is probably unrealistic. Here is a graph showing the time required to complete an exercise by pet level:
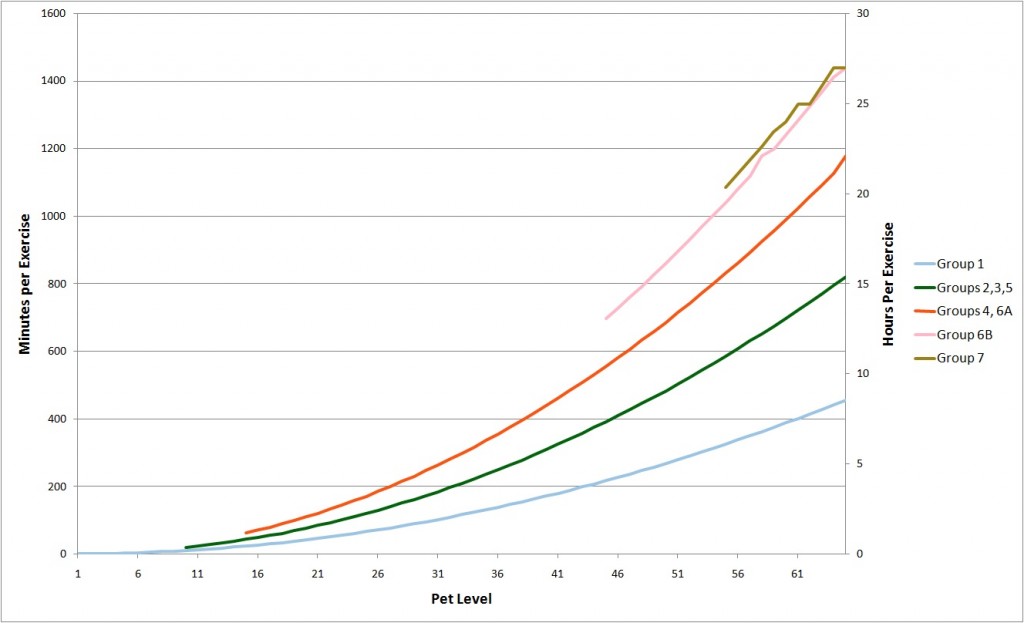
Obviously you will need to intervene far more frequently at lower pet levels, especially for the shorter exercises. This leads to the general rule that should guide all our exercise choices:
The Golden Rule Of Pet Exercise Selection
Pick an exercise from the lowest numbered group possible above whose total time to complete corresponds with the time you will be available to restart an exercise.
When selecting exercises, there is no point in preferring a shorter/less experience one to a longer/more experience one if you are not going to be able to restart anything before the longer exercise would have completed.
With this information we can craft an exercise program for our pets.
Pet Exercise Programs
Here are three distinct training regimens, tailored to the needs of particular types of pirate:
- The “Hot” regimen, also known as the “I Want To Get My Pets To Max Level As Fast As Possible, Even If It Means Waking Up 10 Times A Night To Feed Them” approach
- The “Cold” regimen, a.k.a. the “I Detest Pet Training, Want To Do The Fewest Number Of Exercises Possible (If At All), And Don’t Care How Long It Takes To Get To Max” approach (several authors here at Duelist 101 are passionate practitioners of this exercise plan)
- The “Just Right” regimen, a.k.a. the “I’m A (Moderately) Sane Person, Want To Get My Pets To Max In A Reasonable Amount Of Time, And Am Willing To Do A Bit Of Extra Mouse Clicking” approach
If you followed these regimens exactly, and fed your pets Banana Burgers and Banana Sandwiches (which they did NOT like), you would get the following results for taking a level 1 pet to level 65:
| Hot | Cold | Just Right | |
| Total Number of Exercises | 92 | 54 | 62 |
| Total Time Spent Exercising | 11 days, 21 hours | 19 days, 15 hours | 13 days, 15 hours |
| Total Energy Spent Exercising | 580 | 431 | 428 |
| Final S/A/W stats | 168/168/124 | 130/130/103 | 112/112/82 |
| Final Health stat | 1840 | 1628 | 1696 |
The final S/A/W values shown assume an even distribution of exercises chosen within a group. You can shift many points between these values through exercise selection, but it isn’t really necessary – not many pets have a S/A/W value above 100 (or even above 80). Also, the numbers assume that Cap’n Gunn’s Gauntlet is never chosen – your pet doesn’t need the extra health.
As you can see, the Just Right regimen gets most of the time benefit of the Hot Regimen (and uses considerably less total energy), while doing only a few more exercises than the Cold regimen. Also, the Hot and Just Right regimens are sustainable; Just Right consumes only Level 1 pet gear (which can be cheaply bought), and Hot uses no gear at all. The Cold regimen is NOT sustainable – it consumes much more Level 2 and 3 pet gear than it generates. Over the long term this difference will have to be made up through Pet Wranglin’, in-game drops, and purchases at the Bazaar.
One variant of Just Right to consider is to always do Long John’s Long Jump between levels 10 and 14, which will generate Jump Ropes (Level 2 gear). Then when you reach Level 30, you can optionally substitute one of the Group 4 exercises (both of which take Jump Ropes) for those times when you want an exercise of longer duration (a.k.a. sleep time). Whenever I choose a Group 5 exercise it is always the Long Jump, just to build up my cache of Jump Ropes.
Finally, don’t feel like you have to slavishly adhere to any particular approach. It is OK to select a non-optimal exercise, or to choose one randomly (just like it is ok to occasionally feed your pet a Dessert snack when no-one is looking).
Happy training!